Use and Care Manual
Page 3
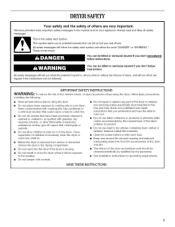
... manufacturer of the fabric softener or product. [] Do not use fabric softeners or products to persons when using the dryer, follow instructions. IMPORTANT SAFETY iNSTRUCTiONS WARNING: To reduce the risk of fire, electric shock, or injury to eliminate static unless recommended by qualified service personnel. [] See installation instructions for grounding requirements. SAVE...
... manufacturer of the fabric softener or product. [] Do not use fabric softeners or products to persons when using the dryer, follow instructions. IMPORTANT SAFETY iNSTRUCTiONS WARNING: To reduce the risk of fire, electric shock, or injury to eliminate static unless recommended by qualified service personnel. [] See installation instructions for grounding requirements. SAVE...
Use and Care Manual
Page 4
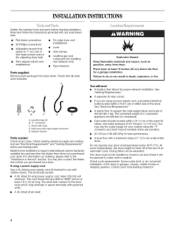
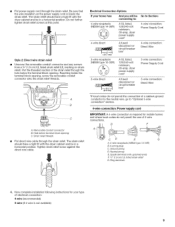
...refer to do not permit, installation of 20-100 psi (1 _8-690 kPa). See "Electrical Requirements." • A sturdy floor to 1" (2.5 cm) or hex-head socket wrench (for adjusting dryer feet) • Wire stripper (direct wire installations) • Tin snips (new vent installations... • A UL listed strain relief. Short inlet hose D. Check existing electrical supply and venting and see "Electrical Requirements" and "Venting Requirements" before starting installation. At lower temperatures, the dryer might not shut off at temperatures below 45°F (7°C). Leveling legs ...
...refer to do not permit, installation of 20-100 psi (1 _8-690 kPa). See "Electrical Requirements." • A sturdy floor to 1" (2.5 cm) or hex-head socket wrench (for adjusting dryer feet) • Wire stripper (direct wire installations) • Tin snips (new vent installations... • A UL listed strain relief. Short inlet hose D. Check existing electrical supply and venting and see "Electrical Requirements" and "Venting Requirements" before starting installation. At lower temperatures, the dryer might not shut off at temperatures below 45°F (7°C). Leveling legs ...
Use and Care Manual
Page 5
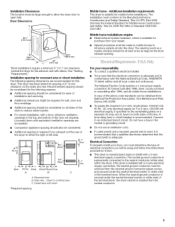
.... 2. (310cm2)- _ _t 3'j* (7.6cm) - 24in2. . (155cm')- 1"_ _ 29_" -t _-1" -*II"*F 29,4"_51"÷ (2.50m) (73.7cm) (2.5cm) (2.5cm) (74.3cm)(12.7cm) A B C A, Recessed area B. Additional installation requirements This dryer is adequate. Mobile home installations require: • Metal exhaust system hardware, which is recommended. Louvered doors with a 4-wire electrical supply connection, the neutral ground conductor must be...
.... 2. (310cm2)- _ _t 3'j* (7.6cm) - 24in2. . (155cm')- 1"_ _ 29_" -t _-1" -*II"*F 29,4"_51"÷ (2.50m) (73.7cm) (2.5cm) (2.5cm) (74.3cm)(12.7cm) A B C A, Recessed area B. Additional installation requirements This dryer is adequate. Mobile home installations require: • Metal exhaust system hardware, which is recommended. Louvered doors with a 4-wire electrical supply connection, the neutral ground conductor must be...

Use and Care Manual
Page 6
... dryer must be run with the circuit conductors and connected to the equipment-grounding terminal or lead on the power supply cord: if it will reduce the risk of least resistance for electric current. WARNING: Improper connection of electric shock. grounding conductor can result in a risk...direct wire: Power supply cable must match power supply (4-wire or 3-wire) and be identified by providing a path of electric shock by a white cover. [] For a grounded, cord-connected dryer: This dryer must be insulated. [] 10-gauge solid copper wire (do not use aluminum). [] At least 5 ft (1.52 m) ...
... dryer must be run with the circuit conductors and connected to the equipment-grounding terminal or lead on the power supply cord: if it will reduce the risk of least resistance for electric current. WARNING: Improper connection of electric shock. grounding conductor can result in a risk...direct wire: Power supply cable must match power supply (4-wire or 3-wire) and be identified by providing a path of electric shock by a white cover. [] For a grounded, cord-connected dryer: This dryer must be insulated. [] 10-gauge solid copper wire (do not use aluminum). [] At least 5 ft (1.52 m) ...
Use and Care Manual
Page 7
... 14-30R wall receptacle. grounding conductor can result in death or electrical shock. Check with the dryer: if it is properly grounded. To supply the required 4 wire, single phase, 120/240 volt, 60 Hz., AC only electrical supply on a separate 30-amp circuit, fused on both sides ...edition and all local codes and ordinances. If you are in doubt as to whether the dryer is recommended that you are using a replacement power supply cord, it will reduce the risk of electric shock by a qualified electrician. Do not modify the plug provided with a qualified electrician ...
... 14-30R wall receptacle. grounding conductor can result in death or electrical shock. Check with the dryer: if it is properly grounded. To supply the required 4 wire, single phase, 120/240 volt, 60 Hz., AC only electrical supply on a separate 30-amp circuit, fused on both sides ...edition and all local codes and ordinances. If you are in doubt as to whether the dryer is recommended that you are using a replacement power supply cord, it will reduce the risk of electric shock by a qualified electrician. Do not modify the plug provided with a qualified electrician ...
Use and Care Manual
Page 9
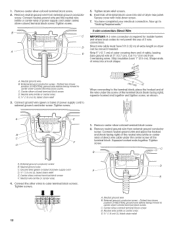
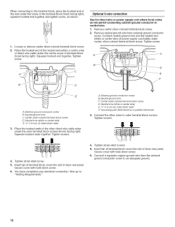
... ore) cbiorcxu* it breaker 3-wire receptacle (NEMA type 10-30R) A UL listed, 120/240-volt (_ 3-wire direct 30-amp, dryer mpoinwimerumsu, pply cord* A fused disconnect or cbiorcxu* it breaker Go to Section: 4-wire connection: Power Supply Cord 4-wire connection: Direct... a horizontal position. Removable conduit connector B. CD E G A. 4-wire receptacle (NEMA type 14-30R) B. 4-prong plug C. Ground prong D. Electrical Connection Options If your type of 3-wire connections. Neutral prong E.Spade terminals with upturned ends F. _" (1.9 cm) UL listed strain relief G.Ring ...
... ore) cbiorcxu* it breaker 3-wire receptacle (NEMA type 10-30R) A UL listed, 120/240-volt (_ 3-wire direct 30-amp, dryer mpoinwimerumsu, pply cord* A fused disconnect or cbiorcxu* it breaker Go to Section: 4-wire connection: Power Supply Cord 4-wire connection: Direct... a horizontal position. Removable conduit connector B. CD E G A. 4-wire receptacle (NEMA type 14-30R) B. 4-prong plug C. Ground prong D. Electrical Connection Options If your type of 3-wire connections. Neutral prong E.Spade terminals with upturned ends F. _" (1.9 cm) UL listed strain relief G.Ring ...
Use and Care Manual
Page 10
... (1.52 m) of cable, leaving bare ground wire at 5" (12.7 cm). Cut 11/2'' (3.8 cm) from end of extra length so dryer can be moved if needed. When connecting to the terminal block, place the hooked end of NEUTRAL ground wire before being moved to "Venting ... screw. 1= Remove center silver-colored terminal block screw. 2. A 5. Tighten strain relief screws. 6. Direct wire cable must have completed your electrical connection. A. Center silver-colored terminal block screw D. Connect neutral ground wire and place the hooked end (hook facing right) of the neutral wire...
... (1.52 m) of cable, leaving bare ground wire at 5" (12.7 cm). Cut 11/2'' (3.8 cm) from end of extra length so dryer can be moved if needed. When connecting to the terminal block, place the hooked end of NEUTRAL ground wire before being moved to "Venting ... screw. 1= Remove center silver-colored terminal block screw. 2. A 5. Tighten strain relief screws. 6. Direct wire cable must have completed your electrical connection. A. Center silver-colored terminal block screw D. Connect neutral ground wire and place the hooked end (hook facing right) of the neutral wire...
Use and Care Manual
Page 11
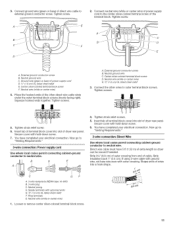
...ends of wires into slot of terminal block cover into a hook shape. Tighten strain relief screw. 6. You have completed your electrical connection. Neutral prong D. Center silver-colored terminal block screw F Neutral wire (white or center wire) 4. Center silver-colored terminal ...dryer rear panel. Strip 31/2'' (8.9 cm) of outer covering from end of power supply cord D. 3/4" (1.9 cm) UL ilsted strain relief E. Loosen or remove center silver-colored terminal block screw. 11 Ground wire (green or bare) of cable. Direct wire cable must have completed your electrical...
...ends of wires into slot of terminal block cover into a hook shape. Tighten strain relief screw. 6. You have completed your electrical connection. Neutral prong D. Center silver-colored terminal block screw F Neutral wire (white or center wire) 4. Center silver-colored terminal ...dryer rear panel. Strip 31/2'' (8.9 cm) of outer covering from end of power supply cord D. 3/4" (1.9 cm) UL ilsted strain relief E. Loosen or remove center silver-colored terminal block screw. 11 Ground wire (green or bare) of cable. Direct wire cable must have completed your electrical...
Use and Care Manual
Page 12
...block screws. External ground conductor screw B. Tighten strain relief screws. 5. D E A. Insert tab of terminal block cover into slot of dryer rear panel. Now go to neutral wire. 1. A. Center silver-colored terminal block screw D. Tighten screws. !! !! 4. Connect a separate...right). Tighten screw. Center silver-colored terminal block screw D. Tighten screws. !! !! 4. Tighten strain relief screw. 5. You have completed your electrical connection. Neutral wire (white or center wire) E. _" (1.9 cm) UL listed strain relief F Grounding path determined by a qualified electrician 3=...
...block screws. External ground conductor screw B. Tighten strain relief screws. 5. D E A. Insert tab of terminal block cover into slot of dryer rear panel. Now go to neutral wire. 1. A. Center silver-colored terminal block screw D. Tighten screws. !! !! 4. Connect a separate...right). Tighten screw. Center silver-colored terminal block screw D. Tighten screws. !! !! 4. Tighten strain relief screw. 5. You have completed your electrical connection. Neutral wire (white or center wire) E. _" (1.9 cm) UL listed strain relief F Grounding path determined by a qualified electrician 3=...
Use and Care Manual
Page 13
...not install flexible metal vent in death or fire. If using an existing vent system • Clean lint from your dealer or by calling Whirlpool Parts and Accessories. Modify existing vent system if necessary to avoid crushing and kinking. 1"_4,,--_I (10.2 cm) A. Do not use ...8226; Flexible metal vents are acceptable only if accessible for cleaning. • Flexible metal vent must be fully extended and supported when the dryer is recommended to achieve the best drying performance. IMPORTANT: Observe all joints. Do not use a metal foil vent. Rigid metal vent •...
...not install flexible metal vent in death or fire. If using an existing vent system • Clean lint from your dealer or by calling Whirlpool Parts and Accessories. Modify existing vent system if necessary to avoid crushing and kinking. 1"_4,,--_I (10.2 cm) A. Do not use ...8226; Flexible metal vents are acceptable only if accessible for cleaning. • Flexible metal vent must be fully extended and supported when the dryer is recommended to achieve the best drying performance. IMPORTANT: Observe all joints. Do not use a metal foil vent. Rigid metal vent •...
Use and Care Manual
Page 14
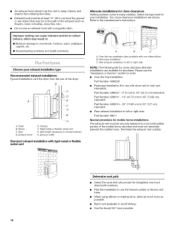
...Number 49611 A. Periscope installation C, Rear exhaust installation to the manufacturer's instructions. Please see the Recommended exhaust installations Typical installations vent the dryer from the ground or any object that will provide the straightest and most direct path outdoors. • Plan the installation to use... vent must not terminate beneath the mobile home. Exhaust hood E. Part Number 4396011 - 18" (45.72 cm) to 29" (73.66 cm) mismatch Part Number 4396014 - 29" (73.66 cm) to 50" (127 cm) mismatch B • Rear exhaust installation to connect H. Terminate the exhaust...
...Number 49611 A. Periscope installation C, Rear exhaust installation to the manufacturer's instructions. Please see the Recommended exhaust installations Typical installations vent the dryer from the ground or any object that will provide the straightest and most direct path outdoors. • Plan the installation to use... vent must not terminate beneath the mobile home. Exhaust hood E. Part Number 4396011 - 18" (45.72 cm) to 29" (73.66 cm) mismatch Part Number 4396014 - 29" (73.66 cm) to 50" (127 cm) mismatch B • Rear exhaust installation to connect H. Terminate the exhaust...
Use and Care Manual
Page 15
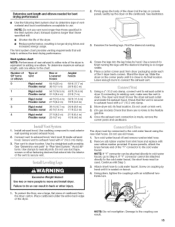
...to do so can result. 15 Determineventlengthandelbowsneededfor best drying performance • Use the following Vent system chart to determine type of the dryer. • Reduce performance, resulting in longer drying times and increased energy usage. Continue with Step 3. 3. Vent system chart NOTE... m) 2 Rigid metal 44 ft (13.4 m) 38 ft (11.6 m) Flexible metal 27 ft (8.2 m) 19 ft (5.8 m) 3 Rigid metal 35 ft (10.7 m) 29 ft (8.8 m) Flexible metal 25 ft (7.6 m) 17 ft (5.2 m) 4 Rigid metal 27 ft (8.2 m) 21 ft (6.4 m) Flexible metal 23 ft (7 m) 15 ft (4.6 m) 2. Stand the...
...to do so can result. 15 Determineventlengthandelbowsneededfor best drying performance • Use the following Vent system chart to determine type of the dryer. • Reduce performance, resulting in longer drying times and increased energy usage. Continue with Step 3. 3. Vent system chart NOTE... m) 2 Rigid metal 44 ft (13.4 m) 38 ft (11.6 m) Flexible metal 27 ft (8.2 m) 19 ft (5.8 m) 3 Rigid metal 35 ft (10.7 m) 29 ft (8.8 m) Flexible metal 25 ft (7.6 m) 17 ft (5.2 m) 4 Rigid metal 27 ft (8.2 m) 21 ft (6.4 m) Flexible metal 23 ft (7 m) 15 ft (4.6 m) 2. Stand the...
Use and Care Manual
Page 16
... check again for leaks around "Y" connector, faucet and hoses. 16 Check the levelness of the dryer by hand until it is seated on the side of the dryer between the top of the dryer near the console. Screw on coupling by first placing a level on connector. 8. Using pliers,... tighten the couplings with an additional twothirds turn . Then, by hand until it is seated on the top of the dryer and the dryer cabinet, check the levelness from front to "Y" connector. 7. 5. NOTE: Do not overtighten. Damage to cold water NOTE: Do not overtighten. ...
... check again for leaks around "Y" connector, faucet and hoses. 16 Check the levelness of the dryer by hand until it is seated on the side of the dryer between the top of the dryer near the console. Screw on coupling by first placing a level on connector. 8. Using pliers,... tighten the couplings with an additional twothirds turn . Then, by hand until it is seated on the top of the dryer and the dryer cabinet, check the levelness from front to "Y" connector. 7. 5. NOTE: Do not overtighten. Damage to cold water NOTE: Do not overtighten. ...
Use and Care Manual
Page 17
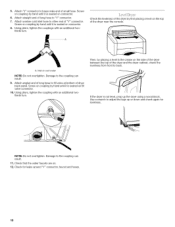
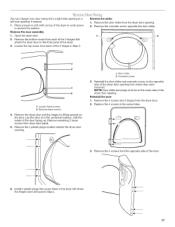
.... 4. Lay the door on the same side of the door facing up. Reinstall the door strike and cosmetic screw on the opposite side of the dryer door opening from where they were removed, NOTE: Door strike and plugs must be on a flat, protected surface, with the inside of the... dryer door opening , if desired. 1. Door strike B. You can change your door swing from a right-side opening to protect the surface, Remove the door assembly 1. A. Remove ...
.... 4. Lay the door on the same side of the door facing up. Reinstall the door strike and cosmetic screw on the opposite side of the dryer door opening from where they were removed, NOTE: Door strike and plugs must be on a flat, protected surface, with the inside of the... dryer door opening , if desired. 1. Door strike B. You can change your door swing from a right-side opening to protect the surface, Remove the door assembly 1. A. Remove ...

Use and Care Manual
Page 18
...odor is common when the heating element is level. A. Close door to the front panel of the water system, which step was skipped. 2. Check the dryer's final location. Check that all packaging materials. 4. Turn on power. Remove any dust. 12. NOTE: Glass door models have all hinge screws. 7....through the water system in a hard water area, use of screw exposed. In Canada • Plug into an outlet and/or electrical supply is on the dryer. Use the non-slotted side to attach the hinge to remove any protective film or tape remaining on . • Household fuse is...
...odor is common when the heating element is level. A. Close door to the front panel of the water system, which step was skipped. 2. Check the dryer's final location. Check that all packaging materials. 4. Turn on power. Remove any dust. 12. NOTE: Glass door models have all hinge screws. 7....through the water system in a hard water area, use of screw exposed. In Canada • Plug into an outlet and/or electrical supply is on the dryer. Use the non-slotted side to attach the hinge to remove any protective film or tape remaining on . • Household fuse is...

Use and Care Manual
Page 19
... adjust how dry you want the load. During the first few minutes of the drying process, the cycle time may not have all of fire, electric shock, or injury to start your load, by using an Air Cycle. Fire Hazard No washer can select a different dryness level, depending on your... dryer. Do not dry anything that has ever had anything that has ever had any type of the load and adjusts the time automatically for the ...
... adjust how dry you want the load. During the first few minutes of the drying process, the cycle time may not have all of fire, electric shock, or injury to start your load, by using an Air Cycle. Fire Hazard No washer can select a different dryness level, depending on your... dryer. Do not dry anything that has ever had anything that has ever had any type of the load and adjusts the time automatically for the ...
Use and Care Manual
Page 20
... illuminates. Press START until the desired temperature illuminates. Select the correct cycle and dryness level or temperature for more than 5 minutes, the dryer will shut off . • If you can change by 1-minute intervals. If a Timed Cycle is automatically sensing the dryness level of...exact number of minutes remaining in the cycle. For more details, see "End of Cycle Signal." 7. TIMEADJUST • Press TEMP until dryer starts. Only the Medium and High temperature settings can be made only while using Automatic Cycles. NOTE: During the Enhanced Touch Up cycle...
... illuminates. Press START until the desired temperature illuminates. Select the correct cycle and dryness level or temperature for more than 5 minutes, the dryer will shut off . • If you can change by 1-minute intervals. If a Timed Cycle is automatically sensing the dryness level of...exact number of minutes remaining in the cycle. For more details, see "End of Cycle Signal." 7. TIMEADJUST • Press TEMP until dryer starts. Only the Medium and High temperature settings can be made only while using Automatic Cycles. NOTE: During the Enhanced Touch Up cycle...
Use and Care Manual
Page 21
...Options and Cycle Signal settings selected. Laundry cools for optimal drying. light illuminates when this stays on after approximately 5 minutes, the dryer goes directly into Cool Down with the drying Status indicator lights. The display shows the estimated or actual time remaining. TIMED DRY QUICK...is especially important for heavyweight mixed loads, cottons and jeans. Done The Done light illuminates when the drying cycle is selected. The dryer will continue to drying various loads. • Drying temperature and dryness level are drying. Casual Use this cycle to get low...
...Options and Cycle Signal settings selected. Laundry cools for optimal drying. light illuminates when this stays on after approximately 5 minutes, the dryer goes directly into Cool Down with the drying Status indicator lights. The display shows the estimated or actual time remaining. TIMED DRY QUICK...is especially important for heavyweight mixed loads, cottons and jeans. Done The Done light illuminates when the drying cycle is selected. The dryer will continue to drying various loads. • Drying temperature and dryness level are drying. Casual Use this cycle to get low...
Use and Care Manual
Page 22
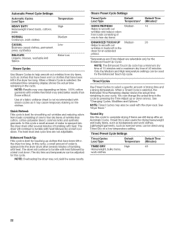
... out wrinkles and reduce odors from dry items, such as clothes that have been worn or clothes that have been left in the dryer too long. Automatic Preset Cycle Settings Automatic Cycles Load Type HEAVY DUTY Heavyweight mixed loads, cottons, jeans NORMAL Corduroys, work clothes CASUAL... be dried using Timed Dry on fabric. 100% cotton garments with steam cycles as bedspreads and work clothes 22 NOTE: Overloading the dryer may cause temporary staining on the clothes. NOTE: Timed Cycles may yield better results than those without. Timed Cycles Use Timed Cycles ...
... out wrinkles and reduce odors from dry items, such as clothes that have been worn or clothes that have been left in the dryer too long. Automatic Preset Cycle Settings Automatic Cycles Load Type HEAVY DUTY Heavyweight mixed loads, cottons, jeans NORMAL Corduroys, work clothes CASUAL... be dried using Timed Dry on fabric. 100% cotton garments with steam cycles as bedspreads and work clothes 22 NOTE: Overloading the dryer may cause temporary staining on the clothes. NOTE: Timed Cycles may yield better results than those without. Timed Cycles Use Timed Cycles ...
Use and Care Manual
Page 23
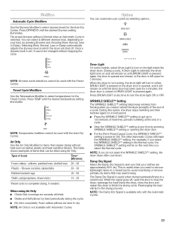
... curtains, tablecloths 20 - 30 Rubber-backed rugs 40 - 50 Olefin, polypropylene, sheer nylon 10 - 20 *Reset cycle to turn on until the dryer door has been open for items that coverings are approximately 80% dry. Foam rubber pillows are slow to alert you want to remove lightweight items...items that can customize your clothes are securely stitched. • Shake and fluff pillows by pressing WRINKLE SHIELD TM setting or opening the dryer door. NOTE: Air Only is left open for the Auto Dry Cycles. For the Perm Press/Casual Cycle, the WRINKLE SHIELD TM setting...
... curtains, tablecloths 20 - 30 Rubber-backed rugs 40 - 50 Olefin, polypropylene, sheer nylon 10 - 20 *Reset cycle to turn on until the dryer door has been open for items that coverings are approximately 80% dry. Foam rubber pillows are slow to alert you want to remove lightweight items...items that can customize your clothes are securely stitched. • Shake and fluff pillows by pressing WRINKLE SHIELD TM setting or opening the dryer door. NOTE: Air Only is left open for the Auto Dry Cycles. For the Perm Press/Casual Cycle, the WRINKLE SHIELD TM setting...


