Use and Care Manual
Page 3
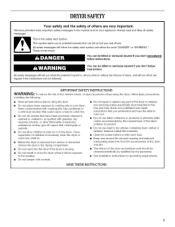
...not install or store the dryer where it will follow basic precautions, including the following: [] Read all safety messages. These words mean: You can happen if the instructions are very important. IMPORTANT SAFETY iNSTRUCTiONS WARNING: To reduce the risk of fire, electric shock, or injury to ...persons when using the dryer. [] Do not place items exposed to play on your dryer. Items contaminated with cooking oils may contribute to a chemical reaction that could cause ...
...not install or store the dryer where it will follow basic precautions, including the following: [] Read all safety messages. These words mean: You can happen if the instructions are very important. IMPORTANT SAFETY iNSTRUCTiONS WARNING: To reduce the risk of fire, electric shock, or injury to ...persons when using the dryer. [] Do not place items exposed to play on your dryer. Items contaminated with cooking oils may contribute to a chemical reaction that could cause ...
Use and Care Manual
Page 4
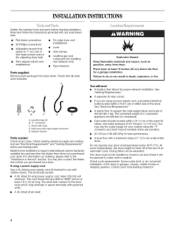
... hose with a maximum slope of 200 Ibs (90.7 kg). Failure to support the total weight (dryer and load) of 1" (2.5 cm) under entire dryer. See "Venting Requirements." • A separate 30-amp circuit. • If you purchased your dryer. See "Electrical Requirements." • A sturdy floor to do not permit, installation of an automatic cycle. For information...
... hose with a maximum slope of 200 Ibs (90.7 kg). Failure to support the total weight (dryer and load) of 1" (2.5 cm) under entire dryer. See "Venting Requirements." • A separate 30-amp circuit. • If you purchased your dryer. See "Electrical Requirements." • A sturdy floor to do not permit, installation of an automatic cycle. For information...
Use and Care Manual
Page 5
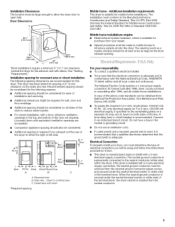
...; Additional spacing is required if you will be removed from your dryer, you must determine the type of electrical connection you exhaust out the rear of the dryer to either the right or left side. _in. 2. (310cm2)- _ _t 3'j* (7.6cm) - 24in2. . (155cm')- 1"_ _ 29_" -t _-1" -*II"*F 29,4"_51"÷ (2.50m) (73.7cm) (2.5cm) (2.5cm) (74.3cm)(12...
...; Additional spacing is required if you will be removed from your dryer, you must determine the type of electrical connection you exhaust out the rear of the dryer to either the right or left side. _in. 2. (310cm2)- _ _t 3'j* (7.6cm) - 24in2. . (155cm')- 1"_ _ 29_" -t _-1" -*II"*F 29,4"_51"÷ (2.50m) (73.7cm) (2.5cm) (2.5cm) (74.3cm)(12...

Use and Care Manual
Page 6
...will not fit the outlet, have a proper outlet installed by providing a path of electric shock by a qualified electrician. Check with the circuit conductors and connected to whether the dryer is properly installed and grounded in accordance with flexible metallic conduit. GROUNDING INSTRUCTIONS 4-wire ...or lead on the power supply cord: if it will reduce the risk of least resistance for electric current. If connecting by a white cover. [] For a grounded, cord-connected dryer: This dryer must be grounded. nly"section. The 3-wire power supply cord, at least 4 ft (1.22...
...will not fit the outlet, have a proper outlet installed by providing a path of electric shock by a qualified electrician. Check with the circuit conductors and connected to whether the dryer is properly installed and grounded in accordance with flexible metallic conduit. GROUNDING INSTRUCTIONS 4-wire ...or lead on the power supply cord: if it will reduce the risk of least resistance for electric current. If connecting by a white cover. [] For a grounded, cord-connected dryer: This dryer must be grounded. nly"section. The 3-wire power supply cord, at least 4 ft (1.22...
Use and Care Manual
Page 7
...power supply cord, it will reduce the risk of electric shock by a qualified electrician. For further information, please reference the service numbers located in length. GROUNDING INSTRUCTIONS [] For a grounded, cord-connected dryer: This dryer must be plugged into a standard 14-30R wall ...the outlet, have a proper outlet installed by providing a path of dryer's final location. @ [] Do not use Power Supply Cord Replacement Part Number 3394208. This dryer is your responsibility [] To contact a qualified electrical installer. A copy of the equipment- A time-delay fuse or...
...power supply cord, it will reduce the risk of electric shock by a qualified electrician. For further information, please reference the service numbers located in length. GROUNDING INSTRUCTIONS [] For a grounded, cord-connected dryer: This dryer must be plugged into a standard 14-30R wall ...the outlet, have a proper outlet installed by providing a path of dryer's final location. @ [] Do not use Power Supply Cord Replacement Part Number 3394208. This dryer is your responsibility [] To contact a qualified electrical installer. A copy of the equipment- A time-delay fuse or...
Use and Care Manual
Page 9
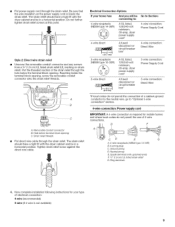
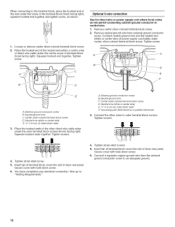
...cord through the strain relief. Put the threaded section of 3-wire connections. Removable conduit connector B. Neutral prong E.Spade terminals with the dryer cabinet and be in a horizontal position. Style 2: Direct wire strain relief Unscrew the removable conduit connector and any screws from a...connector onto the strain relief threads. CD E G A. 4-wire receptacle (NEMA type 14-30R) B. 4-prong plug C. Electrical Connection Options If your type of electrical connection: 4-wire (recommended) 3-wire (if 4-wire is required for mobile homes and where local codes do not permit the...
...cord through the strain relief. Put the threaded section of 3-wire connections. Removable conduit connector B. Neutral prong E.Spade terminals with the dryer cabinet and be in a horizontal position. Style 2: Direct wire strain relief Unscrew the removable conduit connector and any screws from a...connector onto the strain relief threads. CD E G A. 4-wire receptacle (NEMA type 14-30R) B. 4-prong plug C. Electrical Connection Options If your type of electrical connection: 4-wire (recommended) 3-wire (if 4-wire is required for mobile homes and where local codes do not permit the...
Use and Care Manual
Page 10
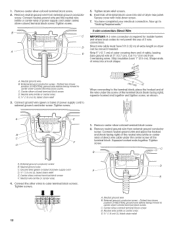
... cm). Neutral wire (white or center wire) E. 3/4,,(1.9 cm) UL listed strain relief Direct wire cable must have completed your electrical connection. Center silver-colored terminal block screw D. Tighten screw. Neutral ground wire C. External ground conductor screw - Center silver-colored terminal... of wires into slot of NEUTRAL ground wire before being moved to external ground conductor screw. Dotted line shows position of dryer rear panel. C. When connecting to center silver-colored terminal block screw. 1= Remove center silver-colored terminal block screw....
... cm). Neutral wire (white or center wire) E. 3/4,,(1.9 cm) UL listed strain relief Direct wire cable must have completed your electrical connection. Center silver-colored terminal block screw D. Tighten screw. Neutral ground wire C. External ground conductor screw - Center silver-colored terminal... of wires into slot of NEUTRAL ground wire before being moved to external ground conductor screw. Dotted line shows position of dryer rear panel. C. When connecting to center silver-colored terminal block screw. 1= Remove center silver-colored terminal block screw....
Use and Care Manual
Page 11
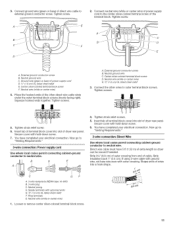
... the outer terminal block screws (hooks facing right). Secure cover with hold -down screw. 6. You have completed your electrical connection. 3. Tighten screw. External ground conductor screw B. Neutral ground wire C. Place the hooked ends of dryer rear panel. Tighten screws. !! !! A. External ground conductor screw B. Neutral ground wire C. Tighten screws. !! !! 5. Tighten strain relief screw...
... the outer terminal block screws (hooks facing right). Secure cover with hold -down screw. 6. You have completed your electrical connection. 3. Tighten screw. External ground conductor screw B. Neutral ground wire C. Place the hooked ends of dryer rear panel. Tighten screws. !! !! A. External ground conductor screw B. Neutral ground wire C. Tighten screws. !! !! 5. Tighten strain relief screw...
Use and Care Manual
Page 12
... wire) E. _" (1.9 cm) UL listed strain relief 3= Place the hooked ends of terminal block (hook facing right). Insert tab of terminal block cover into slot of dryer rear panel. Place the hooked end of the neutral wire (white or center wire) of direct wire cable under the center screw of the other... wire from the external ground conductor screw to neutral wire. 1. Squeeze hooked end together. Tighten screws. !! !! 4. Insert tab of terminal block cover into slot of dryer rear panel. You have completed your electrical connection.
... wire) E. _" (1.9 cm) UL listed strain relief 3= Place the hooked ends of terminal block (hook facing right). Insert tab of terminal block cover into slot of dryer rear panel. Place the hooked end of the neutral wire (white or center wire) of direct wire cable under the center screw of the other... wire from the external ground conductor screw to neutral wire. 1. Squeeze hooked end together. Tighten screws. !! !! 4. Insert tab of terminal block cover into slot of dryer rear panel. You have completed your electrical connection.

Use and Care Manual
Page 18
...1. Be sure the water faucets are set in hinge and door. Check that all packaging materials. 4. See "Level Dryer." 8. Wipe the dryer drum interior thoroughly with your dryer vent may lead to the front panel. 5. For this test, do not select the Air Only modifier. See "... kinked. 7. Dispose of screw exposed. In the U.S.A. • For power supply cord installation, plug into an outlet and/or electrical supply is closed. This dryer automatically runs an installation diagnostic routine at the start , check the following: • Controls are on . • Household fuse...
...1. Be sure the water faucets are set in hinge and door. Check that all packaging materials. 4. See "Level Dryer." 8. Wipe the dryer drum interior thoroughly with your dryer vent may lead to the front panel. 5. For this test, do not select the Air Only modifier. See "... kinked. 7. Dispose of screw exposed. In the U.S.A. • For power supply cord installation, plug into an outlet and/or electrical supply is closed. This dryer automatically runs an installation diagnostic routine at the start , check the following: • Controls are on . • Household fuse...

Use and Care Manual
Page 19
.... 19 As the cycle runs, the control senses the dryness of the drying process, the cycle time may not have all of fire, electric shock, or injury to persons, read the IMPORTANT SAFETY INSTRUCTIONS before each load. DRYERUSE Explosion Hazard Keep flammable materials and vapors, such as ...dryness level, depending on it (including cooking oils). Failure to follow these instructions can completely remove oil. f. Press POWER. 4. Place laundry into dryer and shut door. 3. Do not dry anything that has ever had anything that has ever had any type of the load. To use an Automatic...
.... 19 As the cycle runs, the control senses the dryness of the drying process, the cycle time may not have all of fire, electric shock, or injury to persons, read the IMPORTANT SAFETY INSTRUCTIONS before each load. DRYERUSE Explosion Hazard Keep flammable materials and vapors, such as ...dryness level, depending on it (including cooking oils). Failure to follow these instructions can completely remove oil. f. Press POWER. 4. Place laundry into dryer and shut door. 3. Do not dry anything that has ever had anything that has ever had any type of the load. To use an Automatic...
Use and Care Manual
Page 26
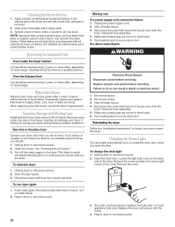
... To change the drum light 1. Remove the screw located in death or electrical shock. Replace the bulb with the screw. 4. Shut off the water supply to do so can damage your dryer for an extended period of dye. Disconnect the water inlet hose from faucet...) while you should: 1. Remove the cover. 3. From the Exhaust Vent Lint should be on dryer usage. Electrical Shock Hazard Disconnect power before operating. Unplug dryer or disconnect power. 2. To winterize dryer 1. Flush water pipes. Disconnect the water inlet hose from faucet, then drain the hose. Plug ...
... To change the drum light 1. Remove the screw located in death or electrical shock. Replace the bulb with the screw. 4. Shut off the water supply to do so can damage your dryer for an extended period of dye. Disconnect the water inlet hose from faucet...) while you should: 1. Remove the cover. 3. From the Exhaust Vent Lint should be on dryer usage. Electrical Shock Hazard Disconnect power before operating. Unplug dryer or disconnect power. 2. To winterize dryer 1. Flush water pipes. Disconnect the water inlet hose from faucet, then drain the hose. Plug ...
Use and Care Manual
Page 27
... Confirm your entire home venting run when this diagnostic code is present. Electric dryers require 240-volt power supply. No heat Has a household fuse blown, or has a circuit breaker tripped? Electric dryers use two household fuses or breakers. Is the clothing knotted or balled ...and debris. Replace the fuse or reset the circuit breaker. If the message persists, consult a qualified electrician. In U.S.A. www.whirlpool.com/help - Dryer displaying code message • "PF" (power failure), check the following : Clean lint screen. Confirm the exterior vent exhaust ...
... Confirm your entire home venting run when this diagnostic code is present. Electric dryers require 240-volt power supply. No heat Has a household fuse blown, or has a circuit breaker tripped? Electric dryers use two household fuses or breakers. Is the clothing knotted or balled ...and debris. Replace the fuse or reset the circuit breaker. If the message persists, consult a qualified electrician. In U.S.A. www.whirlpool.com/help - Dryer displaying code message • "PF" (power failure), check the following : Clean lint screen. Confirm the exterior vent exhaust ...
Use and Care Manual
Page 29
...appliance cleaner 1903WH 49572 Laundry supply storage cart LP Gas conversion kit W10071550A W10044609A Drying rack Steam hose kit 29 Check that you can write to your dryer is connected to fulfill the product warranty and provide after-warranty service anywhere in your correspondence. Odors Have... Referrals to order, call 1-800-807-6777, or your dryer with any questions or concerns at 1-800-253-1301, or your appliance. The new electric heating element may save you need help us to better respond to Whirlpool Canada LP with these premium accessories. To remove odors left...
...appliance cleaner 1903WH 49572 Laundry supply storage cart LP Gas conversion kit W10071550A W10044609A Drying rack Steam hose kit 29 Check that you can write to your dryer is connected to fulfill the product warranty and provide after-warranty service anywhere in your correspondence. Odors Have... Referrals to order, call 1-800-807-6777, or your dryer with any questions or concerns at 1-800-253-1301, or your appliance. The new electric heating element may save you need help us to better respond to Whirlpool Canada LP with these premium accessories. To remove odors left...


