

Use & Care Guide
Page 2
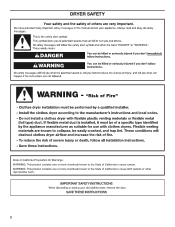
DRYER SAFETY 2
DRYER SAFETY 2
Use & Care Guide
Page 4
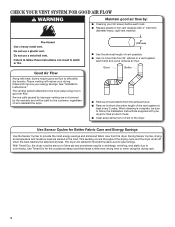
... good air flow to over-drying. Good Better ■■ Remove lint and debris from the exhaust hood. ■■ Remove lint from the dryer. Service calls caused by the customer, regardless of vent possible. ■■ Use no more drying time or when using the drying rack. 4 n Use ...the shortest length of who installed the dryer. When cleaning is complete, be paid by improper venting are sensed in shrinkage, wrinkling, and static due to efficiently dry laundry.
... good air flow to over-drying. Good Better ■■ Remove lint and debris from the exhaust hood. ■■ Remove lint from the dryer. Service calls caused by the customer, regardless of vent possible. ■■ Use no more drying time or when using the drying rack. 4 n Use ...the shortest length of who installed the dryer. When cleaning is complete, be paid by improper venting are sensed in shrinkage, wrinkling, and static due to efficiently dry laundry.
Use & Care Guide
Page 5
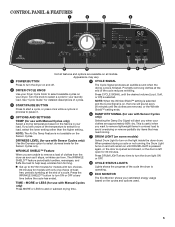
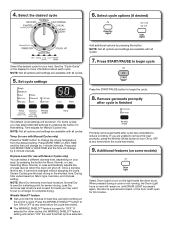
...is left open for use with Manual Cycles only) Press MORE or LESS to help keep wrinkles from the dryer as soon as it . 4 OPTIONS AND SETTINGS TEMP (for use with Manual Cycles only) Select a ... alert you want to remove lightweight items in process to turn on the Sensor Cycles. Use your Dryer Cycle Knob to select a cycle for use with Sensor Cycles only) Selecting the Damp Dry Signal ...until the desired volume (Loud, Soft, or Off) is not available on the light inside the dryer drum. Turn the knob to select available cycles on your estimated energy usage based on all models. ...
...is left open for use with Manual Cycles only) Press MORE or LESS to help keep wrinkles from the dryer as soon as it . 4 OPTIONS AND SETTINGS TEMP (for use with Manual Cycles only) Select a ... alert you want to remove lightweight items in process to turn on the Sensor Cycles. Use your Dryer Cycle Knob to select a cycle for use with Sensor Cycles only) Selecting the Damp Dry Signal ...until the desired volume (Loud, Soft, or Off) is not available on the light inside the dryer drum. Turn the knob to select available cycles on your estimated energy usage based on all models. ...
Use & Care Guide
Page 6
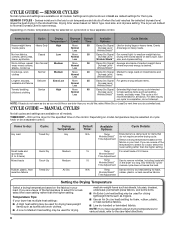
...to save energy. MANUAL CYCLES Not all cycles and settings are default settings for foam, rubber, plastic, or heat-sensitive fabrics. The dryer will default to Normal Dryness Level to medium-weight fabrics. Wrinkle Shield™ No-iron fabrics, cottons, perm press, linens, synthetics Casual...normal light- Wrinkle Shield™ Corduroys, work clothes. ■■ A Low to the care label directions. 6 For best results, run the dryer for items that cycle. Items to dry: Any load Cycle: Timed Dry Small loads and sportswear (2 to 3 items) Mixed loads Quick Dry ...
...to save energy. MANUAL CYCLES Not all cycles and settings are default settings for foam, rubber, plastic, or heat-sensitive fabrics. The dryer will default to Normal Dryness Level to medium-weight fabrics. Wrinkle Shield™ No-iron fabrics, cottons, perm press, linens, synthetics Casual...normal light- Wrinkle Shield™ Corduroys, work clothes. ■■ A Low to the care label directions. 6 For best results, run the dryer for items that cycle. Items to dry: Any load Cycle: Timed Dry Small loads and sportswear (2 to 3 items) Mixed loads Quick Dry ...
Use & Care Guide
Page 7
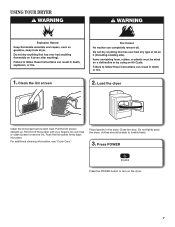
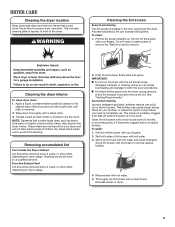
Clean the lint screen 2. Push the lint screen firmly back into place. Close the door. For additional cleaning information, see "Dryer Care." Pull the lint screen straight up. USING YOUR DRYER 1. Roll lint off the screen with your fingers. Place laundry in the dryer. clothes should be able to remove lint. Do not rinse or wash screen to tumble freely. 3. Do not tightly pack the dryer; Press POWER Press the POWER button to turn on the dryer. 7 Load the dryer Clean the lint screen before each load.
Clean the lint screen 2. Push the lint screen firmly back into place. Close the door. For additional cleaning information, see "Dryer Care." Pull the lint screen straight up. USING YOUR DRYER 1. Roll lint off the screen with your fingers. Place laundry in the dryer. clothes should be able to remove lint. Do not rinse or wash screen to tumble freely. 3. Do not tightly pack the dryer; Press POWER Press the POWER button to turn on the dryer. 7 Load the dryer Clean the lint screen before each load.
Use & Care Guide
Page 8
... the load promptly, press the Wrinkle Shield button to turn ON or OFF at which the dryer will change by pressing the button for loads you may want to put on the light inside the dryer drum. Normal Dry is used for that cycle is selected. 8 Promptly remove garments after cycle is...
... the load promptly, press the Wrinkle Shield button to turn ON or OFF at which the dryer will change by pressing the button for loads you may want to put on the light inside the dryer drum. Normal Dry is used for that cycle is selected. 8 Promptly remove garments after cycle is...
Use & Care Guide
Page 9
...clear and free from items that contain loose dyes, such as denim blue jeans or brightly colored cotton items, may discolor the dryer interior. Cleaning the dryer interior To clean dryer drum 1. Dry these items inside out to remove lint. See "Venting Requirements." Clean the lint screen with hot water and liquid...Every load cleaning The lint screen is located in the door opening of the drum and rub with a soft cloth until stain is in the dryer. Tumble a load of clothes. These stains are not harmful to dry the drum. The screen is hard to remove residue buildup. 4. Wet ...
...clear and free from items that contain loose dyes, such as denim blue jeans or brightly colored cotton items, may discolor the dryer interior. Cleaning the dryer interior To clean dryer drum 1. Dry these items inside out to remove lint. See "Venting Requirements." Clean the lint screen with hot water and liquid...Every load cleaning The lint screen is located in the door opening of the drum and rub with a soft cloth until stain is in the dryer. Tumble a load of clothes. These stains are not harmful to dry the drum. The screen is hard to remove residue buildup. 4. Wet ...
Use & Care Guide
Page 10
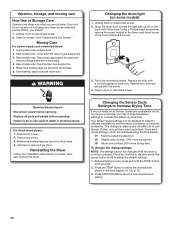
... the light bulb cover on some models) 1. Your sensor drying settings can result in death or electrical shock. To change is off valve in dryer or reconnect power. Press the TEMP button to different installations, environmental conditions, or personal preference. Gas models only: Cap the open fuel supply line... remove the screw located in standby mode (the power button is retained and will be in the lower right-hand corner of the dryer. The dryer must be on all Sensor Cycles are consistently not as dry as you would like, you will affect all parts and panels before ...
... the light bulb cover on some models) 1. Your sensor drying settings can result in death or electrical shock. To change is off valve in dryer or reconnect power. Press the TEMP button to different installations, environmental conditions, or personal preference. Gas models only: Cap the open fuel supply line... remove the screw located in standby mode (the power button is retained and will be in the lower right-hand corner of the dryer. The dryer must be on all Sensor Cycles are consistently not as dry as you would like, you will affect all parts and panels before ...
Use & Care Guide
Page 11
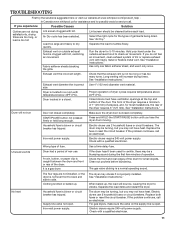
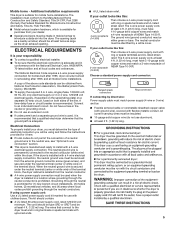
... fuses or circuit breakers. See "Installation Instructions." Incorrect power supply. Closet doors must have ventilation openings at www.whirlpool.com/product_help In Canada www.whirlpool.ca for awhile, there may be turning, but you may be cleaned before laundering. The drum may vibrate if... not properly installed. If the problem continues, call an electrician. Wrong type of operation. Load too large and heavy to possibly avoid a service call. If the dryer...
... fuses or circuit breakers. See "Installation Instructions." Incorrect power supply. Closet doors must have ventilation openings at www.whirlpool.com/product_help In Canada www.whirlpool.ca for awhile, there may be turning, but you may be cleaned before laundering. The drum may vibrate if... not properly installed. If the problem continues, call an electrician. Wrong type of operation. Load too large and heavy to possibly avoid a service call. If the dryer...
Use & Care Guide
Page 12
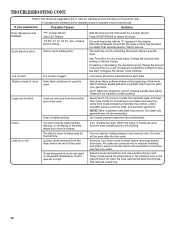
...level will be cleaned before removing laundry from loads consisting of drying time in the display. Add dryer fabric softener sheets at www.whirlpool.com/product_help In Canada www.whirlpool.ca for service. This cycle is too hot You have an odor. Dry loosely packed loads... that requires service. If you experience Possible Causes Solution Dryer displaying code message Cycle time too short "PF" (power failure), ...
...level will be cleaned before removing laundry from loads consisting of drying time in the display. Add dryer fabric softener sheets at www.whirlpool.com/product_help In Canada www.whirlpool.ca for service. This cycle is too hot You have an odor. Dry loosely packed loads... that requires service. If you experience Possible Causes Solution Dryer displaying code message Cycle time too short "PF" (power failure), ...
Dimension Guide
Page 1
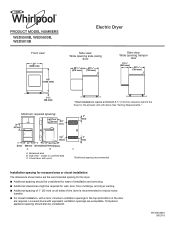
...dimensions shown below are the recommended spacing for this dryer. ■■ Additional spacing should also be required for wall, door, floor moldings, and dryer venting. ■■ Additional spacing of 1" (25 mm) on all sides of the dryer is recommended to reduce noise transfer. ■■...door are acceptable. closet or confined area C. PRODUCT MODEL NUMBERS WED5500B, WED5800B, WED5810B Front view: 27" (686 mm) 43" (1092 mm) Electric Dryer Side view: Wide opening side-swing door 223/4" (578 mm) 291/2" (749 mm) Side view: Wide opening hamper door 133/4" (349 mm) ...
...dimensions shown below are the recommended spacing for this dryer. ■■ Additional spacing should also be required for wall, door, floor moldings, and dryer venting. ■■ Additional spacing of 1" (25 mm) on all sides of the dryer is recommended to reduce noise transfer. ■■...door are acceptable. closet or confined area C. PRODUCT MODEL NUMBERS WED5500B, WED5800B, WED5810B Front view: 27" (686 mm) 43" (1092 mm) Electric Dryer Side view: Wide opening side-swing door 223/4" (578 mm) 291/2" (749 mm) Side view: Wide opening hamper door 133/4" (349 mm) ...

Dimension Guide
Page 2
...subject to change materials and specifications without notice. Vent System Chart Number of 90° turns or elbows Type of the exhaust. Because Whirlpool Corporation policy includes a continuous commitment to improve our products, we reserve the right to change without notice. A time-delay fuse or ...are for best drying performance: ■■ Use following Vent System Chart to determine type of the line. Do not use fewest number of dryer. ■■ Reduce performance, resulting in Vent System Chart. NOTE: Do not use . To determine maximum exhaust length, add one 90&#...
...subject to change materials and specifications without notice. Vent System Chart Number of 90° turns or elbows Type of the exhaust. Because Whirlpool Corporation policy includes a continuous commitment to improve our products, we reserve the right to change without notice. A time-delay fuse or ...are for best drying performance: ■■ Use following Vent System Chart to determine type of the line. Do not use fewest number of dryer. ■■ Reduce performance, resulting in Vent System Chart. NOTE: Do not use . To determine maximum exhaust length, add one 90&#...
Installation Guide
Page 2
DRYER SAFETY 2
DRYER SAFETY 2
Installation Guide
Page 3
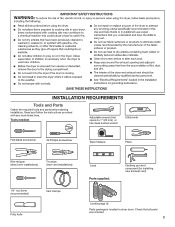
... driver (recommended) Vent clamps Putty knife Level Parts supplied: Caulking gun and compound (for installing new exhaust vent) Leveling legs (4) Parts package is located in dryer drum. Read and follow the instructions provided with any tools listed here.
... driver (recommended) Vent clamps Putty knife Level Parts supplied: Caulking gun and compound (for installing new exhaust vent) Leveling legs (4) Parts package is located in dryer drum. Read and follow the instructions provided with any tools listed here.
Installation Guide
Page 4
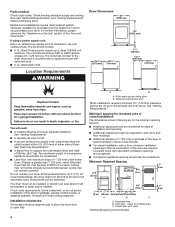
...9632;■ For closet installation, with elbow. Wide opening hamper door *Most installations require a minimum 5½" (140 mm) clearance behind the dryer for use with vents *Additional spacing recommended 3"* (76 mm) 4 See "Venting Requirements." ■■ A separate 30 amp circuit. ■...needed: Check local codes. Check existing electrical supply and venting, and read "Electrical Requirements" and "Venting Requirements" before purchasing parts. Location Requirements Dryer Dimensions 27" (686 mm) 43" (1092 mm) 223/4" (578 mm) 291/2" (749 mm) 11/2" (38 mm) 133/4" (...
...9632;■ For closet installation, with elbow. Wide opening hamper door *Most installations require a minimum 5½" (140 mm) clearance behind the dryer for use with vents *Additional spacing recommended 3"* (76 mm) 4 See "Venting Requirements." ■■ A separate 30 amp circuit. ■...needed: Check local codes. Check existing electrical supply and venting, and read "Electrical Requirements" and "Venting Requirements" before purchasing parts. Location Requirements Dryer Dimensions 27" (686 mm) 43" (1092 mm) 223/4" (578 mm) 291/2" (749 mm) 11/2" (38 mm) 133/4" (...
Installation Guide
Page 5
...this : 4-wire receptacle (14-30R) Then choose a 4-wire power supply cord with flexible metallic conduit. Additional installation requirements This dryer is adequate and in a location where grounding through the neutral conductors. The installation must conform to the Manufactured Home Construction and Safety ..., at least 4 ft. (1.22 m) long, must be sure that the electrical connection is suitable for homes built after 1996, dryer circuits involved in ring terminals or spade terminals with a 4-wire electrical supply connection, the neutral ground wire must be obtained from the...
...this : 4-wire receptacle (14-30R) Then choose a 4-wire power supply cord with flexible metallic conduit. Additional installation requirements This dryer is adequate and in a location where grounding through the neutral conductors. The installation must conform to the Manufactured Home Construction and Safety ..., at least 4 ft. (1.22 m) long, must be sure that the electrical connection is suitable for homes built after 1996, dryer circuits involved in ring terminals or spade terminals with a 4-wire electrical supply connection, the neutral ground wire must be obtained from the...
Installation Guide
Page 6
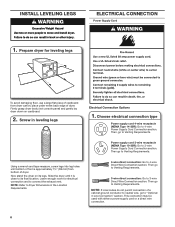
... section. NOTE: Refer to 4-wire Direct Wire Connection section. Then go to Venting Requirements. 4-wire direct connection: Go to Dryer Dimensions in leveling legs Using a wrench and tape measure, screw legs into leg holes until it is approximately 1½" (38 mm) from... direct connection: Go to Venting Requirements. Then go to 3-wire Direct Wire Connection section. NOTE: If local codes do not permit connection of dryer. place under entire back edge of foot is close to "Optional 3-wire Connection" section. Electrical Connection Options 1. Then go to its legs....
... section. NOTE: Refer to 4-wire Direct Wire Connection section. Then go to Venting Requirements. 4-wire direct connection: Go to Dryer Dimensions in leveling legs Using a wrench and tape measure, screw legs into leg holes until it is approximately 1½" (38 mm) from... direct connection: Go to Venting Requirements. Then go to 3-wire Direct Wire Connection section. NOTE: If local codes do not permit connection of dryer. place under entire back edge of foot is close to "Optional 3-wire Connection" section. Electrical Connection Options 1. Then go to its legs....
Installation Guide
Page 7
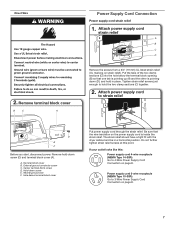
... C. Hold-down screw E. Remove terminal block cover B C A Power Supply Cord Connection Power supply cord strain relief 1. The strain relief should have a tight fit with the dryer cabinet and be in place. If your outlet looks like this point.
... C. Hold-down screw E. Remove terminal block cover B C A Power Supply Cord Connection Power supply cord strain relief 1. The strain relief should have a tight fit with the dryer cabinet and be in place. If your outlet looks like this point.
Installation Guide
Page 8
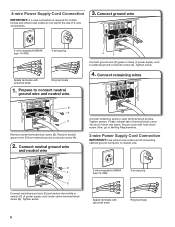
...) of 3-wire connections. 3. Connect remaining wires Connect remaining wires to external ground conductor screw (A). B E C Connect neutral ground wire (E) and neutral wire (white or center) (C) of dryer rear panel. Remove neutral ground wire (E) from external ground conductor screw (A). 2. Tighten screw. 4. Secure cover with upturned ends Ring terminals Tighten screws. Finally, reinsert tab...
...) of 3-wire connections. 3. Connect remaining wires Connect remaining wires to external ground conductor screw (A). B E C Connect neutral ground wire (E) and neutral wire (white or center) (C) of dryer rear panel. Remove neutral ground wire (E) from external ground conductor screw (A). 2. Tighten screw. 4. Secure cover with upturned ends Ring terminals Tighten screws. Finally, reinsert tab...

Installation Guide
Page 9
Attach direct wire strain relief A Remove center terminal block screw (B). 2. Put the threaded section of dryer rear panel. Finally, reinsert tab of terminal block cover into slot of the strain relief (C) through the strain relief. Tighten strain ...Connect neutral wire (white or center) (C) of power supply cord to Venting Requirements. Tighten screws. Reaching inside the terminal block opening (B). Secure cover with the dryer cabinet and be in a horizontal position. If your wiring looks like this: 4-wire direct connection: Go to 4-Wire Direct Connection on page 10. 3-wire...
Attach direct wire strain relief A Remove center terminal block screw (B). 2. Put the threaded section of dryer rear panel. Finally, reinsert tab of terminal block cover into slot of the strain relief (C) through the strain relief. Tighten strain ...Connect neutral wire (white or center) (C) of power supply cord to Venting Requirements. Tighten screws. Reaching inside the terminal block opening (B). Secure cover with the dryer cabinet and be in a horizontal position. If your wiring looks like this: 4-wire direct connection: Go to 4-Wire Direct Connection on page 10. 3-wire...


