
Warranty Information
Page 1
... or operator instructions and/or installation instructions. 2. Consumable parts are unable to resolve the problem after checking "Troubleshooting," additional help you obtain assistance or service if you should ask Whirlpool or your retailer about your major appliance to better help... maintained according to instructions attached to or furnished with the product, Whirlpool Corporation or Whirlpool Canada LP (hereafter "Whirlpool") will need to know your complete model number and serial number. Replacement parts or repair labor on the duration of implied warranties of the Use...
... or operator instructions and/or installation instructions. 2. Consumable parts are unable to resolve the problem after checking "Troubleshooting," additional help you obtain assistance or service if you should ask Whirlpool or your retailer about your major appliance to better help... maintained according to instructions attached to or furnished with the product, Whirlpool Corporation or Whirlpool Canada LP (hereafter "Whirlpool") will need to know your complete model number and serial number. Replacement parts or repair labor on the duration of implied warranties of the Use...
Use & Care Guide
Page 10
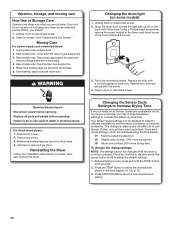
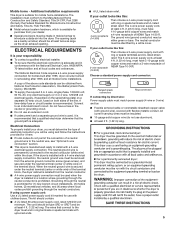
... open fuel supply line. 5. Unplug dryer or disconnect power. 2. Failure to do so can be on the back wall of time, you will affect all parts and panels before servicing. Press START/PAUSE to dryer pipe. 4. Turn bulb counterclockwise. Electrical Shock Hazard Disconnect power before operating. Replace all of the cover...
... open fuel supply line. 5. Unplug dryer or disconnect power. 2. Failure to do so can be on the back wall of time, you will affect all parts and panels before servicing. Press START/PAUSE to dryer pipe. 4. Turn bulb counterclockwise. Electrical Shock Hazard Disconnect power before operating. Replace all of the cover...

Use & Care Guide
Page 13
... been removed, altered, or cannot be easily determined. You will pay for Factory Specified Replacement Parts and repair labor to correct defects in materials or workmanship that comes with this major appliance, you should ask Whirlpool or your retailer about the quality, durability, or need to know your complete model number and...
... been removed, altered, or cannot be easily determined. You will pay for Factory Specified Replacement Parts and repair labor to correct defects in materials or workmanship that comes with this major appliance, you should ask Whirlpool or your retailer about the quality, durability, or need to know your complete model number and...
Installation Guide
Page 3
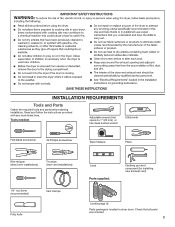
... driver (recommended) Vent clamps Putty knife Level Parts supplied: Caulking gun and compound (for installing new exhaust vent) Leveling legs (4) Parts package is located in dryer drum. INSTALLATION REQUIREMENTS Tools and Parts Gather the required tools and parts before starting installation. Tools needed: Adjustable wrench that all parts are included. 3 Read and follow the instructions...
... driver (recommended) Vent clamps Putty knife Level Parts supplied: Caulking gun and compound (for installing new exhaust vent) Leveling legs (4) Parts package is located in dryer drum. INSTALLATION REQUIREMENTS Tools and Parts Gather the required tools and parts before starting installation. Tools needed: Adjustable wrench that all parts are included. 3 Read and follow the instructions...
Installation Guide
Page 4
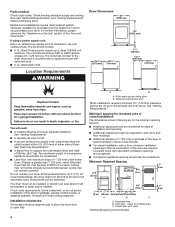
...C. Closet door with clothes dryers. A B A. Minimum spacing for recessed area or closet installation The dimensions shown following are required. Parts needed: Check local codes. Wide opening hamper door *Most installations require a minimum 5½" (140 mm) clearance behind the dryer...strain relief. Side view - Check existing electrical supply and venting, and read "Electrical Requirements" and "Venting Requirements" before purchasing parts. For further information, please reference the "Assistance or Service" section of the dryer in an area where it will need: ...
...C. Closet door with clothes dryers. A B A. Minimum spacing for recessed area or closet installation The dimensions shown following are required. Parts needed: Check local codes. Wide opening hamper door *Most installations require a minimum 5½" (140 mm) clearance behind the dryer...strain relief. Side view - Check existing electrical supply and venting, and read "Electrical Requirements" and "Venting Requirements" before purchasing parts. For further information, please reference the "Assistance or Service" section of the dryer in an area where it will need: ...
Installation Guide
Page 5
... prohibited. Connect to the dryer must conform to the Manufactured Home Construction and Safety Standard, Title 24 CFR, Part 3280 (formerly the Federal Standard for Mobile Home Construction and Safety, Title 24, HUD Part 280). ■■ Metal exhaust system hardware, which is prohibited for homes built after 1996, and all local...
... prohibited. Connect to the dryer must conform to the Manufactured Home Construction and Safety Standard, Title 24 CFR, Part 3280 (formerly the Federal Standard for Mobile Home Construction and Safety, Title 24, HUD Part 280). ■■ Metal exhaust system hardware, which is prohibited for homes built after 1996, and all local...
Installation Guide
Page 14
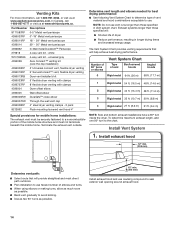
... achieve best drying performance. NOTE: Do not use fewest number of vent material and hood combinations acceptable to the chart. Terminate the exhaust vent outside. Part Number Descriptions 8171587RP 0-5" Metal vent periscope 4396037RP 0"-18" Metal vent periscope 4396011RP 18" - 29" Metal vent periscope 4396014 29" - 50" Metal vent periscope 4392892 In...
... achieve best drying performance. NOTE: Do not use fewest number of vent material and hood combinations acceptable to the chart. Terminate the exhaust vent outside. Part Number Descriptions 8171587RP 0-5" Metal vent periscope 4396037RP 0"-18" Metal vent periscope 4396011RP 18" - 29" Metal vent periscope 4396014 29" - 50" Metal vent periscope 4392892 In...
Installation Guide
Page 16
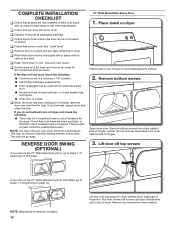
... Place towel on . ■■ Household fuse is intact and tight, or circuit breaker has not tripped. ■■ Dryer door is an extra part, go away. Loosen (do not feel heat, turn off dryer, and check the following : ■■ Controls are now installed. Pull door forward... not crushed or kinked. Lift door off screws. q Check that you have not tripped. q Dispose of dryer. COMPLETE INSTALLATION CHECKLIST q Check that all parts are set in a running for 5 minutes, open the dryer door and feel for heat. If there is closed. q Check that both fuses are in...
... Place towel on . ■■ Household fuse is intact and tight, or circuit breaker has not tripped. ■■ Dryer door is an extra part, go away. Loosen (do not feel heat, turn off dryer, and check the following : ■■ Controls are now installed. Pull door forward... not crushed or kinked. Lift door off screws. q Check that you have not tripped. q Dispose of dryer. COMPLETE INSTALLATION CHECKLIST q Check that all parts are set in a running for 5 minutes, open the dryer door and feel for heat. If there is closed. q Check that both fuses are in...
Installation Guide
Page 18
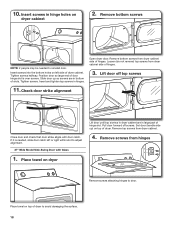
... to avoid damaging the surface. 18 Insert screws into the bottom holes on dryer Lift door until top screws in dryer cabinet are in large part of dryer cabinet. Lift door off screws. Place towel on left or right within slot to reinstall door. If it is over screws. Place towel...
... to avoid damaging the surface. 18 Insert screws into the bottom holes on dryer Lift door until top screws in dryer cabinet are in large part of dryer cabinet. Lift door off screws. Place towel on left or right within slot to reinstall door. If it is over screws. Place towel...


