
Dimension Guide
Page 1
..." in the top are for the exhaust vent with a door, the minimum ventilation openings in the path of the line. Specifications subject to change without notice. Wide opening side-swing door B. Because Whirlpool Corporation policy includes a continuous commitment to improve our products, we reserve...) on a separate 30-amp circuit, fused on both sides of the exhaust. Do not have a 90° turn to the outside. 4" (102 mm) diameter vent is recommended. Exhaust hood styles: B 4" C A (102 mm) Dryer dimensions OVERALL DIMENSIONS 43 " (1092 mm) 23 ¾" (603 mm) 43 " (...
..." in the top are for the exhaust vent with a door, the minimum ventilation openings in the path of the line. Specifications subject to change without notice. Wide opening side-swing door B. Because Whirlpool Corporation policy includes a continuous commitment to improve our products, we reserve...) on a separate 30-amp circuit, fused on both sides of the exhaust. Do not have a 90° turn to the outside. 4" (102 mm) diameter vent is recommended. Exhaust hood styles: B 4" C A (102 mm) Dryer dimensions OVERALL DIMENSIONS 43 " (1092 mm) 23 ¾" (603 mm) 43 " (...

Installation Instructions
Page 3
... (25 mm) or hex-head socket wrench Utility knife Tape measure Level Pliers Caulking gun and compound (for installing new exhaust vent) You will need: ■■ A location allowing for proper exhaust installation. For further information, please reference the "Assistance ...Instructions. Parts needed : Flat-blade screwdriver #2 Phillips screwdriver Wire stripper (direct wire installations) Tin snips (new vent installations) 1/4" nut driver (recommended) Vent clamps Leveling legs (4) Parts package is located in ring terminals or spade terminals with any tools listed here. ...
... (25 mm) or hex-head socket wrench Utility knife Tape measure Level Pliers Caulking gun and compound (for installing new exhaust vent) You will need: ■■ A location allowing for proper exhaust installation. For further information, please reference the "Assistance ...Instructions. Parts needed : Flat-blade screwdriver #2 Phillips screwdriver Wire stripper (direct wire installations) Tin snips (new vent installations) 1/4" nut driver (recommended) Vent clamps Leveling legs (4) Parts package is located in ring terminals or spade terminals with any tools listed here. ...

Installation Instructions
Page 4
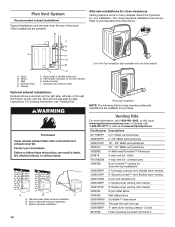
...and automatic sensor cycles may not operate correctly. A time-delay fuse or circuit breaker is suitable for the exhaust vent with the National Electrical Code, ANSI/NFPA 70-latest edition and all mobile home installations. Minimum spacing for recessed ... doors with equivalent ventilation openings are acceptable. ■■ Companion appliance spacing should also be considered. ■■ Level floor with vents *Additional spacing recommended 3"* (76 mm) Mobile home - Electrical Requirements It is your local building inspector. See "Electrical Requirements." ■...
...and automatic sensor cycles may not operate correctly. A time-delay fuse or circuit breaker is suitable for the exhaust vent with the National Electrical Code, ANSI/NFPA 70-latest edition and all mobile home installations. Minimum spacing for recessed ... doors with equivalent ventilation openings are acceptable. ■■ Companion appliance spacing should also be considered. ■■ Level floor with vents *Additional spacing recommended 3"* (76 mm) Mobile home - Electrical Requirements It is your local building inspector. See "Electrical Requirements." ■...

Installation Instructions
Page 6
... finish turning legs until it is no longer visible. Now stand the dryer on cardboard. 6 To avoid damaging floor, use a wrench to connect the exhaust vent. Failure to do so can result in leveling legs Excessive Weight Hazard Use two or more people to its feet. Slide the dryer until diamond...
... finish turning legs until it is no longer visible. Now stand the dryer on cardboard. 6 To avoid damaging floor, use a wrench to connect the exhaust vent. Failure to do so can result in leveling legs Excessive Weight Hazard Use two or more people to its feet. Slide the dryer until diamond...
Installation Instructions
Page 7
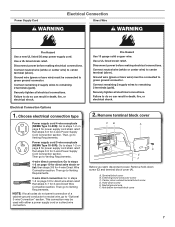
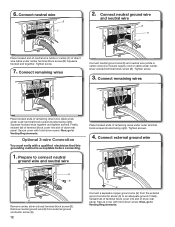
...direct wire strain relief: then steps 3-8 for 3-wire Direct Wire Connection section. Ground wire (green or bare wire) must be connected to Venting Requirements. A. use a new ul listed 30 amp power supply cord. Then go to do so can result in death, fire, or... electrical shock. NOTE: If local codes do not permit connection of a cabinet-ground conductor to neutral wire, go to Venting Requirements. 3-wire direct connection: Go to green ground connector. Securely tighten all electrical connections. Failure to "Optional 3-wire Connection" section. Terminal ...
...direct wire strain relief: then steps 3-8 for 3-wire Direct Wire Connection section. Ground wire (green or bare wire) must be connected to Venting Requirements. A. use a new ul listed 30 amp power supply cord. Then go to do so can result in death, fire, or... electrical shock. NOTE: If local codes do not permit connection of a cabinet-ground conductor to neutral wire, go to Venting Requirements. 3-wire direct connection: Go to green ground connector. Securely tighten all electrical connections. Failure to "Optional 3-wire Connection" section. Terminal ...
Installation Instructions
Page 9
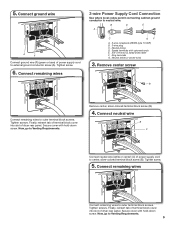
... mm) UL listed strain relief F. Neutral prong D. Ring terminals G. Now, go to center, silver-colored terminal block screw (B). Connect remaining wires Connect remaining wires to Venting Requirements. Finally, reinsert tab of terminal block cover into slot of power supply cord to...
... mm) UL listed strain relief F. Neutral prong D. Ring terminals G. Now, go to center, silver-colored terminal block screw (B). Connect remaining wires Connect remaining wires to Venting Requirements. Finally, reinsert tab of terminal block cover into slot of power supply cord to...
Installation Instructions
Page 11
... rear panel. Tighten screw. 8. Connect neutral ground wire and neutral wire B C E 3-wire Direct Wire Connection Use where local codes permit connecting cabinet-ground conductor to Venting Requirements. Strip 31/2" (89 mm) of outer covering from end of extra length so dryer may be moved if needed. Squeeze hooked ends together and...
... rear panel. Tighten screw. 8. Connect neutral ground wire and neutral wire B C E 3-wire Direct Wire Connection Use where local codes permit connecting cabinet-ground conductor to Venting Requirements. Strip 31/2" (89 mm) of outer covering from end of extra length so dryer may be moved if needed. Squeeze hooked ends together and...
Installation Instructions
Page 12
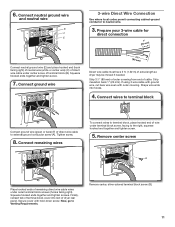
... from external ground conductor screw (A). 12 A G Connect a separate copper ground wire (G) from the external ground conductor screw (A) to Venting Requirements. Now, go to connect neutral ground wire and neutral wire Place hooked ends of power supply cord or cable under outer terminal ...wires Connect neutral ground wire (E) and neutral wire (white or center wire) (C) of remaining wires under center terminal block screw (B). Prepare to Venting Requirements. Secure cover with hold -down screw. Connect neutral ground wire and neutral wire B E C Place hooked end of neutral wire (...
... from external ground conductor screw (A). 12 A G Connect a separate copper ground wire (G) from the external ground conductor screw (A) to Venting Requirements. Now, go to connect neutral ground wire and neutral wire Place hooked ends of power supply cord or cable under outer terminal ...wires Connect neutral ground wire (E) and neutral wire (white or center wire) (C) of remaining wires under center terminal block screw (B). Prepare to Venting Requirements. Secure cover with hold -down screw. Connect neutral ground wire and neutral wire B E C Place hooked end of neutral wire (...

Installation Instructions
Page 13
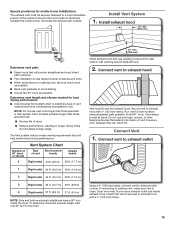
... other fastening devices that extend into any object that may be used for more information. 13 Replace plastic or metal foil vents with lint. Flexible metal vent: (Acceptable only if accessible to clean) ■■ Must be fully extended and supported in death or fire. NOTE...final dryer location. ■■ Remove excess to woodwork, furniture, paint, wallpaper, carpets, etc. Do not use a heavy metal vent. Venting Requirements WARNING VENTING Exhaust hoods: ■■ Must be at least 12" (305 mm) from entire length of the system and make sure exhaust ...
... other fastening devices that extend into any object that may be used for more information. 13 Replace plastic or metal foil vents with lint. Flexible metal vent: (Acceptable only if accessible to clean) ■■ Must be fully extended and supported in death or fire. NOTE...final dryer location. ■■ Remove excess to woodwork, furniture, paint, wallpaper, carpets, etc. Do not use a heavy metal vent. Venting Requirements WARNING VENTING Exhaust hoods: ■■ Must be at least 12" (305 mm) from entire length of the system and make sure exhaust ...
Installation Instructions
Page 14
... - universal grey 4396028 Sure Connect™ venting kit (over-the-top installation) 4396009RP 5' Universal connect vent, flexible dryer venting 4396010RP 6' SecureConnect™ vent, flexible dryer venting 4396013RB Dryer vent installer's kit 4396033RP 5' flexible dryer venting with clamps 4396727RP 8' flexible dryer venting with one offset elbow) B A. Rigid metal or flexible metal vent G. Vent length necessary to the manufacturer's instructions. Exhaust outlet...
... - universal grey 4396028 Sure Connect™ venting kit (over-the-top installation) 4396009RP 5' Universal connect vent, flexible dryer venting 4396010RP 6' SecureConnect™ vent, flexible dryer venting 4396013RB Dryer vent installer's kit 4396033RP 5' flexible dryer venting with clamps 4396727RP 8' flexible dryer venting with one offset elbow) B A. Rigid metal or flexible metal vent G. Vent length necessary to the manufacturer's instructions. Exhaust outlet...
Installation Instructions
Page 15
... portion of the mobile home structure and must fit over the exhaust hood. Avoid 90° turns. Use clamps to existing vent, make sure vent is secured to exhaust hood Vent must fit over dryer exhaust outlet and inside the dryer. If connecting to seal all joints. Install...drying times and increased energy usage. NOTE: Do not use duct tape, screws, or other fastening devices that vent is clean. Connect vent to exhaust outlet Using a 4" (102 mm) clamp, connect vent to dryer location using elbows or making turns, allow as much room as possible. ■■ Bend...
... portion of the mobile home structure and must fit over the exhaust hood. Avoid 90° turns. Use clamps to existing vent, make sure vent is secured to exhaust hood Vent must fit over dryer exhaust outlet and inside the dryer. If connecting to seal all joints. Install...drying times and increased energy usage. NOTE: Do not use duct tape, screws, or other fastening devices that vent is clean. Connect vent to exhaust outlet Using a 4" (102 mm) clamp, connect vent to dryer location using elbows or making turns, allow as much room as possible. ■■ Bend...

Installation Instructions
Page 16
... . ■■ Household fuse is intact and tight, or circuit breaker has not tripped. ■■ Dryer door is first heated. Avoid crushing or kinking vent. Repeat from under the dryer. q Read "Dryer Use" in your tools. Not Level LEVEL Not Level If dryer is on a full heat cycle (not an... cloth to operate correctly. Check that dryer is still no heat, contact a qualified technician. After dryer is an extra part, go away. 16 Be sure vent is first used. 2.
... . ■■ Household fuse is intact and tight, or circuit breaker has not tripped. ■■ Dryer door is first heated. Avoid crushing or kinking vent. Repeat from under the dryer. q Read "Dryer Use" in your tools. Not Level LEVEL Not Level If dryer is on a full heat cycle (not an... cloth to operate correctly. Check that dryer is still no heat, contact a qualified technician. After dryer is an extra part, go away. 16 Be sure vent is first used. 2.
Owners Manual
Page 3
... dry articles that you cannot reach your gas supplier from the accumulation of lint, dust, and dirt. ■ The interior of the dryer and exhaust vent should be performed by smell. Installation and service must be cleaned periodically by qualified service personnel. ■ See installation instructions for grounding requirements. Follow the...
... dry articles that you cannot reach your gas supplier from the accumulation of lint, dust, and dirt. ■ The interior of the dryer and exhaust vent should be performed by smell. Installation and service must be cleaned periodically by qualified service personnel. ■ See installation instructions for grounding requirements. Follow the...
Owners Manual
Page 4
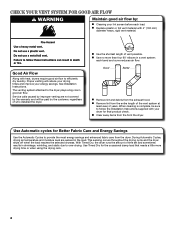
...times and improve your lint screen before each bend and curve reduces air flow. each load. Use Automatic cycles for final product check. The venting system attached to over-drying. n Clear away items from the exhaust hood. n Use no more drying time or when using the drying ... the Installation Instructions supplied with your dryer for Better Fabric Care and Energy Savings Use the Automatic Cycles to efficiently dry laundry. CHECK YOUR VENT SYSTEM FOR GOOD AIR FLOW Maintain good air flow by: n Cleaning your energy savings. n Remove lint from the dryer. Good Air Flow...
...times and improve your lint screen before each bend and curve reduces air flow. each load. Use Automatic cycles for final product check. The venting system attached to over-drying. n Clear away items from the exhaust hood. n Use no more drying time or when using the drying ... the Installation Instructions supplied with your dryer for Better Fabric Care and Energy Savings Use the Automatic Cycles to efficiently dry laundry. CHECK YOUR VENT SYSTEM FOR GOOD AIR FLOW Maintain good air flow by: n Cleaning your energy savings. n Remove lint from the dryer. Good Air Flow...

Owners Manual
Page 9
... water. 5. Removing accumulated lint From Inside the Dryer Cabinet Lint should be removed every 2 years, or more often, depending on dryer usage. From the Exhaust Vent Lint should be removed every 2 years, or more often, depending on dryer usage. 2. n If lint falls off the screen with a damp cloth. 3. See...
... water. 5. Removing accumulated lint From Inside the Dryer Cabinet Lint should be removed every 2 years, or more often, depending on dryer usage. From the Exhaust Vent Lint should be removed every 2 years, or more often, depending on dryer usage. 2. n If lint falls off the screen with a damp cloth. 3. See...
Owners Manual
Page 11
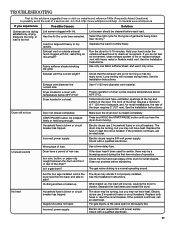
... FAQs (Frequently Asked Questions) to possibly avoid the cost of a service call an electrician. http://www.whirlpool.com/help - In Canada www.whirlpool.ca If you may be turning, but you experience Possible Causes Solution Clothes are not drying satisfactorily, drying... times are too long, or load is closed completely. Lint screen should be turning, but you may be a thumping sound during the first few minutes of lint or replace exhaust vent...
... FAQs (Frequently Asked Questions) to possibly avoid the cost of a service call an electrician. http://www.whirlpool.com/help - In Canada www.whirlpool.ca If you may be turning, but you experience Possible Causes Solution Clothes are not drying satisfactorily, drying... times are too long, or load is closed completely. Lint screen should be turning, but you may be a thumping sound during the first few minutes of lint or replace exhaust vent...
