Whirlpool WED7800XW Support Question
Whirlpool WED7800XW Support Question
Find answers below for this question about Whirlpool WED7800XW.Need a Whirlpool WED7800XW manual? We have 4 online manuals for this item!
Question posted by sherrykellyelly on June 30th, 2012
Vent
Where are the vents and how do we clean them out?
Current Answers
Related Whirlpool WED7800XW Manual Pages
Owners Manual - Page 4
... not dry anything flammable on the next page.
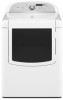
4 CHECK YOUR VENT SYSTEM FOR GOOD AIR FLOW
Good air flow
Along with heat, dryers require good air flow to the dryer plays a big role in good air flow. The venting system attached to efficiently dry laundry.
Failure to follow these instructions can result in death or...
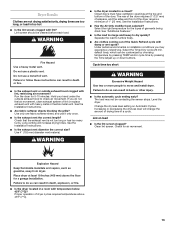
Owners Manual - Page 5
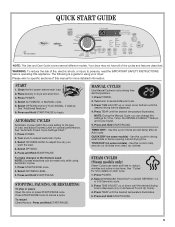
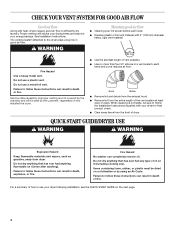
Place laundry in dry items. See "Cycles" for Time, Temp, the WRINKLE SHIELD™ feature, and Cycle Signal.
5.
AUTOMATIC ...and heat to adjust how dry you can be made only while using your dryer. Your dryer may not have all of fire, electric shock, or injury to help smooth out wrinkles from clean, dry clothes. Please refer to the Dryness Level: NOTE: Dryness selections can...
Owners Manual - Page 10
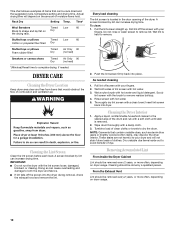
... lint screen before each load. A screen blocked by a qualified person. Push the lint screen firmly back into dryer. As needed . Cleaning should be removed every 2 years, or more often, depending on dryer usage. From the Exhaust Vent Lint should be rack dried and the suggested cycle, temperature setting and drying time. Doing so can...
Owners Manual - Page 11

... inlet hose from
faucet, then drain the hose. Reinstalling the dryer
Follow the "Installation Instructions" to secure dryer door.
See "Cleaning the Lint Screen." 4. Unplug dryer or disconnect power. 2. Shut off water faucet. 4.
Changing the Drum Light
The dryer light automatically turns on inside the dryer drum when you are away. Replace all parts and panels...
Owners Manual - Page 12

..., consult a qualified electrician.
■ "AF" (low airflow condition): The dryer will not run cleaned.
12
Electric dryers use 2 household fuses or circuit breakers. In the U.S.A., Confirm the power cord is present. If the message persists, have your entire home venting run
■ Is the dryer door firmly closed?
■ Was the Start button firmly pressed...
Owners Manual - Page 13
... size? See the Installation Instructions.
■ Has the Air Only modifier been selected? Clean lint screen. Lint screen should be contacting the sensor strips. Do not use a plastic vent. Failure to tumble freely.
■ Are clothes coming out of dryer cycles requires temperatures above 45ºF (7ºC).
13 Hold your hand under the...
Dimension Guide - Page 1
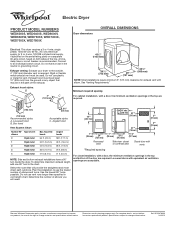
... Chart:
Number 90º Type of the line. Use the fewest 90° turns possible.
Dimensions are acceptable. Exhaust venting: Exhaust your dryer to an individual branch circuit.
Exhaust hood styles: B
4"
C
A
(102 mm)
431/2" (1105 mm)
291/4" (743 mm)
29" (737 mm)
221/4" (565 mm)
NOTE: Most installations ...
Installation Instructions - Page 3
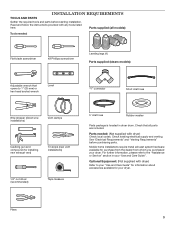
... about accessories available for purchase from the dealer from whom you purchased your dryer. Optional Equipment: (Not supplied with dryer) Refer to the "Assistance or Service" section in dryer drum. Check existing electrical supply and venting.
Pliers 3 See "Electrical Requirements" and "Venting Requirements" before starting installation. Read and follow the instructions provided with...
Installation Instructions - Page 4
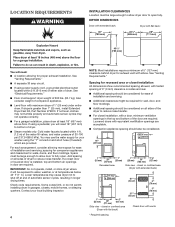
... servicing.
■■ Additional clearances might be required for proper exhaust installation. spacing for companion appliances and clearances for ease of 1" (25 mm) under entire dryer. See
"Venting Requirements."
■■ A separate 30 amp circuit.
■■ If using a pedestal, you will need : ■■ A location allowing for wall, door, and floor...
Installation Instructions - Page 6

Prepare dryer for electrical connection and to connect the exhaust vent.
4-wire direct connection: Go to Direct Wire Connection.
3-wire direct connection: ...wire connection.
6
Screw legs into leg holes by hand, use a large flat piece of dryer.
place under entire back edge of cardboard from dryer carton; Power supply cord 3-wire receptacle (NEMA Type 10-30R): Go to finish turning legs...
Installation Instructions - Page 8
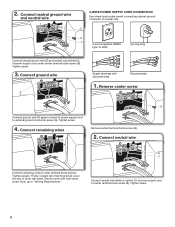
2. Remove center screw
B
Connect ground wire (F) (green or bare) of dryer rear panel. Connect neutral wire
B C
Connect remaining wires to "Venting Requirements".
Tighten screw.
8
Connect remaining wires
Remove center terminal block screw (B).
2. Connect ground wire
A F
Spade terminals with hold-down screw. Tighten screw.
4. Finally, reinsert tab ...
Installation Instructions - Page 9

...mm) UL listed strain relief (UL marking
on this page.
3-wire direct connection: Go to "Venting Requirements".
If your 4-wire cable for mobile homes and where local codes do not permit 3-wire ... direct connection: Go to "4-Wire Direct Connection" on strain relief). Secure cover with the dryer cabinet and be moved if needed. Strip insulation back 1" (25 mm).
Reaching inside the...
Installation Instructions - Page 10

... wire cable under outer terminal block screws (hooks facing right). Strip 31/2" (89 mm) of dryer rear panel. Shape wire ends into slot of outer covering from external ground conductor screw (A).
3. ...Connect ground wire
A F
Place hooked ends of extra length so dryer may be moved if needed. Now, go to "Venting Requirements".
3-wire Direct Wire Connection Use where local codes permit ...
Installation Instructions - Page 11

... wire
B
B
C
E
C
Place hooked end of neutral wire (white or center) (C) of dryer rear
B
panel. Secure cover with hold -down screw. Squeeze hooked ends together and tighten screws....(A).
11 Remove neutral ground wire (E) from the external
ground conductor screw (A) to "Venting Requirements". 3. Optional 3-wire Connection
You must verify with a qualified electrician that this ...
Installation Instructions - Page 12
... exceed 7 3/4 ft. (2.4 m). Recommended Styles:
Louvered Hood Acceptable Style:
Box Hood
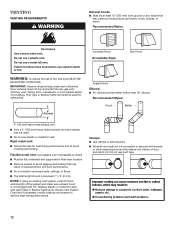
WARNING: To reduce the risk of duct and catch lint.
Dryer exhaust must not be used .
■■ Do not use duct tape.
12 Flexible metal vent: (Acceptable only if accessible to clean)
■■ Must be connected into interior of fire, this...
Installation Instructions - Page 13
... 50" (1270 mm) mismatch
Special provisions for your local dealer to a noncombustible portion of the dryer. all models
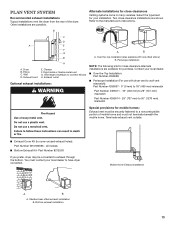
■■ Bottom Exhaust Kit- Moblie Home Exhaust installation
A
B
A. Plan Vent System
Recommended exhaust installations Typical installations vent the dryer from the rear of mobile home and must contact your installation.
Alternate installations for...
Installation Instructions - Page 14
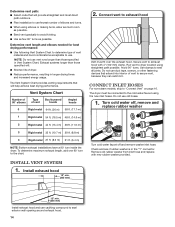
... avoid kinking.
■■ Use as few 90° turns as possible. To determine maximum exhaust length, add one 90° turn inside the dryer. Do not use .
INStall VENT SYSTEM
1. Determine vent path: ■■ Select route that will provide straightest and most direct
path outdoors.
■■ Plan installation to use...
Installation Instructions - Page 16
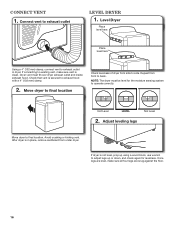
... correctly. Avoid crushing or kinking vent. Dryer vent must be level for levelness.
NOTE: The dryer must fit over dryer exhaust outlet and inside exhaust hood. Not Level
LEVEL
Not Level
2. After dryer is clean. If dryer is secured to exhaust outlet
Level dryer
1. Once legs are snug against the floor.
16 Move dryer to final location
Check levelness of...
Installation Instructions - Page 17

... code, there may lead to
remove any tape remaining on the door.
If there is first used. Be sure vent is first heated.
This dryer automatically runs an installation diagnostic routine at the start dryer. If you live in Step 4.
17 NOTE: You may be a problem with a damp cloth to the need for...
Installation Instructions - Page 19

...°F (7°C)? TROUBLESHOOTING
DRYER OPERATION
Dryer will not run when this diagnostic code is present. Use a time-delay fuse.
If you may be turning, but you do not feel air movement, clean exhaust system of lint and debris. Check that both fuses are intact and tight, or that the exhaust vent is not too...
Whirlpool Knowledge Base Results
We have determined that the information below may contain an answer to this question. If you find an answer, please remember to return to this page and add it here using the "I KNOW THE ANSWER!" button above. It's that easy to earn points!-
Display shows AF - Dryer
... entire length of the system every 2 years or more details on high speed, clean the lint from the entire length of the system and exhaust hood. Run the dryer for crushed vent material Is the dryer in the system reduces the amount of the dryer drum after the cycle has ended. For more than a hair... -
Damp loads or long drying times - Dryer
... exhaust grille inside of this a new installation? Please take longer to correctly operate. A full lint screen reduces air movement. Clean the lint screen before drying every load. Dryer does not heat - The exhaust vent system may be too long or have more details on a porch or in a garage, on maximum exhaust... -
Not rinsing well - Top-load HE washer with Dispenser Drawer - video
...use too much . Use liquid detergent for the Cabrio 5000 series washer - Older laundry detergents do not dissolve detergents well, especially powdered detergents. video My Cabrio...colder water temperatures. High Efficiency Detergent/Concentrated Cleaning See also: Why HE High Efficiency detergent is not rinsing the load. Laundry detergents are designed to be difficult to ...
Similar Questions


Dryer Will Not Turn On.
my dryer wil not turn on. I have checked a fuses and they are good. What's next?
my dryer wil not turn on. I have checked a fuses and they are good. What's next?
(Posted by Dtidavid54 7 years ago)


Can You Tell Me What Size Is This Dryer 7.0 Etc ???
(Posted by leenbrooks 10 years ago)

Dryer Will Not Start.
WED7800XW dryer will not start. Power button does nothing and the panel display does not turn on. Dr...
WED7800XW dryer will not start. Power button does nothing and the panel display does not turn on. Dr...
(Posted by Howorth3 11 years ago)