

Dimension Guide
Page 1
... required spacing For cabinet installation, with elbow. To determine maximum exhaust length, add one 90° turn inside the dryer. Louvered doors with product. 27" Electric Dryer PRODUCT MODEL NUMBERS WED5500X, WED5550X, WED5600X, WED5700X Electrical: This dryer requires a 3 or 4 wire, single phase, 120/240 volt, 60 Hz., AC only electrical supply (or 3 or 4 wire, 120/208 volt electrical supply, if specified on the serial/rating plate) on a separate 30-amp circuit, fused...
... required spacing For cabinet installation, with elbow. To determine maximum exhaust length, add one 90° turn inside the dryer. Louvered doors with product. 27" Electric Dryer PRODUCT MODEL NUMBERS WED5500X, WED5550X, WED5600X, WED5700X Electrical: This dryer requires a 3 or 4 wire, single phase, 120/240 volt, 60 Hz., AC only electrical supply (or 3 or 4 wire, 120/208 volt electrical supply, if specified on the serial/rating plate) on a separate 30-amp circuit, fused...

Installation Instructions
Page 3
... Dryer User Instructions. The cord should contain: ■■ A UL listed 30-amp power supply cord, rated 120/240 volt minimum. See "Venting Requirements." ■■ A separate 30 amp circuit. 3 Parts needed : Flat-blade screwdriver #2 Phillips screwdriver Wire stripper (direct wire installations) Tin snips (new vent installations) 1/4" nut driver (recommended) Vent clamps Leveling legs (4) Parts package is located in ring terminals or spade terminals with upturned ends. ■■ A UL listed strain relief. If using a power supply cord: Use a UL listed power...
... Dryer User Instructions. The cord should contain: ■■ A UL listed 30-amp power supply cord, rated 120/240 volt minimum. See "Venting Requirements." ■■ A separate 30 amp circuit. 3 Parts needed : Flat-blade screwdriver #2 Phillips screwdriver Wire stripper (direct wire installations) Tin snips (new vent installations) 1/4" nut driver (recommended) Vent clamps Leveling legs (4) Parts package is located in ring terminals or spade terminals with upturned ends. ■■ A UL listed strain relief. If using a power supply cord: Use a UL listed power...

Installation Instructions
Page 4
... floor to water and/or weather. Installation clearances: The location must conform to introduce outside air into the dryer. See "Venting Requirements." Closet door with elbow. A copy of the line. At lower temperatures, the dryer might be made in garages, closets, mobile homes, or sleeping quarters. Wide opening . Minimum spacing for recessed area or closet installation The dimensions shown following are using power supply cord, a grounded electrical outlet located within...
... floor to water and/or weather. Installation clearances: The location must conform to introduce outside air into the dryer. See "Venting Requirements." Closet door with elbow. A copy of the line. At lower temperatures, the dryer might be made in garages, closets, mobile homes, or sleeping quarters. Wide opening . Minimum spacing for recessed area or closet installation The dimensions shown following are using power supply cord, a grounded electrical outlet located within...

Installation Instructions
Page 5
... dryer is installed with a 4-wire electrical supply connection, the neutral ground wire must be removed from the neutral conductor. ■■ A 4-wire power supply connection must be used when the dryer is isolated from the external ground connector screw (green screw), and secured under the neutral terminal (center or white wire) of the terminal block. The kit should be type SRD or SRDT and be at least 4 ft. (1.22 m) long...
... dryer is installed with a 4-wire electrical supply connection, the neutral ground wire must be removed from the neutral conductor. ■■ A 4-wire power supply connection must be used when the dryer is isolated from the external ground connector screw (green screw), and secured under the neutral terminal (center or white wire) of the terminal block. The kit should be type SRD or SRDT and be at least 4 ft. (1.22 m) long...
Installation Instructions
Page 10
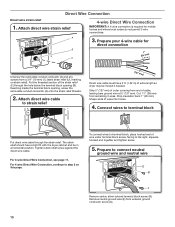
... right, squeeze hooked end together and tighten screw. 5. A 3. Reaching inside the terminal block opening (B). Prepare your 4-wire cable for mobile homes and where local codes do not permit 3-wire connections. Attach direct wire cable to strain relief (127 5" mm) Direct wire cable must have a tight fit with the dryer cabinet and be moved if needed. To connect wires to connect neutral ground wire and neutral wire E B A Remove center, silver-colored terminal block screw (B). Direct Wire Connection Direct wire...
... right, squeeze hooked end together and tighten screw. 5. A 3. Reaching inside the terminal block opening (B). Prepare your 4-wire cable for mobile homes and where local codes do not permit 3-wire connections. Attach direct wire cable to strain relief (127 5" mm) Direct wire cable must have a tight fit with the dryer cabinet and be moved if needed. To connect wires to connect neutral ground wire and neutral wire E B A Remove center, silver-colored terminal block screw (B). Direct Wire Connection Direct wire...
Installation Instructions
Page 12
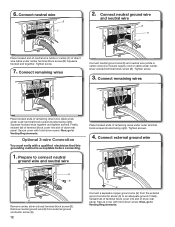
... terminal block screw (B). Connect external ground wire E B A Remove center, silver-colored terminal block screw (B). Finally, reinsert tab of terminal block cover into slot of remaining direct wire cable wires under outer terminal block screws (hooks facing right). Tighten screw. 7. Squeeze hooked ends together and tighten screws. Now, go to Venting Requirements. Connect neutral wire B C 2. Secure cover with hold -down screw. Tighten screws. 4. Tighten screw. 3. Now, go to Venting Requirements. Connect remaining wires Place hooked ends of dryer rear panel...
... terminal block screw (B). Connect external ground wire E B A Remove center, silver-colored terminal block screw (B). Finally, reinsert tab of terminal block cover into slot of remaining direct wire cable wires under outer terminal block screws (hooks facing right). Tighten screw. 7. Squeeze hooked ends together and tighten screws. Now, go to Venting Requirements. Connect neutral wire B C 2. Secure cover with hold -down screw. Tighten screws. 4. Tighten screw. 3. Now, go to Venting Requirements. Connect remaining wires Place hooked ends of dryer rear panel...

Installation Instructions
Page 13
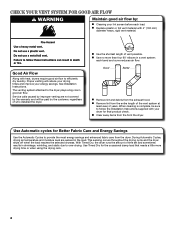
... existing vent system, clean lint from ground or any object that extend into any gas vent, chimney, wall, ceiling, attic, crawlspace, or a concealed space of the system and make sure exhaust hood is not plugged with lint. Good Better Clamps: ■■ Use clamps to avoid sagging and kinking that may be fully extended and supported in final dryer location. ■■ Remove...
... existing vent system, clean lint from ground or any object that extend into any gas vent, chimney, wall, ceiling, attic, crawlspace, or a concealed space of the system and make sure exhaust hood is not plugged with lint. Good Better Clamps: ■■ Use clamps to avoid sagging and kinking that may be fully extended and supported in final dryer location. ■■ Remove...
Installation Instructions
Page 14
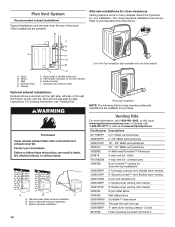
...flexible dryer venting with one offset elbow) B A. Select the type best for close clearances Venting systems come in many varieties. Vent length necessary to the manufacturer's instructions. Exhaust outlet I H F. Exhaust hood E. Periscope installation NOTE: The following kits for your installation. Plan Vent System Recommended exhaust installations Typical installations vent the dryer from the rear of the dryer. Left or right side exhaust installation C. Each kit includes step-by-step instructions. Bottom exhaust installation 14 Venting Kits For...
...flexible dryer venting with one offset elbow) B A. Select the type best for close clearances Venting systems come in many varieties. Vent length necessary to the manufacturer's instructions. Exhaust outlet I H F. Exhaust hood E. Periscope installation NOTE: The following kits for your installation. Plan Vent System Recommended exhaust installations Typical installations vent the dryer from the rear of the dryer. Left or right side exhaust installation C. Each kit includes step-by-step instructions. Bottom exhaust installation 14 Venting Kits For...
Installation Instructions
Page 15
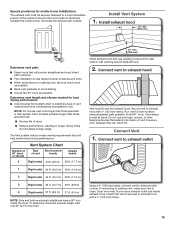
... longer drying times and increased energy usage. Vent System Chart Number of 90° turns or elbows Type of vent to exhaust hood with 4" (102 mm) clamp. Run vent to seal exterior wall opening around exhaust hood. 2. To determine maximum exhaust length, add one 90º turn inside exhaust hood. Install exhaust hood 12" min. (305 mm) Determine vent path: ■■ Select route that will provide straightest and most direct...
... longer drying times and increased energy usage. Vent System Chart Number of 90° turns or elbows Type of vent to exhaust hood with 4" (102 mm) clamp. Run vent to seal exterior wall opening around exhaust hood. 2. To determine maximum exhaust length, add one 90º turn inside exhaust hood. Install exhaust hood 12" min. (305 mm) Determine vent path: ■■ Select route that will provide straightest and most direct...

Installation Instructions
Page 16
..., open the dryer door and feel for the moisture sensing system to adjust legs up using a wood block, use wrench to operate correctly. q Check dryer's final location. See "Level Dryer". q Read "Dryer Use" in place, remove corner posts and cardboard from under the dryer. q When the dryer has been running or "On" position. ■■ Start button has been pushed firmly. ■■ Dryer is plugged into an outlet and/or electrical supply...
..., open the dryer door and feel for the moisture sensing system to adjust legs up using a wood block, use wrench to operate correctly. q Check dryer's final location. See "Level Dryer". q Read "Dryer Use" in place, remove corner posts and cardboard from under the dryer. q When the dryer has been running or "On" position. ■■ Start button has been pushed firmly. ■■ Dryer is plugged into an outlet and/or electrical supply...
Owners Manual
Page 3
... products to eliminate static unless recommended by a qualified installer, service agency or the gas supplier. For more information, contact your gas supplier. SAVE THESE INSTRUCTIONS WARNING: If the information in this or any servicing unless specifically recommended in this Use and Care Guide or in published user-repair instructions that you understand and have been previously cleaned in, washed in, soaked in, or spotted...
... products to eliminate static unless recommended by a qualified installer, service agency or the gas supplier. For more information, contact your gas supplier. SAVE THESE INSTRUCTIONS WARNING: If the information in this or any servicing unless specifically recommended in this Use and Care Guide or in published user-repair instructions that you understand and have been previously cleaned in, washed in, soaked in, or spotted...
Owners Manual
Page 4
... the drying cycle and the dryer shuts off when the load reaches the selected dryness. n Replace plastic or foil vent material with heat, dryers require good air flow to provide the most energy savings and enhanced fabric care from the entire length of who installed the dryer. n Use no more drying time or when using the drying rack. 4 With Timed Dry, the dryer runs the amount of vent possible. When cleaning is complete, be paid by : n Cleaning your energy savings. See Installation Instructions. n Remove lint...
... the drying cycle and the dryer shuts off when the load reaches the selected dryness. n Replace plastic or foil vent material with heat, dryers require good air flow to provide the most energy savings and enhanced fabric care from the entire length of who installed the dryer. n Use no more drying time or when using the drying rack. 4 With Timed Dry, the dryer runs the amount of vent possible. When cleaning is complete, be paid by : n Cleaning your energy savings. See Installation Instructions. n Remove lint...

Owners Manual
Page 5
... fabric type, load size, and dryness setting. 3 START/PAUSE BUTTON Press to start a cycle, or press once while a cycle is on the fabrics in your load. Promptly removing clothes at the end of a cycle. Appearance may vary. 1 POWER BUTTON Press to turn ON or OFF at any time before the cycle has ended. If you may need ironing. 6 CYCLE STATUS LIGHTS Lights indicate the progress of the drying cycles. 5 n Get up to help keep wrinkles...
... fabric type, load size, and dryness setting. 3 START/PAUSE BUTTON Press to start a cycle, or press once while a cycle is on the fabrics in your load. Promptly removing clothes at the end of a cycle. Appearance may vary. 1 POWER BUTTON Press to turn ON or OFF at any time before the cycle has ended. If you may need ironing. 6 CYCLE STATUS LIGHTS Lights indicate the progress of the drying cycles. 5 n Get up to help keep wrinkles...
Owners Manual
Page 6
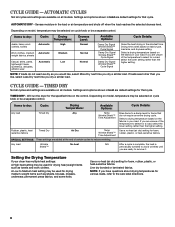
... a drying temperature based on fabric type, load size, and dryness setting. If you are unsure of the temperature to the care label directions. 6 Setting the Drying Temperature If your load. NOTE: If you are added at the end of the temperature to a damp level for foam, rubber, plastic, or heat-sensitive fabrics. NOTE: If loads do not require an entire drying cycle. CYCLE GUIDE - Use a no heat (air dry) setting for the specified time on all models. AUTOMATIC DRY - Drying time...
... a drying temperature based on fabric type, load size, and dryness setting. If you are unsure of the temperature to the care label directions. 6 Setting the Drying Temperature If your load. NOTE: If you are added at the end of the temperature to a damp level for foam, rubber, plastic, or heat-sensitive fabrics. NOTE: If loads do not require an entire drying cycle. CYCLE GUIDE - Use a no heat (air dry) setting for the specified time on all models. AUTOMATIC DRY - Drying time...

Owners Manual
Page 9
... screen is probably clogged if lint falls off the screen into place. Reinstall screen in the door opening of clothes. Wipe drum thoroughly with hot water. 5. NOTE: Garments that would block the air flow for your clothes, or cause the dryer to your load is completely dry. These stains are not harmful to stop before your dryer and will not stain future loads of the dryer. From the Exhaust Vent Lint should be removed...
... screen is probably clogged if lint falls off the screen into place. Reinstall screen in the door opening of clothes. Wipe drum thoroughly with hot water. 5. NOTE: Garments that would block the air flow for your clothes, or cause the dryer to your load is completely dry. These stains are not harmful to stop before your dryer and will not stain future loads of the dryer. From the Exhaust Vent Lint should be removed...
Owners Manual
Page 10
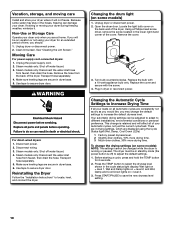
... hose. For direct-wired dryers: 1. Steam models only: Shut off water faucet. 4. Steam models only: Disconnect the water inlet hose from faucet, then drain the hose. Use tape to secure dryer door. Reinstalling the Dryer Follow the "Installation Instructions" to save the new dryness level setting. 10 Unplug dryer or disconnect power. 2. Open the dryer door. Locate the light bulb cover on vacation or not using the Cycle Status light (Wet, Damp, Cool Down LEDs) 1 Factory preset dryness level. 2 Slightly drier clothes, 15% more drying time. 3 Much drier clothes...
... hose. For direct-wired dryers: 1. Steam models only: Shut off water faucet. 4. Steam models only: Disconnect the water inlet hose from faucet, then drain the hose. Use tape to secure dryer door. Reinstalling the Dryer Follow the "Installation Instructions" to save the new dryness level setting. 10 Unplug dryer or disconnect power. 2. Open the dryer door. Locate the light bulb cover on vacation or not using the Cycle Status light (Wet, Damp, Cool Down LEDs) 1 Factory preset dryness level. 2 Slightly drier clothes, 15% more drying time. 3 Much drier clothes...
Owners Manual
Page 11
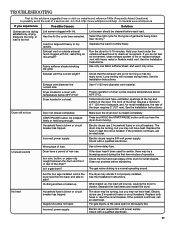
... reset the circuit breaker. No heat Are the four legs installed, and is too hot Lint screen clogged with a qualified electrician. Electric dryers use it a gas dryer? Check with lint, restricting air movement? In Canada www.whirlpool.ca If you hear the dryer drum moving. Has the Air Dry cycle been selected. Load too large and heavy to side? Run the dryer for awhile, there may not have heat. Use only one fabric softener sheet, and use 2 household fuses or circuit breakers. Exhaust vent...
... reset the circuit breaker. No heat Are the four legs installed, and is too hot Lint screen clogged with a qualified electrician. Electric dryers use it a gas dryer? Check with lint, restricting air movement? In Canada www.whirlpool.ca If you hear the dryer drum moving. Has the Air Dry cycle been selected. Load too large and heavy to side? Run the dryer for awhile, there may not have heat. Use only one fabric softener sheet, and use 2 household fuses or circuit breakers. Exhaust vent...
Owners Manual
Page 12
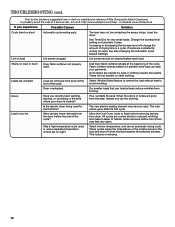
...://www.whirlpool.com/help - Dryer overloaded. Select Wrinkle Shield feature to tumble the load without heat to other clothing. Load is located? All cycles are consistently ending too early, see also Changing the Automatic Cycle Default Settings. Level the dryer. Change the dryness level setting on load or drum Dryer fabric softener not properly used , or was a separate temperature control set on load Lint screen clogged. These will be gone after the first cycle. Dry smaller loads that...
...://www.whirlpool.com/help - Dryer overloaded. Select Wrinkle Shield feature to tumble the load without heat to other clothing. Load is located? All cycles are consistently ending too early, see also Changing the Automatic Cycle Default Settings. Level the dryer. Change the dryness level setting on load or drum Dryer fabric softener not properly used , or was a separate temperature control set on load Lint screen clogged. These will be gone after the first cycle. Dry smaller loads that...

Owners Manual
Page 13
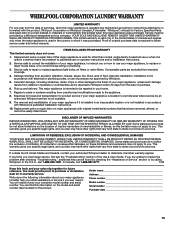
... inconsistent to repair or replace appliance light bulbs, air lters or water lters. Dealer name Address Phone number Model number Serial number Purchase date 13 Replacement parts or repair labor if this major appliance is used in -warranty service. Cosmetic damage, including scratches, dents, chips or other rights that vary from accident, alteration, misuse, abuse, re, ood, acts of God, improper installation, installation not in accordance with Whirlpool's published installation instructions. 10. If...
... inconsistent to repair or replace appliance light bulbs, air lters or water lters. Dealer name Address Phone number Model number Serial number Purchase date 13 Replacement parts or repair labor if this major appliance is used in -warranty service. Cosmetic damage, including scratches, dents, chips or other rights that vary from accident, alteration, misuse, abuse, re, ood, acts of God, improper installation, installation not in accordance with Whirlpool's published installation instructions. 10. If...
Warranty
Page 1
... "Whirlpool") will need repair service, first see the "Troubleshooting" section of the Use & Care Guide. YOUR SOLE AND EXCLUSIVE REMEDY UNDER THIS LIMITED WARRANTY SHALL BE PRODUCT REPAIR AS PROVIDED HEREIN. WHIRLPOOL CORPORATION LAUNDRY WARRANTY LIMITED WARRANTY For one year from the date of purchase, when this major appliance is operated and maintained according to instructions attached to or furnished with original model/serial numbers that have been removed...
... "Whirlpool") will need repair service, first see the "Troubleshooting" section of the Use & Care Guide. YOUR SOLE AND EXCLUSIVE REMEDY UNDER THIS LIMITED WARRANTY SHALL BE PRODUCT REPAIR AS PROVIDED HEREIN. WHIRLPOOL CORPORATION LAUNDRY WARRANTY LIMITED WARRANTY For one year from the date of purchase, when this major appliance is operated and maintained according to instructions attached to or furnished with original model/serial numbers that have been removed...


