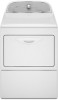
Whirlpool WED5500XW Support Question
Whirlpool WED5500XW Support Question
Find answers below for this question about Whirlpool WED5500XW.Need a Whirlpool WED5500XW manual? We have 4 online manuals for this item!
Question posted by kycwright on November 1st, 2021
What Size Is The Whirlpool Wed5500xw???
What size is the Whirlpool WED5500XW.....7.0, 7.2 or 7.4??
Current Answers
Answer #1: Posted by Technoprince123 on November 1st, 2021 7:03 AM
Technoprince123

Member since:
February 8th, 2021 Points: 1,198,370

Member since:
February 8th, 2021 Points: 1,198,370
https://www.manualslib.com/products/Whirlpool-Wed5500xw-33436.html
https://www.appliancesconnection.com/whirlpool-wed5500xw-i151362.html
Please response if this answer is acceptable and solw your problem thanks
Related Whirlpool WED5500XW Manual Pages
Dimension Guide - Page 1

... provide the straightest and most direct path outdoors. Large opening hamper door
*M ost intallations require a minimum 5 1/2" (140 mm) clearance behind the dryer for planning purposes only. Louvered hood B. Louvered doors with product. Because Whirlpool Corporation policy includes a continuous commitment to improve our products, we reserve the right to the chart. 27" Electric...
Installation Instructions - Page 2
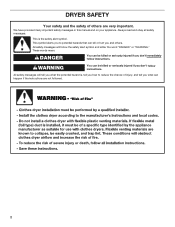
... symbol and either the word "DANGER" or "WARNING." Always read and obey all safety messages.
WARNING
You can happen if the instructions are very important. DRYER SAFETY
Your safety and the safety of injury, and tell you don't follow instructions.
Installation Instructions - Page 3

...listed here.
For further information, please reference the "Assistance or Service" section of the Dryer User Instructions. The kit should be type SRD or SRDT and be at least 4 ft...required tools and parts before purchasing parts. Read and follow the instructions provided with clothes dryers. Check existing electrical supply and venting, and read "Electrical Requirements" and "Venting ...
Installation Instructions - Page 4

...the ground path is adequate.
4 closet or confined area C. Additional installation requirements
This dryer is recommended to open fully. The National Electrical Code requires a 4-wire power supply ... and ordinances. A copy of the above code standards can be large enough to allow the dryer door to reduce noise transfer.
■■ For closet installation, with vents
*Additional spacing...
Installation Instructions - Page 5

...The neutral ground wire is manufactured ready to the neutral conductor (white wire) within the dryer. If using and follow the instructions provided for it here.
■■ If local...kit marked for use aluminum). ■■ At least 5 ft. (1.52 m) long.
If the dryer is installed with a 4-wire electrical supply connection, the neutral ground wire must be removed from the neutral...
Installation Instructions - Page 8
Spade terminals with the dryer cabinet and be in place.
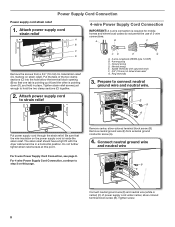
Do not further tighten strain relief screws at this page. Power Supply Cord Connection
Power supply cord strain relief
1.
Prepare ...
Installation Instructions - Page 9
... with upturned ends E. 3/4" (19 mm) UL listed strain relief F. Finally, reinsert tab of terminal block cover into slot of dryer rear panel. Finally, reinsert tab of terminal block cover into slot of dryer rear panel. B
D
E
A
C
GF
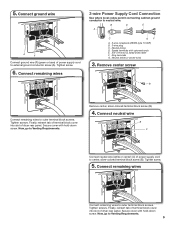
A. 3-wire receptacle (NEMA type 10-30R) B. 3-wire plug C.
Spade terminals with hold -down screw. Remove center...
Installation Instructions - Page 10
... tighten screw.
5. A
3. Cut 11/2" (38 mm) from external ground conductor screw (A).
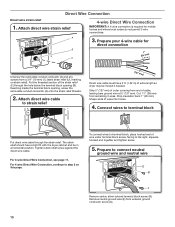
10 To connect wires to terminal block, place hooked end of extra length so dryer may be in a horizontal position. Attach direct wire strain relief
4-wire Direct Wire Connection
IMPORTANT: A 4-wire connection is required for
direct connection
B (251"mm)
C
Unscrew...
Installation Instructions - Page 11
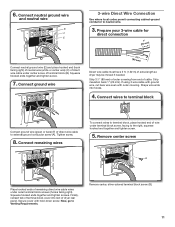
...ground wire, cut bare wire even with hold-down screw. Shape wire ends into slot of dryer rear panel.
Tighten screw.
8. Connect remaining wires
To connect wires to the right, squeeze hooked...green or bare) (F) of remaining direct wire cable wires under center screw of extra length so dryer may be moved if needed. Squeeze hooked ends together and tighten screw.
7. Secure cover with ...
Installation Instructions - Page 17
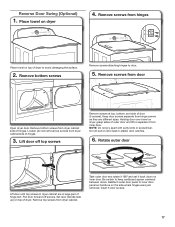
... it 180º and set it from hinge screws as they are in dryer cabinet are different sizes. Remove top screws from dryer cabinet side of hinge slot. Insert 5 door screws.
17 Set door (... door panel to avoid damaging the surface.
2. Loosen (do not remove) top screws from dryer cabinet. NOTE: Do not pry apart with putty knife or screwdriver. Remove bottom screws
Remove screws...
Installation Instructions - Page 20

All rights reserved
® Registered Trademark/TM Trademark of Whirlpool, U.S.A.
2/10 Printed in U.S.A.
W10096988A
W10306460A-SP 2©02010 Whirlpool Corporation.
Owners Manual - Page 4
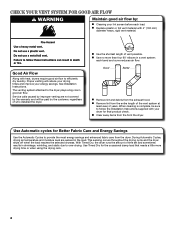
...176; elbows in good air flow. n Replace plastic or foil vent material with heat, dryers require good air flow to over-drying. The venting system attached to provide the most ... Remove lint and debris from the front the dryer.
Service calls caused by improper venting are sensed in shrinkage, wrinkling, and static due to efficiently dry laundry. n Use the shortest length of the vent...
Owners Manual - Page 5

... at any time before the cycle has ended. Drying time will vary based on fabric type, load size, and dryness setting.
3 START/PAUSE BUTTON Press to remove a load of the drying cycles.
... DRY SIGNAL (for models with ACCUDRY™ Control Senses moisture in your laundry load. Appearance may choose a setting based on your dryer. Turn the knob to 60 or 150 minutes for models with two choices...
Owners Manual - Page 6
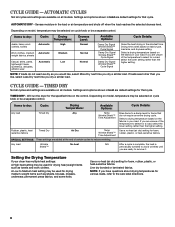
..., plastic, or heat-sensitive fabrics. Use a no heat (air dry) setting for that cycle. Setting the Drying Temperature
If your dryer has multiple heat settings:
A High heat setting may be a separate control. Line dry bonded or laminated fabrics. AUTOMATIC DRY - If... Settings and options shown in your load. Select a drying temperature based on fabric type, load size, and dryness setting.
Owners Manual - Page 7
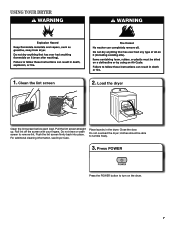
.... Roll lint off the screen with your fingers. Pull the lint screen straight up.
For additional cleaning information, see Dryer Care. USING YOUR DRYER
1. Do not overload the dryer; Clean the lint screen
2. Do not rinse or wash screen to turn on the dryer.
7 Place laundry in the dryer. clothes should be able to tumble freely.
3.
Owners Manual - Page 9

... inside out to remove lint. Doing so can build up . Roll lint off the screen
with your fingers. Reinstall screen in the dryer. This includes clearing piles of laundry in front of the drum and rub with a soft cloth until stain is located in the door opening of clean cloths or towels...
Owners Manual - Page 11
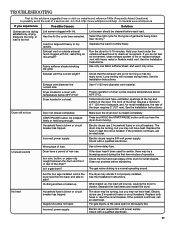
... to dry quickly. Fabric softener sheets blocking the grille. Exhaust vent diameter the correct size.
Replace the fuse or reset the circuit breaker.
If the dryer hasn't been used for most installations, the rear of operation. In Canada www.whirlpool.ca
If you may be a thumping sound during the first few minutes of...
Owners Manual - Page 12
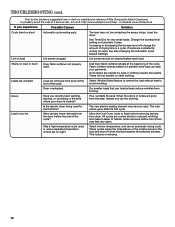
...your garments. Add dryer fabric softener sheets ...area. Were laundry items removed from the dryer before each ... before removing laundry from dryer at the beginning... Automatic Cycles. Level the dryer. Fabric softener sheets added...Dryer fabric softener not properly used , or was a separate temperature control set on high?
Dryer... your dryer is too hot
Is the electric dryer being used...
Owners Manual - Page 13

... your major appliance to repair or replace appliance light bulbs, air lters or water lters. In Canada, call
. You will pay for future reference. WHIRLPOOL CORPORATION LAUNDRY WARRANTY
LIMITED WARRANTY
For one year from the date of purchase, when this major appliance is operated and maintained according to instructions attached to or...
Warranty - Page 1
... this limitation may not apply to you ever need it is installed in an inaccessible location or is not installed in accordance with Whirlpool's published installation instructions.
10. WHIRLPOOL CORPORATION LAUNDRY WARRANTY
LIMITED WARRANTY
For one year from the date of purchase, when this major appliance is operated and maintained according to instructions...
Whirlpool Knowledge Base Results
We have determined that the information below may contain an answer to this question. If you find an answer, please remember to return to this page and add it here using the "I KNOW THE ANSWER!" button above. It's that easy to earn points!-
The amount of water seems too low - Front-load Duet washer
...level on this washer should seem low, because this is empty. Approximately 1/2 inch of the top of water varies by cycle and load size to fill normally. To test for the door to side. Find Manuals & Front-load washer It will remain above the water level... is properly leveled from front to back and side to unlock. Front-load Duet Sport Washer is not cleaning laundry - -
The cycle time is not correct - Cabrio® washer with agitator
... the end of excessive suds or unbalanced load, the Estimated Time Remaining on : detergent type, size and type of load, cycle selection, and household water temperature and pressure. If excessive suds ... an unbalanced load is detected, then the washer will make several attempts to redistribute the laundry load in the suds to the cycle. Display shows an error code - Product Recall... -
Lint is on the load - Front-load washer
... search tips Washer will not start - Sort lint-producing fabrics (towels, chenille) from the laundry load. Also sort by paper or tissues left in the first few washes. video The...Lint is on the load - Lint is on your load size. Front-load washer My front-load washer produces a lot of a dryer removes lint from lint takers (corduroys, synthetics, permanent press...
Similar Questions


Dryer Will Not Turn On.
my dryer wil not turn on. I have checked a fuses and they are good. What's next?
my dryer wil not turn on. I have checked a fuses and they are good. What's next?
(Posted by Dtidavid54 7 years ago)


Can The Whirlpool Wed5500xw Dryer Be Converted To Use The Side Vent?
I purchased the whirlpool side vent kit, but there is not access to the vent on the rear of this dry...
I purchased the whirlpool side vent kit, but there is not access to the vent on the rear of this dry...
(Posted by rmoors 12 years ago)