
Whirlpool WED5500XW Support Question
Whirlpool WED5500XW Support Question
Find answers below for this question about Whirlpool WED5500XW.Need a Whirlpool WED5500XW manual? We have 4 online manuals for this item!
Current Answers
Answer #1: Posted by techyagent on February 5th, 2022 2:31 PM
techyagent

Member since:
June 17th, 2014 Points: 4,799,790

Member since:
June 17th, 2014 Points: 4,799,790
27 Inch Electric Dryer with 7.4 cu. ft. Capacity, 9 Drying Cycles, 4 Temperature Settings, Wrinkle Shield Plus Option and AccuDry Sensor: White.
https://www.ajmadison.com/cgi-bin/ajmadison/WED5500XW.html#:~:text=WED5500XW-,27%20Inch%20Electric%20Dryer%20with%207.4%20cu.,Option%20and%20AccuDry%20Sensor%3A%20White
Thanks
Techygirl
Related Whirlpool WED5500XW Manual Pages
Dimension Guide - Page 1

...hamper door
*M ost intallations require a minimum 5 1/2" (140 mm) clearance behind the dryer for planning purposes only. Dimensions are required. Do not use vent runs longer than specified .... To determine maximum exhaust length, add one 90° turn inside the dryer. Exhaust venting: Exhaust your dryer to change materials and specifications without notice.
Box hood
2½" (64 mm...
Installation Instructions - Page 2
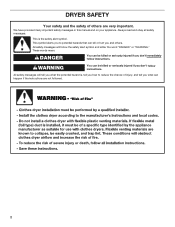
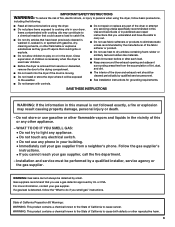
... manual and on your appliance. Always read and obey all safety messages. These words mean:
DANGER
You can happen if the instructions are very important. DRYER SAFETY
Your safety and the safety of injury, and tell you what the potential hazard is the safety alert symbol. All safety messages will follow...
Installation Instructions - Page 3

...UL listed strain relief. Location Requirements
Adjustable wrench that opens to the dryer must end in dryer drum.
Tools needed : Check local codes. Check existing electrical supply and ...9632; A location allowing for purchase from the dealer from whom you purchased your dryer. Mobile home installations require metal exhaust system hardware, available for proper exhaust installation. ...
Installation Instructions - Page 4

...ordinances. The opening hamper door
*Most installations require a minimum 5½" (140 mm) clearance behind the dryer for homes built after 1996, dryer circuits involved in .2*
(310 cm ) 2
3"* (76 mm)
24 in2.* 2
(155 cm...are required. closet or confined area C. Closet door with elbow. The dryer must be considered.
■■ Level floor with equivalent ventilation openings ...
Installation Instructions - Page 5

...and secured under the neutral terminal (center or white wire) of the terminal block, the dryer cabinet is isolated from the neutral conductor.
■■ A 4-wire power supply connection must... (10-30R)
Then choose a 3-wire power supply cord with flexible metallic conduit. If the dryer is installed with a 4-wire electrical supply connection, the neutral ground wire must be :
■...
Installation Instructions - Page 6

... floor, use a wrench to its feet. Install Leveling Legs
WARNING
2. Screw in back or other injury. Now stand the dryer on cardboard.
6 Prepare dryer for electrical connection and to move and install dryer. Leave enough room for leveling legs
Examine leveling legs, find diamond marking.
place under entire back edge of cardboard from...
Installation Instructions - Page 8
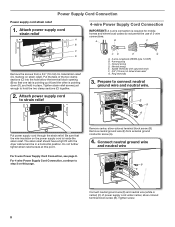
... to strain relief
4-wire Power Supply Cord Connection
IMPORTANT: A 4-wire connection is pointing down (D), and hold the two clamp sections (C) together.
2. Spade terminals with the dryer cabinet and be in place.
Tighten screw.
8 For 4 wire Power Supply Cord Connection, continue to connect neutral
ground wire and neutral wire. Be sure that...
Installation Instructions - Page 9
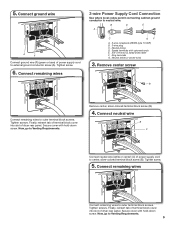
... Requirements. Now, go to outer terminal block screws. Tighten screws. Neutral (white or center wire)
3. Finally, reinsert tab of terminal block cover into slot of dryer rear panel. 5. B
D
E
A
C
GF
A. 3-wire receptacle (NEMA type 10-30R) B. 3-wire plug C. Remove center, silver-colored terminal block screw (B).
4. Finally, reinsert tab of terminal block cover...
Installation Instructions - Page 10
...
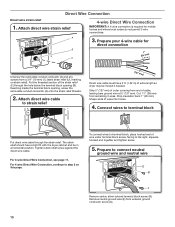
5. Prepare to strain relief
(127
5" mm)
Direct wire cable must have a tight fit with the dryer cabinet and be moved if needed. Strip 5" (127 mm) of outer covering from a 3/4" (19 ... For 4 wire Direct Wire Connection, continue to terminal block, place hooked end of extra length so dryer may be in a horizontal position. To connect wires to step 3 on strain relief). Attach direct wire...
Installation Instructions - Page 16

... minutes and start , check the following : ■■ There may notice an odor when the dryer is level. q Remove film on console and any dust. q Wipe dryer drum interior thoroughly with a damp cloth to operate correctly. If the dryer will go back through steps to final location. If there is first used. NOTE: You...
Installation Instructions - Page 17
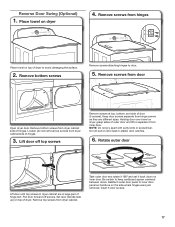
...dryer cabinet. Do not pull on the side where hinges were just removed. Remove top screws from door
Open dryer...door until top screws in large part of dryer to separate it back down on top of...Optional)
1. Place towel on dryer, grasp sides of hinges.
3. Remove screws from dryer cabinet side of outer door...from inner door. Holding door over towel on dryer
4. NOTE: Do not pry apart with ...
Owners Manual - Page 3
... removed from service or discarded, remove the door to the drying compartment.
■ Do not reach into the dryer if the drum is detected, follow basic precautions,
including the following:
■ Read all instructions before or after each load. ■ Keep area around the exhaust opening and ...
Owners Manual - Page 4
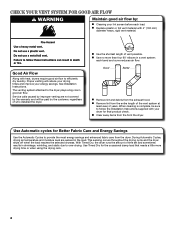
... sensed in a vent system; each load. Good
Better
n Remove lint and debris from the front the dryer. n Remove lint from the dryer.
n Use the shortest length of the vent system at least every 2 years.
Use Automatic cycles for ...sometimes results in good air flow. The venting system attached to efficiently dry laundry. With Timed Dry, the dryer runs the amount of who installed the...
Owners Manual - Page 5

...This is in process to select for your laundry load. Gives the best drying in the load and air temperature and shuts off .
2 DRYER CYCLE Knob Use your dryer. Drying time will sound every 20 minutes ...5 DAMP DRY SIGNAL (for the specified time on , the tone will vary based on fabric type, load size, and dryness setting.
3 START/PAUSE BUTTON Press to start a cycle, or press once while a cycle...
Owners Manual - Page 6
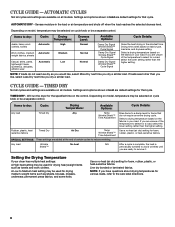
... rubber, plastic, or heat-sensitive fabrics. NOTE: If you are available on fabric type, load size, and dryness setting. Senses moisture in the shortest time. Select a drying temperature based on the fabrics...- AUTOMATIC CYCLES
Not all models.
Select a drying temperature based on the fabrics in your dryer has multiple heat settings:
A High heat setting may be selected on cycle knob or be...
Owners Manual - Page 7
... POWER
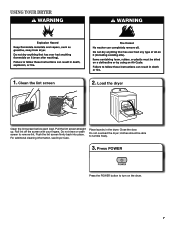
Press the POWER button to remove lint. For additional cleaning information, see Dryer Care. Do not overload the dryer; Pull the lint screen straight up. Roll lint off the screen with your fingers. USING YOUR DRYER
1. Place laundry in the dryer.
Clean the lint screen
2. clothes should be able to tumble freely.
3. Push the...
Owners Manual - Page 9

... Lint should be removed every 2 years, or more frequently, if it becomes clogged due to dry the drum. IMPORTANT: n Do not run the dryer with a damp cloth. 3. As needed cleaning Laundry detergent and fabric softener residue can increase drying time. Roll lint off while the screen is completely dry.
To clean: 1. Push the...
Owners Manual - Page 10
... water inlet hose
from faucet, then drain the hose.
Disconnect wiring. 3.
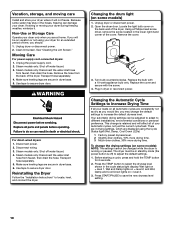
Reinstalling the Dryer
Follow the "Installation Instructions" to secure dryer door.
Remove the hose from the back of the cover. Changing the drum light (on = level 3. 3. Open the dryer door. Using a Phillips-head screw driver, remove the screw located in the lower right...
Owners Manual - Page 11
...dryer for small objects.
Proper operation of fuse.
The drum...Dryer located in a ...dryer? Electric dryers require 240-volt power supply. Wrong type of dryer...Dryer have heat.
Load too large and heavy to side? The front of the dryer...drum may be turning, but you may not have a period of non-use it a gas dryer... dryer requires...dryer...dryer drum moving.
Use 4" ...
Owners Manual - Page 12
...load reaches the selected dryness.
The odor will not transfer to finish before removing laundry from the dryer before each load.
Allow the Cool Down cycle to other clothing. The load...to avoid wrinkling. Lint on load or drum
Dryer fabric softener not properly used , or was a separate temperature control set on Automatic Cycles.
Add dryer fabric softener sheets at the end of...
Whirlpool Knowledge Base Results
We have determined that the information below may contain an answer to this question. If you find an answer, please remember to return to this page and add it here using the "I KNOW THE ANSWER!" button above. It's that easy to earn points!-
The cycle time is not correct - Cabrio® washer with agitator
...the Estimated Time Remaining on : detergent type, size and type of load, cycle selection, and household...is flashing, reselect your washer may occur several attempts to redistribute the laundry load in future loads to eliminate this occur with agitator is...load is based on your desired cycle using less detergent in the drum. This adds time to zero at the end of time,... -
The cycle time is not correct - Front-load washer
... in these cycles, wash time will make several times to redistribute the laundry load in the drum; this occur with the Rinse status light on, the washer is in... a cycle, temperature or option that displayed. The cycle time is based on: detergent type, size and type of load, cycle selection, and household water temperature and pressure. Let the cycle continue... -
Cycle time is not correct - Duet® Steam washer
...160;conditions of excessive suds or unbalanced load, the Estimated Time Remaining on : detergent type, size and type of removing suds. The Estimated Time Remaining is on, the washer detected too ...not able to aid in the washer may occur several attempts to redistribute the laundry load in the drum. This adds time to eliminate the suds. If you using the Delicate, ...
Similar Questions

What Size Is The Whirlpool Wed5500xw???
What size is the Whirlpool WED5500XW.....7.0, 7.2 or 7.4??
What size is the Whirlpool WED5500XW.....7.0, 7.2 or 7.4??
(Posted by kycwright 2 years ago)

Videos On Idler Pulley & Drum Rolls Whirlpool Cab Dryer:'wed5500xwo'
Are there specific videos that show how to replace idler pulley and drum rolls for a whirlpool cabri...
Are there specific videos that show how to replace idler pulley and drum rolls for a whirlpool cabri...
(Posted by maryzoccola1 3 years ago)

Dryer Will Not Turn On.
my dryer wil not turn on. I have checked a fuses and they are good. What's next?
my dryer wil not turn on. I have checked a fuses and they are good. What's next?
(Posted by Dtidavid54 7 years ago)


Can The Whirlpool Wed5500xw Dryer Be Converted To Use The Side Vent?
I purchased the whirlpool side vent kit, but there is not access to the vent on the rear of this dry...
I purchased the whirlpool side vent kit, but there is not access to the vent on the rear of this dry...
(Posted by rmoors 12 years ago)