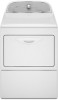
Whirlpool WED5500XW Support Question
Whirlpool WED5500XW Support Question
Find answers below for this question about Whirlpool WED5500XW.Need a Whirlpool WED5500XW manual? We have 4 online manuals for this item!
Question posted by maryzoccola1 on December 13th, 2020
Videos On Idler Pulley & Drum Rolls Whirlpool Cab Dryer:'wed5500xwo'
Are there specific videos that show how to replace idler pulley and drum rolls for a whirlpool cabrio dryer "wed5500xwo"?Specifically, I want to make sure I don't damage the dryer, by taking it apart unnecessarily.Thanks!Mary
Current Answers
Answer #1: Posted by Odin on December 13th, 2020 12:27 PM
Odin

Member since:
April 10th, 2010 Points: 41,236,690

Member since:
April 10th, 2010 Points: 41,236,690
See https://ishort.ink/fKH4. If necessary, go to other links provided there.
Hope this is useful. Please don't forget to click the Accept This Answer button if you do accept it. My aim is to provide reliable helpful answers, not just a lot of them. See https://www.helpowl.com/profile/Odin.
Related Whirlpool WED5500XW Manual Pages
Dimension Guide - Page 1

...ventilation openings are for the exhaust vent with product. Specifications subject to change without notice. Exhaust hood styles: B
4"
C
A
(102 mm)
Dryer dimensions
OVERALL DIMENSIONS
43 " (1092 mm)
23 ...exhaust. Because Whirlpool Corporation policy includes a continuous commitment to improve our products, we reserve the right to change materials and specifications without notice....
Installation Instructions - Page 2
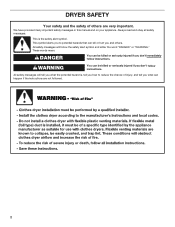
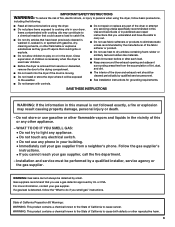
DRYER SAFETY
Your safety and the safety of injury, and tell you what the potential hazard is the safety alert symbol. This symbol alerts you to ...
Installation Instructions - Page 3

... 120/240 volt minimum. For further information, please reference the "Assistance or Service" section of the Dryer User Instructions. Tools needed : Check local codes. Location Requirements
Adjustable wrench that opens to the dryer must end in dryer drum. See "Venting Requirements." ■■ A separate 30 amp circuit.
3 Mobile home installations require metal exhaust system...
Installation Instructions - Page 4

...or sleeping quarters. The installation must be sure that the ground path is your local building inspector.
Connect to introduce outside air into the dryer. closet or confined area C. Electrical ... servicing.
■■ Additional clearances might be required for purchase from your dryer at temperatures below 45°F (7°C).
Wide opening side-swing door B....
Installation Instructions - Page 5

...from the neutral conductor.
■■ A 4-wire power supply connection must be used when the dryer is prohibited. All current-carrying wires must match power supply (4-wire or 3-wire) and be:
...wire to the neutral wire, see "Optional 3-wire connection" section.
■■ This dryer is isolated from the external ground connector screw (green screw), and secured under the neutral ...
Installation Instructions - Page 6

... marking
1.
Screw legs into leg holes by hand, use a large flat piece of dryer. To avoid damaging floor, use a wrench to finish turning legs until it is no longer visible. Failure to move and install dryer. Now stand the dryer on cardboard.
6 Screw in leveling legs
Excessive Weight Hazard Use two or more people...
Installation Instructions - Page 8
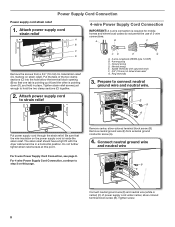
...
CD
E
G
A. 4-wire receptacle (NEMA type 14-30R) B. 4-prong plug C. Neutral prong E. Be sure that one tab is pointing up (A) and the other is pointing down (D), and hold the two clamp sections (C)...screw (A).
4.
Do not further tighten strain relief screws at this page. Spade terminals with the dryer cabinet and be in place. E
B
A
Put power supply cord through the strain relief. ...
Installation Instructions - Page 9
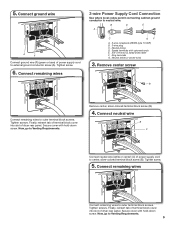
... neutral wire. Secure cover with upturned ends E. 3/4" (19 mm) UL listed strain relief F. Tighten screws. Finally, reinsert tab of terminal block cover into slot of dryer rear panel. Secure cover with hold -down screw. Finally, reinsert tab of terminal block cover into slot of...
Installation Instructions - Page 10
..., continue to strain relief
(127
5" mm)
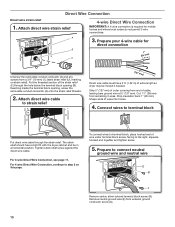
Direct wire cable must have a tight fit with the dryer cabinet and be moved if needed. Direct Wire Connection
Direct wire strain relief
1. Remove neutral ground wire ... block opening (B). To connect wires to terminal block, place hooked end of extra length so dryer may be in a horizontal position. The strain relief should have 5 ft. (1.52 m) ...
Installation Instructions - Page 11
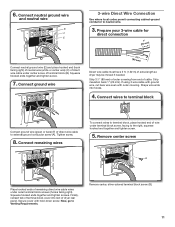
...tab of terminal block cover into hooks.
4. Strip 31/2" (89 mm) of outer covering from end of dryer rear panel. Squeeze hooked ends together and tighten screws. Prepare your 3-wire cable for
direct connection
(251"... to terminal block, place hooked end of extra length so dryer may be moved if needed. Secure cover with outer covering. Remove center, silver-colored terminal block screw...
Installation Instructions - Page 13

...extended and supported in :
Moisture damage to seal all governing codes and ordinances. WARNING: To reduce the risk of fire, this dryer MUST BE
EXHAUSTED OUTDOORS. Replace plastic or metal foil vents with...;■ Must be at least 12" (305 mm) from entire length of the system and make sure exhaust hood is not plugged with lint.
Only rigid or flexible metal vent shall be used for exhausting...
Installation Instructions - Page 15
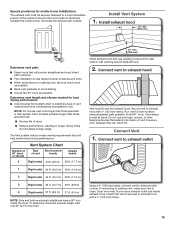
... times and increased energy usage. Dryer vent must fit over dryer exhaust outlet and inside the dryer. Special provisions for best drying performance: ■■ Use following Vent system chart to determine type of vent
material and hood combinations acceptable to use.
Use clamps to existing vent, make sure vent is secured to exhaust hood...
Installation Instructions - Page 16

... you do not feel heat, cancel cycle and close the door.
q Check dryer's final location.
This odor is common when the heating element is in your tools. The odor will not start the dryer. Level Dryer
1. Once legs are level, make sure all parts are snug against the ground before tightening them. q Check that all...
Installation Instructions - Page 17
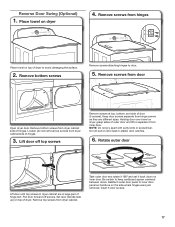
...top screws
Remove screws at top, bottom, and side of dryer to avoid damaging the surface.
2. Remove bottom screws
Remove screws attaching hinges ...dryer cabinet side of hinges.
3. Be certain to inner door panel so handle is on top of hinge slot. Take outer door and rotate it 180º and set it from hinges
Place towel on inner door. Lift door off screws. NOTE: Do not pry apart...
Owners Manual - Page 3
...Do not reach into the dryer if the drum is moving.
■ Do not install or store the dryer where it will be performed ...in , or spotted with cooking oils may result causing property damage, personal injury or death.
- Items contaminated with gasoline, ....
■ Do not repair or replace any part of the dryer or attempt any servicing unless specifically recommended in this manual is detected,...
Owners Manual - Page 7
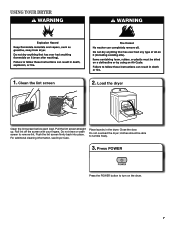
Roll lint off the screen with your fingers. Push the lint screen firmly back into place. Do not overload the dryer; Pull the lint screen straight up. Close the door. clothes should be able to turn on the dryer.
7 USING YOUR DRYER
1. For additional cleaning information, see Dryer Care. Place laundry in the dryer. Press POWER
Press the...
Owners Manual - Page 9

...: 1. Scrub lint screen with your fingers. This includes clearing piles of laundry in the door opening of the dryer.
Cleaning the lint screen
Every load cleaning The lint screen is located in front of the dryer.
This buildup can build up . Roll lint off the screen into place.
Pull the lint screen straight up...
Owners Manual - Page 10
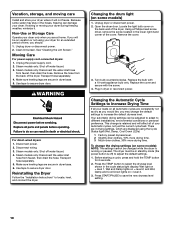
...conditions or personal preference. For direct-wired dryers: 1. Disconnect wiring. 3. Turn bulb counterclockwise. Your automatic drying settings can damage your dryer where it . Transport hose separately. ...Make sure leveling legs are at home.
Locate the light bulb cover on = level 3. 3. The dryer must be adjusted to adapt to adjust the default settings. 1. Reinstalling the Dryer...
Owners Manual - Page 11
... or flexible metal vent. Proper operation of fuse.
Make sure the dryer door is too hot
Lint screen clogged with a qualified electrician.
11 Electric dryers require 240-volt power supply.
Incorrect power supply. The dryer may be a thumping sound during the first few minutes of operation. Replace both fuses or reset the circuit breaker.
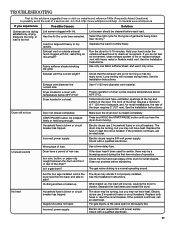
TROUBLESHOOTING
First...
Owners Manual - Page 12
...Were laundry items removed from dryer.
Select a lower temperature, and use an automatic drying cycle.
Lint on Automatic Cycles. Add dryer fabric...? Loads are cooled slowly to reduced wrinkling and make it easier to possibly avoid the cost of the... set on load or drum
Dryer fabric softener not properly used for very small loads. In Canada www.whirlpool.ca
If you recently been...
Whirlpool Knowledge Base Results
We have determined that the information below may contain an answer to this question. If you find an answer, please remember to return to this page and add it here using the "I KNOW THE ANSWER!" button above. It's that easy to earn points!-
Display shows AF - Dryer
...is less than 4 elbows. Make sure the outside exhaust hood clogged with lint? Kinked or crushed exhaust vent material slows moist air from the inside the dryer drum. This slows moist ...use it only once. Remove any fabric softener sheets from leaving the dryer and extends drying time. Replace any plastic or metal foil vent with rigid or flexible heavy metal vent.... -
Damp loads or long drying times - Dryer
... hood clogged with rigid or flexible heavy metal vent. Please take longer to be in a garage or on dryer use it only once. Remove any plastic or metal foil vent with lint and restricting air movement? Were you drying a large load? Make sure that the louvers or flapper door easily open and close... -
Loads are wrinkled - Top-load HE washer with Dispenser Drawer
...video Not rinsing well - sound clips Large loads increase the likelihood of time after the end of new wrinkles when the load spins. Make sure...HE washer with Dispenser Drawer The loads from the dryer to get the best performance from the load. Remove ...to promptly remove loads from my Cabrio High Efficiency washer are wrinkled - video Loads are wrinkled. Top-load HE washer...
Similar Questions

Dryer Takes Too Long To Dry Clothes
Have to set dryer to one setting for towels to dry any type load . After cycle of 54 minutes is done...
Have to set dryer to one setting for towels to dry any type load . After cycle of 54 minutes is done...
(Posted by plazajoe 7 years ago)

Dryer Won't Shut Off.
My dryer is OFF but will not stop tumbling. I'm trying to find out what could be causing this??? Any...
My dryer is OFF but will not stop tumbling. I'm trying to find out what could be causing this??? Any...
(Posted by lmbutler73 8 years ago)

Why Does My Dryer Take So Long To Dry?
I have to dry my clothes for 2 cycles on the "timed drying" cycle @ maximum dry time for my clothes ...
I have to dry my clothes for 2 cycles on the "timed drying" cycle @ maximum dry time for my clothes ...
(Posted by zmoua00 11 years ago)

Can The Whirlpool Wed5500xw Dryer Be Converted To Use The Side Vent?
I purchased the whirlpool side vent kit, but there is not access to the vent on the rear of this dry...
I purchased the whirlpool side vent kit, but there is not access to the vent on the rear of this dry...
(Posted by rmoors 12 years ago)