Owners Manual
Page 1
... complete model number and serial number. WARNING You can find this manual and on the model and serial number label, located at the top inside dryer door well. You can be killed or seriously injured if you what can kill or hurt you what the potential hazard is the safety alert... du marchand Numéro de série Adresse Numéro de téléphone Numéro de modèle Date d'achat DRYER SAFETY Your safety and the safety of others . We have provided many important safety messages in -warranty service. This symbol alerts you to help you...
... complete model number and serial number. WARNING You can find this manual and on the model and serial number label, located at the top inside dryer door well. You can be killed or seriously injured if you what can kill or hurt you what the potential hazard is the safety alert... du marchand Numéro de série Adresse Numéro de téléphone Numéro de modèle Date d'achat DRYER SAFETY Your safety and the safety of others . We have provided many important safety messages in -warranty service. This symbol alerts you to help you...
Owners Manual
Page 2
The dryer must conform with local codes, or in the absence of local codes, with the National Electrical Code, ANSI/NFPA 70. 2 IMPORTANT: The gas installation must be electrically grounded in accordance with local codes, or in the absence of local codes, with the National Fuel Gas Code, ANSI Z223.1/NFPA 54.
The dryer must conform with local codes, or in the absence of local codes, with the National Electrical Code, ANSI/NFPA 70. 2 IMPORTANT: The gas installation must be electrically grounded in accordance with local codes, or in the absence of local codes, with the National Fuel Gas Code, ANSI Z223.1/NFPA 54.
Owners Manual
Page 3
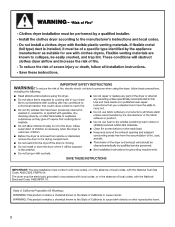
...elbows in a vent system; See Installation Instructions. Do not use a plastic vent. When cleaning is detected, follow the Installation Instructions supplied with your dryer for Good Air Flow Along with 4" (102 mm) diameter heavy, rigid vent material. Follow the gas supplier's instructions. • If you smell ... more information, contact your gas supplier. Check Your Vent System for final product check. ■■ Clear away items from the front the dryer. 3 WHAT TO DO IF YOU SMELL GAS: • Do not try to do not use any phone in your building. • ...
...elbows in a vent system; See Installation Instructions. Do not use a plastic vent. When cleaning is detected, follow the Installation Instructions supplied with your dryer for Good Air Flow Along with 4" (102 mm) diameter heavy, rigid vent material. Follow the gas supplier's instructions. • If you smell ... more information, contact your gas supplier. Check Your Vent System for final product check. ■■ Clear away items from the front the dryer. 3 WHAT TO DO IF YOU SMELL GAS: • Do not try to do not use any phone in your building. • ...
Owners Manual
Page 4
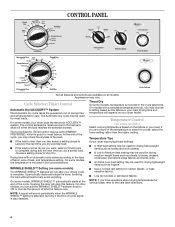
...SHIELD™ automatically starts at the end of drying time and enhances fabric care. If you are available on the fabrics in your dryer uses the electronic ACCUDRY™ system. Cycle Selector (Timer) Control Automatic Dry/ACCUDRY™ System The Automatic dry cycle takes the ...blouses, dresses, underwear, permanent press fabrics, and some models) Select a drying temperature based on all models. It periodically starts and stops the dryer, tumbling the load without heat to Very Dry. NOTE: A signal will stop this feature. The Automatic Dry cycle may vary. At the end...
...SHIELD™ automatically starts at the end of drying time and enhances fabric care. If you are available on the fabrics in your dryer uses the electronic ACCUDRY™ system. Cycle Selector (Timer) Control Automatic Dry/ACCUDRY™ System The Automatic dry cycle takes the ...blouses, dresses, underwear, permanent press fabrics, and some models) Select a drying temperature based on all models. It periodically starts and stops the dryer, tumbling the load without heat to Very Dry. NOTE: A signal will stop this feature. The Automatic Dry cycle may vary. At the end...
Owners Manual
Page 5
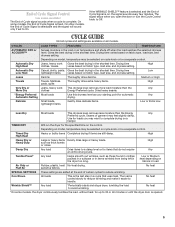
... load Air Only or Fluff Air Rubber, plastic, heat No-heat drying. No heat Wrinkle Shield™ Any load *Periodically starts and stops dryer, tumbling the load to a damp level or for items that uses heat. The signal stops when you may feel slightly damp. CYCLE GUIDE ... or be a separate control. Depending on model, temperature may be selected on cycle knob or be a separate control. On some models, the dryer continuously tumbles the load, without heat, for automatic Any drying. sensitive fabrics No heat SPECIAL SETTINGS These settings are added at the end of Cycle...
... load Air Only or Fluff Air Rubber, plastic, heat No-heat drying. No heat Wrinkle Shield™ Any load *Periodically starts and stops dryer, tumbling the load to a damp level or for items that uses heat. The signal stops when you may feel slightly damp. CYCLE GUIDE ... or be a separate control. Depending on model, temperature may be selected on cycle knob or be a separate control. On some models, the dryer continuously tumbles the load, without heat, for automatic Any drying. sensitive fabrics No heat SPECIAL SETTINGS These settings are added at the end of Cycle...
Owners Manual
Page 6
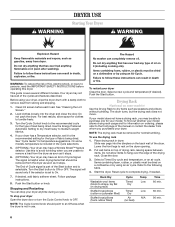
... different models. See "Cleaning the Lint Screen." 2. Turn the Cycle Control knob to medium-weight fabrics. 4. To stop your dryer Open the dryer door or turn the Cycle Control knob to follow these instructions can result in death, explosion, or fire. Fire Hazard No washer... SAFETY INSTRUCTIONS before each load. Place drying rack in use the drying rack 1. Start the dryer. Do not pack the dryer. Push the Start button. WARNING DRYER USE Starting Your Dryer WARNING Explosion Hazard Keep flammable materials and vapors, such as sweaters and pillows without tumbling. For...
... different models. See "Cleaning the Lint Screen." 2. Turn the Cycle Control knob to medium-weight fabrics. 4. To stop your dryer Open the dryer door or turn the Cycle Control knob to follow these instructions can result in death, explosion, or fire. Fire Hazard No washer... SAFETY INSTRUCTIONS before each load. Place drying rack in use the drying rack 1. Start the dryer. Do not pack the dryer. Push the Start button. WARNING DRYER USE Starting Your Dryer WARNING Explosion Hazard Keep flammable materials and vapors, such as sweaters and pillows without tumbling. For...
Owners Manual
Page 7
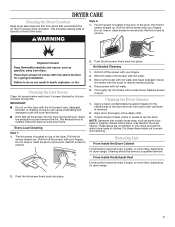
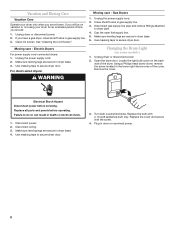
... Inside the Exhaust Vent Lint should be done by lint can cause overheating and damage to remove. 1. Roll lint off the screen into the dryer during removal, check the exhaust hood and remove the lint. A screen blocked by a qualified servicer. Do not rinse or wash screen to avoid...Cleaning the Lint Screen Clean lint screen before each load. NOTE: Garments that would block the air flow for proper dryer operation. DRYER CARE Cleaning the Dryer Location Keep dryer area clear and free from items that contain loose dyes, such as denim blue jeans or brightly colored cotton items,...
... Inside the Exhaust Vent Lint should be done by lint can cause overheating and damage to remove. 1. Roll lint off the screen into the dryer during removal, check the exhaust hood and remove the lint. A screen blocked by a qualified servicer. Do not rinse or wash screen to avoid...Cleaning the Lint Screen Clean lint screen before each load. NOTE: Garments that would block the air flow for proper dryer operation. DRYER CARE Cleaning the Dryer Location Keep dryer area clear and free from items that contain loose dyes, such as denim blue jeans or brightly colored cotton items,...
Owners Manual
Page 8
...bulb with the screw. 4. Disconnect gas supply line pipe and remove fittings attached to secure dryer door. Use masking tape to dryer pipe. 4. Disconnect wiring. 3. Use masking tape to secure dryer door. Replace the cover and secure with a 10-watt appliance bulb only. WARNING Electrical ...-hand corner of the cover. Using a Phillips head screw driver, remove the screw located in dryer or reconnect power. 8 Turn bulb counterclockwise. Unplug dryer or disconnect power. 2. Open the dryer door. If you will be on some models) 1. Unplug the power supply cord. 2. Make...
...bulb with the screw. 4. Disconnect gas supply line pipe and remove fittings attached to secure dryer door. Use masking tape to dryer pipe. 4. Disconnect wiring. 3. Use masking tape to secure dryer door. Replace the cover and secure with a 10-watt appliance bulb only. WARNING Electrical ...-hand corner of the cover. Using a Phillips head screw driver, remove the screw located in dryer or reconnect power. 8 Turn bulb counterclockwise. Unplug dryer or disconnect power. 2. Open the dryer door. If you will be on some models) 1. Unplug the power supply cord. 2. Make...
Owners Manual
Page 9
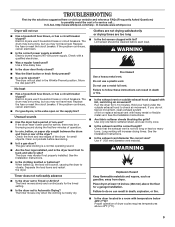
... (Frequently Asked Questions) to possibly avoid the cost of dryer cycles requires temperatures above 45ºF (7ºC). 9 http://www.whirlpool.com/help - In Canada www.whirlpool.ca Dryer will increase drying times. Electric dryers require 240-volt power supply. The dryer will bounce, causing the dryer to side? Electric dryers use a metal foil vent. The drum may not...
... (Frequently Asked Questions) to possibly avoid the cost of dryer cycles requires temperatures above 45ºF (7ºC). 9 http://www.whirlpool.com/help - In Canada www.whirlpool.ca Dryer will increase drying times. Electric dryers require 240-volt power supply. The dryer will bounce, causing the dryer to side? Electric dryers use a metal foil vent. The drum may not...
Owners Manual
Page 10
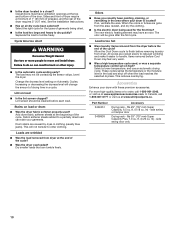
...; Have you recently been painting, staining, or varnishing in a cycle. The odor will change the amount of the cycle? ■■ Was the dryer overloaded? ft. (0.20 cu. m) - Closet doors must have an odor. Lint on Automatic Cycles. Drum stains are wrinkled ■■ Was the... load removed from the dryer before Cool Down may have ventilation openings at the beginning of garments being used ? If so, ventilate the area. Part Number 3404351 3406839 Accessory ...
...; Have you recently been painting, staining, or varnishing in a cycle. The odor will change the amount of the cycle? ■■ Was the dryer overloaded? ft. (0.20 cu. m) - Closet doors must have an odor. Lint on Automatic Cycles. Drum stains are wrinkled ■■ Was the... load removed from the dryer before Cool Down may have ventilation openings at the beginning of garments being used ? If so, ventilate the area. Part Number 3404351 3406839 Accessory ...


