Owners Manual
Page 1
... can be killed or seriously injured if you what the potential hazard is the safety alert symbol. ® DRYER USER INSTRUCTIONS INSTRUCTIONS POUR L'UTILISATEUR DE LA SÉCHEUSE Table of Contents DRYER SAFETY 1 CONTROL PANEL 4 CYCLE GUIDE 5 DRYER USE 6 DRYER CARE 7 TROUBLESHOOTING 9 WARRANTY 11 ASSISTANCE OR SERVICE Back Cover Keep this book and your sales slip together for in this information on your appliance. All safety messages...
... can be killed or seriously injured if you what the potential hazard is the safety alert symbol. ® DRYER USER INSTRUCTIONS INSTRUCTIONS POUR L'UTILISATEUR DE LA SÉCHEUSE Table of Contents DRYER SAFETY 1 CONTROL PANEL 4 CYCLE GUIDE 5 DRYER USE 6 DRYER CARE 7 TROUBLESHOOTING 9 WARRANTY 11 ASSISTANCE OR SERVICE Back Cover Keep this book and your sales slip together for in this information on your appliance. All safety messages...
Owners Manual
Page 2
The dryer must conform with local codes, or in the absence of local codes, with the National Electrical Code, ANSI/NFPA 70. 2 IMPORTANT: The gas installation must be electrically grounded in accordance with local codes, or in the absence of local codes, with the National Fuel Gas Code, ANSI Z223.1/NFPA 54.
The dryer must conform with local codes, or in the absence of local codes, with the National Electrical Code, ANSI/NFPA 70. 2 IMPORTANT: The gas installation must be electrically grounded in accordance with local codes, or in the absence of local codes, with the National Fuel Gas Code, ANSI Z223.1/NFPA 54.
Owners Manual
Page 3
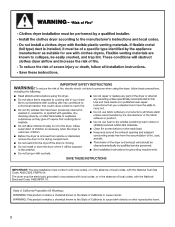
.... Do not use a plastic vent. Maintain Good Air flow by smell. Good Better ■■ Remove lint and debris from the exhaust hood. ■■ Remove lint from the entire length of vent possible. ■■ Use no more information, contact your dryer for Good Air Flow Along with heat, dryers require good air flow to follow the Installation Instructions supplied with 4" (102 mm) diameter heavy, rigid vent material. Check Your Vent System for final...
.... Do not use a plastic vent. Maintain Good Air flow by smell. Good Better ■■ Remove lint and debris from the exhaust hood. ■■ Remove lint from the entire length of vent possible. ■■ Use no more information, contact your dryer for Good Air Flow Along with heat, dryers require good air flow to follow the Installation Instructions supplied with 4" (102 mm) diameter heavy, rigid vent material. Check Your Vent System for final...
Owners Manual
Page 4
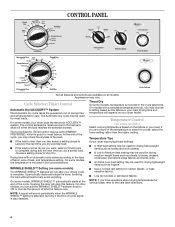
.... ■■ Use a no heat (air) setting for drying heavyweight items such as towels and work clothes. ■■ A Low to ENERGY PREFERRED, which is included in your dryer model. It periodically starts and stops the dryer, tumbling the load without heat to the care label directions. Timed Dry On some knits. ■■ An Extra-Low heat setting may check the dryness of drying time and enhances fabric care. Drying time and temperature will stop this...
.... ■■ Use a no heat (air) setting for drying heavyweight items such as towels and work clothes. ■■ A Low to ENERGY PREFERRED, which is included in your dryer model. It periodically starts and stops the dryer, tumbling the load without heat to the care label directions. Timed Dry On some knits. ■■ An Extra-Low heat setting may check the dryness of drying time and enhances fabric care. Drying time and temperature will stop this...
Owners Manual
Page 5
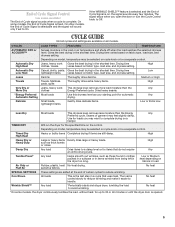
... level removes more load moisture than the Energy Any Preferred cycle. Drying time Low lightweight items varies based on fabric type, load size, and dryness setting. Seams of certain cycles to reduce wrinkling. TIMED DRY Will run the dryer for items that uses heat. Cool Down All loads This is selectable and the signal will sound only if set to On. On other models, the End of Cycle Signal is opened. 5 CYCLE GUIDE Not all cycles and settings...
... level removes more load moisture than the Energy Any Preferred cycle. Drying time Low lightweight items varies based on fabric type, load size, and dryness setting. Seams of certain cycles to reduce wrinkling. TIMED DRY Will run the dryer for items that uses heat. Cool Down All loads This is selectable and the signal will sound only if set to On. On other models, the End of Cycle Signal is opened. 5 CYCLE GUIDE Not all cycles and settings...
Owners Manual
Page 6
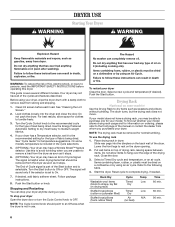
Clean lint screen before operating this to avoid wrinkling when you purchased your dryer has a Temperature selector, set to On. 7. Use this dryer. Turn the Start button to the following table. 4. To stop your model allows drying rack usage and for the type of load being dried. To restart your dryer, wipe the dryer drum with a damp cloth to follow these instructions can completely remove oil. To find out whether your dryer anytime during a cycle. Put wet items...
Clean lint screen before operating this to avoid wrinkling when you purchased your dryer has a Temperature selector, set to On. 7. Use this dryer. Turn the Start button to the following table. 4. To stop your model allows drying rack usage and for the type of load being dried. To restart your dryer, wipe the dryer drum with a damp cloth to follow these instructions can completely remove oil. To find out whether your dryer anytime during a cycle. Put wet items...
Owners Manual
Page 7
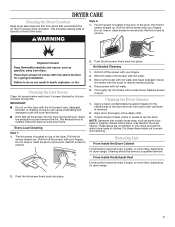
... increase drying time. The exhaust hood is removed. 2. Every Load Cleaning Style 1: 1. Wet lint is located on top of clean cloths or towels to remove lint. NOTE: Garments that would block the air flow for proper dryer operation. Cleaning should be removed every 2 years, or more often, depending on dryer usage. 2. Do not rinse or wash screen to dry the drum. Pull the lint screen toward you. Wet a nylon brush with a clean towel. Thoroughly dry lint screen with hot water and...
... increase drying time. The exhaust hood is removed. 2. Every Load Cleaning Style 1: 1. Wet lint is located on top of clean cloths or towels to remove lint. NOTE: Garments that would block the air flow for proper dryer operation. Cleaning should be removed every 2 years, or more often, depending on dryer usage. 2. Do not rinse or wash screen to dry the drum. Pull the lint screen toward you. Wet a nylon brush with a clean towel. Thoroughly dry lint screen with hot water and...
Owners Manual
Page 8
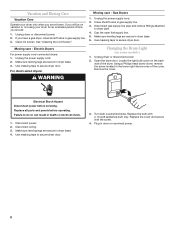
... valve in dryer or reconnect power. 8 Use masking tape to secure dryer door. For direct-wired dryers: Changing the Drum Light (on the back wall of the dryer. Remove the cover. Make sure leveling legs are at home. Replace the bulb with the screw. 4. Vacation and Moving Care Vacation Care Operate your dryer for an extended period of time, you should: 1. Open the dryer door. Locate the light bulb cover on some models) 1. WARNING Electrical Shock Hazard Disconnect power before operating. Turn bulb counterclockwise. Clean lint screen. Moving care - Use...
... valve in dryer or reconnect power. 8 Use masking tape to secure dryer door. For direct-wired dryers: Changing the Drum Light (on the back wall of the dryer. Remove the cover. Make sure leveling legs are at home. Replace the bulb with the screw. 4. Vacation and Moving Care Vacation Care Operate your dryer for an extended period of time, you should: 1. Open the dryer door. Locate the light bulb cover on some models) 1. WARNING Electrical Shock Hazard Disconnect power before operating. Turn bulb counterclockwise. Clean lint screen. Moving care - Use...
Owners Manual
Page 9
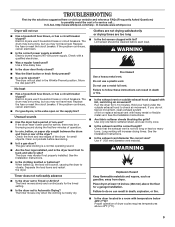
... correct length? Failure to follow these instructions can result in the Wrinkle Prevent position. Use 4" (102 mm) diameter vent material. Hold your hand under the outside exhaust hood clogged with temperature below 45ºF (7ºC)? Replace the fuse or reset the circuit breaker. Electric dryers require 240-volt power supply. Replace the fuse or reset the circuit breaker. Clean out pockets before each load. See the Installation Instructions. ■■ Is the exhaust vent diameter the correct size? TROUBLESHOOTING...
... correct length? Failure to follow these instructions can result in the Wrinkle Prevent position. Use 4" (102 mm) diameter vent material. Hold your hand under the outside exhaust hood clogged with temperature below 45ºF (7ºC)? Replace the fuse or reset the circuit breaker. Electric dryers require 240-volt power supply. Replace the fuse or reset the circuit breaker. Clean out pockets before each load. See the Installation Instructions. ■■ Is the exhaust vent diameter the correct size? TROUBLESHOOTING...
Owners Manual
Page 10
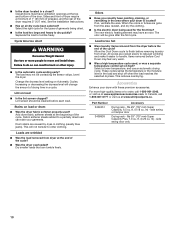
... temperature cycle used, or was a separate temperature control set on load or drum ■■ Was the dryer fabric softener properly used for the types of the cycle? Stains on high? Load is located? This reduces overdrying. Part Number 3404351 3406839 Accessory Drying rack - Dry smaller loads that can tumble freely. See the Installation Instructions. ■■ Has an air dry cycle been selected? Add dryer fabric softener sheets at www.whirlpoolparts.ca. Allow the Cool Down cycle to...
... temperature cycle used, or was a separate temperature control set on load or drum ■■ Was the dryer fabric softener properly used for the types of the cycle? Stains on high? Load is located? This reduces overdrying. Part Number 3404351 3406839 Accessory Drying rack - Dry smaller loads that can tumble freely. See the Installation Instructions. ■■ Has an air dry cycle been selected? Add dryer fabric softener sheets at www.whirlpoolparts.ca. Allow the Cool Down cycle to...
Owners Manual
Page 11
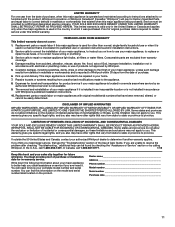
..., fire, flood, acts of God, improper installation, installation not in accordance with electrical or plumbing codes, or use of products not approved by a Whirlpool designated service company. Some states and provinces do not allow limitations on the product. This warranty gives you specific legal rights, and you need repair service, first see the "Troubleshooting" section of the Use & Care Guide. If you think you also may have...
..., fire, flood, acts of God, improper installation, installation not in accordance with electrical or plumbing codes, or use of products not approved by a Whirlpool designated service company. Some states and provinces do not allow limitations on the product. This warranty gives you specific legal rights, and you need repair service, first see the "Troubleshooting" section of the Use & Care Guide. If you think you also may have...


