Owners Manual
Page 1
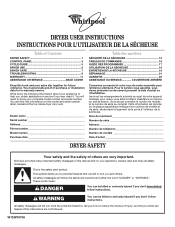
You will need it. You can find this manual and on the model and serial number label, located at the top inside dryer door well. Pour le service sous garantie, vous devez présenter un document prouvant la date d'achat ou d'installation. This is , tell you how ... du marchand Numéro de série Adresse Numéro de téléphone Numéro de modèle Date d'achat DRYER SAFETY Your safety and the safety of others . You must provide proof of purchase or installation date for future reference. Cette information est donné...
You will need it. You can find this manual and on the model and serial number label, located at the top inside dryer door well. Pour le service sous garantie, vous devez présenter un document prouvant la date d'achat ou d'installation. This is , tell you how ... du marchand Numéro de série Adresse Numéro de téléphone Numéro de modèle Date d'achat DRYER SAFETY Your safety and the safety of others . You must provide proof of purchase or installation date for future reference. Cette information est donné...
Owners Manual
Page 4
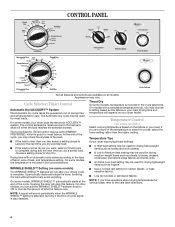
... an automatic cycle varies according to the care label directions. Temperature Tips If your dryer model. On some models, temperature is complete. Opening the door will depend on your dryer has multiple heat settings: ■■ A High heat setting may be used for drying heavyweight items such as towels and work clothes. ■■...
... an automatic cycle varies according to the care label directions. Temperature Tips If your dryer model. On some models, temperature is complete. Opening the door will depend on your dryer has multiple heat settings: ■■ A High heat setting may be used for drying heavyweight items such as towels and work clothes. ■■...
Owners Manual
Page 5
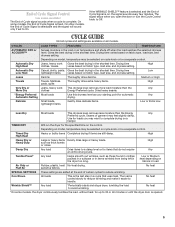
...lightweight items varies based on , the signal sounds every few minutes. Low or Medium heat depending on fabrics in the dryer too long. No heat *On some models, the dryer continuously tumbles the load, without heat, for the specified time on the control. Small loads, lightweight items Gently dries...in the shortest time. No heat Wrinkle Shield™ Any load *Periodically starts and stops dryer, tumbling the load to 30 or 40 minutes or until the dryer door is opened. 5 Depending on model, temperature may feel slightly damp. Gives the best drying in a cycle that do not ...
...lightweight items varies based on , the signal sounds every few minutes. Low or Medium heat depending on fabrics in the dryer too long. No heat *On some models, the dryer continuously tumbles the load, without heat, for the specified time on the control. Small loads, lightweight items Gently dries...in the shortest time. No heat Wrinkle Shield™ Any load *Periodically starts and stops dryer, tumbling the load to 30 or 40 minutes or until the dryer door is opened. 5 Depending on model, temperature may feel slightly damp. Gives the best drying in a cycle that do not ...
Owners Manual
Page 6
... rack in death or fire. Select a Timed Dry cycle and temperature, or an air cycle. Start the dryer. Load clothes loosely into the dimples on a clothesline or by using your model. If desired, add fabric softener sheet. Follow package instructions. 8. Lower the front legs to rest on it... cycle for the type of the cycles and features described. Use this dryer. Stopping and Restarting You can result in dryer. Rack Dry Washable wool items (block to avoid wrinkling when you purchased your model does not have all of fabric being dried. Clean lint screen before ...
... rack in death or fire. Select a Timed Dry cycle and temperature, or an air cycle. Start the dryer. Load clothes loosely into the dimples on a clothesline or by using your model. If desired, add fabric softener sheet. Follow package instructions. 8. Lower the front legs to rest on it... cycle for the type of the cycles and features described. Use this dryer. Stopping and Restarting You can result in dryer. Rack Dry Washable wool items (block to avoid wrinkling when you purchased your model does not have all of fabric being dried. Clean lint screen before ...
Owners Manual
Page 8
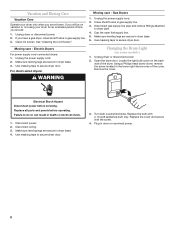
... the open fuel supply line. 5. Make sure leveling legs are secure in dryer base. 4. Make sure leveling legs are secure in gas supply line. 3. Use masking tape to secure dryer door. 3. For direct-wired dryers: Changing the Drum Light (on some models) 1. WARNING Electrical Shock Hazard Disconnect power before operating. Disconnect wiring. 3. Make sure...
... the open fuel supply line. 5. Make sure leveling legs are secure in dryer base. 4. Make sure leveling legs are secure in gas supply line. 3. Use masking tape to secure dryer door. 3. For direct-wired dryers: Changing the Drum Light (on some models) 1. WARNING Electrical Shock Hazard Disconnect power before operating. Disconnect wiring. 3. Make sure...


