

Use & Care Guide
Page 10
... "Cleaning the Lint Screen." Changing the drum light (on vacation or not using your dryer only when you should: 1. Replace all parts and panels before servicing. Use tape to dryer pipe. 4. Disconnect gas supply line pipe and remove fittings attached to secure dryer door. WARNING Electrical Shock Hazard Disconnect power before operating. Failure to...
... "Cleaning the Lint Screen." Changing the drum light (on vacation or not using your dryer only when you should: 1. Replace all parts and panels before servicing. Use tape to dryer pipe. 4. Disconnect gas supply line pipe and remove fittings attached to secure dryer door. WARNING Electrical Shock Hazard Disconnect power before operating. Failure to...
Installation Guide
Page 4
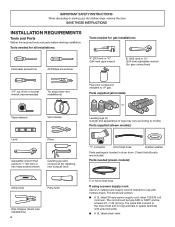
... included. Check that all models): or Leveling legs (4) (Length and appearance of legs may vary according to the dryer must end in dryer drum. Parts needed for gas installations: Flat-blade screwdriver #2 Phillips screwdriver 8" (203 mm) or 10" (254 mm) pipe wrench 8" (... wrench that connect to model) Parts supplied (steam models): "Y" connector Short inlet hose Rubber washer Parts package is located in ring terminals or spade terminals with clothes dryers. INSTALLATION REQUIREMENTS Tools and Parts Gather the required tools and parts before starting installation. The kit ...
... included. Check that all models): or Leveling legs (4) (Length and appearance of legs may vary according to the dryer must end in dryer drum. Parts needed for gas installations: Flat-blade screwdriver #2 Phillips screwdriver 8" (203 mm) or 10" (254 mm) pipe wrench 8" (... wrench that connect to model) Parts supplied (steam models): "Y" connector Short inlet hose Rubber washer Parts package is located in ring terminals or spade terminals with clothes dryers. INSTALLATION REQUIREMENTS Tools and Parts Gather the required tools and parts before starting installation. The kit ...
Installation Guide
Page 5
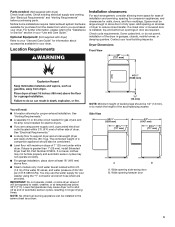
..., or sleeping quarters. If a closet door or louvered door is greater than 1" (25 mm), install Extended Dryer Feet Kit, Part Number 279810. Contact your dryer. If not level, clothes may not tumble properly and automatic sensor cycles may not operate correctly. ■■...needed for proper exhaust installation. See "Electrical Requirements" and "Venting Requirements" before purchasing parts. The combined weight of a companion appliance should be considered. ■■ Level floor with dryer) Check local codes. NOTE: No other fuel-burning appliance can be installed in door...
..., or sleeping quarters. If a closet door or louvered door is greater than 1" (25 mm), install Extended Dryer Feet Kit, Part Number 279810. Contact your dryer. If not level, clothes may not tumble properly and automatic sensor cycles may not operate correctly. ■■...needed for proper exhaust installation. See "Electrical Requirements" and "Venting Requirements" before purchasing parts. The combined weight of a companion appliance should be considered. ■■ Level floor with dryer) Check local codes. NOTE: No other fuel-burning appliance can be installed in door...

Installation Guide
Page 6
... Home Standard CAN/CSA-Z240 MH. ■■ Metal exhaust system hardware, available for mobile home installations. For gas dryers mobile home installations: ■■ Mobile Home Installation Hold-down Kit Part Number W10432680 is available to order. For further information, see "Assistance or Service" section in the top and bottom of...
... Home Standard CAN/CSA-Z240 MH. ■■ Metal exhaust system hardware, available for mobile home installations. For gas dryers mobile home installations: ■■ Mobile Home Installation Hold-down Kit Part Number W10432680 is available to order. For further information, see "Assistance or Service" section in the top and bottom of...

Installation Guide
Page 8
...dryer: This dryer... be provided. 8 This dryer is recommended. CANADA ONLY ELECTRICAL REQUIREMENTS GAS DRYER POWER HOOKUP - A time...Cord intended to whether the dryer is also recommended that a separate circuit serving only this dryer be obtained from: Canadian...to an individual branch circuit. ■■ This dryer is recommended. A time-delay fuse or circuit ... a path of the line. WARNING: Improper connection of dryer's final location. 4-wire receptacle (14-30R) ■&#... dryer: if it is within reach of the equipment- U.S.A. SAVE THESE INSTRUCTIONS ELECTRIC DRYER ...
...dryer: This dryer... be provided. 8 This dryer is recommended. CANADA ONLY ELECTRICAL REQUIREMENTS GAS DRYER POWER HOOKUP - A time...Cord intended to whether the dryer is also recommended that a separate circuit serving only this dryer be obtained from: Canadian...to an individual branch circuit. ■■ This dryer is recommended. A time-delay fuse or circuit ... a path of the line. WARNING: Improper connection of dryer's final location. 4-wire receptacle (14-30R) ■&#... dryer: if it is within reach of the equipment- U.S.A. SAVE THESE INSTRUCTIONS ELECTRIC DRYER ...
Installation Guide
Page 18
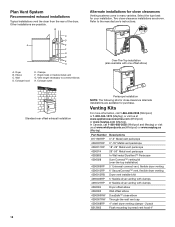
... many varieties. Venting Kits For more information, call 1-800-688-2002 (Whirlpool and Maytag) or visit us at www.whirlpoolparts.ca (Whirlpool) or www.maytag.ca (Maytag). Plan Vent System Recommended exhaust installations Typical installations vent the dryer from the rear of the dryer. Dryer B. Part Number Descriptions 8171587RP 0"-5" Metal vent periscope 4396037RP 0"-18" Metal vent...
... many varieties. Venting Kits For more information, call 1-800-688-2002 (Whirlpool and Maytag) or visit us at www.whirlpoolparts.ca (Whirlpool) or www.maytag.ca (Maytag). Plan Vent System Recommended exhaust installations Typical installations vent the dryer from the rear of the dryer. Dryer B. Part Number Descriptions 8171587RP 0"-5" Metal vent periscope 4396037RP 0"-18" Metal vent...
Installation Guide
Page 22
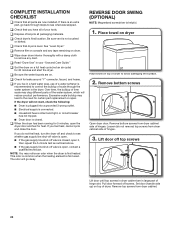
...is helpful. 1. Set door (handle side up) on a full heat cycle (not an air cycle) for certain part replacement or repair. Place towel on dryer Place towel on dryer. ❑ Wipe dryer drum interior thoroughly with a damp cloth to see what was skipped. ❑ Check that you feel heat, turn... the dryer off valve is an extra part, go away. Pull door forward off valve is open , contact a qualified technician. COMPLETE INSTALLATION CHECKLIST ❑ Check that all of your "...
...is helpful. 1. Set door (handle side up) on a full heat cycle (not an air cycle) for certain part replacement or repair. Place towel on dryer Place towel on dryer. ❑ Wipe dryer drum interior thoroughly with a damp cloth to see what was skipped. ❑ Check that you feel heat, turn... the dryer off valve is an extra part, go away. Pull door forward off valve is open , contact a qualified technician. COMPLETE INSTALLATION CHECKLIST ❑ Check that all of your "...


