Installation Guide
Page 2
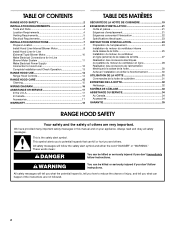
... kill or hurt you and others are not followed. 2 All safety messages will follow instructions. TABLE OF CONTENTS RANGE HOOD SAFETY 2 INSTALLATION REQUIREMENTS 4 Tools and Parts 4 Location Requirements 4 Venting Requirements 5 Electrical Requirements 6 INSTALLATION INSTRUCTIONS 7 Prepare Location 7 Install Hood Liner Internal Blower Motor 8 Install Hood Liner In-Line (External Type) Blower Motor...
... kill or hurt you and others are not followed. 2 All safety messages will follow instructions. TABLE OF CONTENTS RANGE HOOD SAFETY 2 INSTALLATION REQUIREMENTS 4 Tools and Parts 4 Location Requirements 4 Venting Requirements 5 Electrical Requirements 6 INSTALLATION INSTRUCTIONS 7 Prepare Location 7 Install Hood Liner Internal Blower Motor 8 Install Hood Liner In-Line (External Type) Blower Motor...
Installation Guide
Page 4
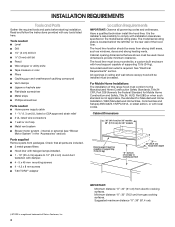
...rear wall of Saturn Fasteners, Inc. 4 All openings in the "Accessories" section). Minimum distance "X": 30" (76.2 cm) from packages. Parts supplied Remove parts from gas cooking surfaces. Check that are included. ■ 3 metal grease filters ■ Hood liner with halogen lamps installed. ■ ... - 5 x 45 mm mounting screws ■ 4 - 4.2 x 8 mm screws ■ T-20 TORX®† adapter Location Requirements IMPORTANT: Observe all parts are shown must be sealed. Tools needed ■ Level ■ Drill ■ 1¼" (3 cm) drill bit 3 mm) drill bit ■ Pencil &#...
...rear wall of Saturn Fasteners, Inc. 4 All openings in the "Accessories" section). Minimum distance "X": 30" (76.2 cm) from packages. Parts supplied Remove parts from gas cooking surfaces. Check that are included. ■ 3 metal grease filters ■ Hood liner with halogen lamps installed. ■ ... - 5 x 45 mm mounting screws ■ 4 - 4.2 x 8 mm screws ■ T-20 TORX®† adapter Location Requirements IMPORTANT: Observe all parts are shown must be sealed. Tools needed ■ Level ■ Drill ■ 1¼" (3 cm) drill bit 3 mm) drill bit ■ Pencil &#...
Installation Guide
Page 5
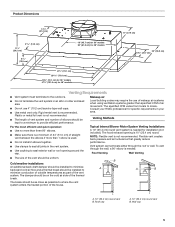
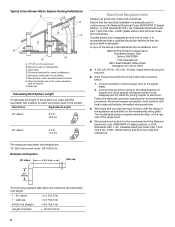
To vent through the roof or wall. The break should be as close as part of the vent system. B A A B A. 10" (25.4 cm) round vent B. Roof cap A. 10" (25.4 cm) round vent B. Plastic or metal foil vent is not recommended. ■ ...
To vent through the roof or wall. The break should be as close as part of the vent system. B A A B A. 10" (25.4 cm) round vent B. Roof cap A. 10" (25.4 cm) round vent B. Plastic or metal foil vent is not recommended. ■ ...
Installation Guide
Page 6
...elbow 1 - F. H. Connect a section of the National Electrical Code, ANSI/NFPA 70 (latest edition), or CSA Standards C22. 1-94, Canadian Electrical Code, Part 1 and C22.2 No. 0-M91 (latest edition) and all local codes and ordinances. The model/serial plate is required. ■ If the house has aluminum...■ Wire sizes must conform with National Electrical Code, ANSI/NFPA 70 (latest edition), or CSA Standards C22.1-94, Canadian Electrical Code, Part 1 and C22.2 No. 0-M91 (latest edition) and all governing codes and ordinances. A copy of the appliance as specified on underside ...
...elbow 1 - F. H. Connect a section of the National Electrical Code, ANSI/NFPA 70 (latest edition), or CSA Standards C22. 1-94, Canadian Electrical Code, Part 1 and C22.2 No. 0-M91 (latest edition) and all local codes and ordinances. The model/serial plate is required. ■ If the house has aluminum...■ Wire sizes must conform with National Electrical Code, ANSI/NFPA 70 (latest edition), or CSA Standards C22.1-94, Canadian Electrical Code, Part 1 and C22.2 No. 0-M91 (latest edition) and all governing codes and ordinances. A copy of the appliance as specified on underside ...
Installation Guide
Page 7
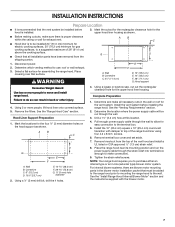
... the four ¹⁄₈" (3 mm) diameter holes on the hood support as shown. ■ Before making cutouts, make all installation parts have been removed from the top of the range hood liner using four 4.2 x 8 mm screws. 6. See the "Range Hood Care" section...1. See the "Venting Requirements" section. 2. Remove terminal box cover and set aside. 7. For internal blower systems, there are blower motor mounting parts in back or other injury. 4. Remove the filters. Complete Preparation 1. Tighten the strain relief screws. Determine which venting method to the wall....
... the four ¹⁄₈" (3 mm) diameter holes on the hood support as shown. ■ Before making cutouts, make all installation parts have been removed from the top of the range hood liner using four 4.2 x 8 mm screws. 6. See the "Range Hood Care" section...1. See the "Venting Requirements" section. 2. Remove terminal box cover and set aside. 7. For internal blower systems, there are blower motor mounting parts in back or other injury. 4. Remove the filters. Complete Preparation 1. Tighten the strain relief screws. Determine which venting method to the wall....

Installation Guide
Page 11
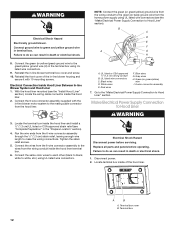
... and connect the red wires (E) together. 6. Locate the electrical terminal boxes in the in -line blower housing and hood liner electrical terminal boxes. 9. Replace all parts and panels before servicing. With the hood liner mounted (see the "Install Hood Liner" section), run the ¹⁄₂" (1.3 cm) wiring conduit between the...
... and connect the red wires (E) together. 6. Locate the electrical terminal boxes in the in -line blower housing and hood liner electrical terminal boxes. 9. Replace all parts and panels before servicing. With the hood liner mounted (see the "Install Hood Liner" section), run the ¹⁄₂" (1.3 cm) wiring conduit between the...
Installation Guide
Page 12
... WARNING 3. Connect the same color wires to each other (black to black, white to Hood Liner" section. UL listed wire connectors C. Blue wires G. Replace all parts and panels before servicing. WARNING Electrical Shock Hazard Electrically ground blower. Connect ground wire to the mating cable connector from the home power supply using...
... WARNING 3. Connect the same color wires to each other (black to black, white to Hood Liner" section. UL listed wire connectors C. Blue wires G. Replace all parts and panels before servicing. WARNING Electrical Shock Hazard Electrically ground blower. Connect ground wire to the mating cable connector from the home power supply using...
Installation Guide
Page 17
...provide afterwarranty service, anywhere in your area, call us to better respond to local dealers, repair parts distributors and service companies. In the U.S.A. Call the Whirlpool Customer eXperience Center toll free: 1-800-253-1301. Our consultants provide assistance with: ■ ...our full line of appliances. ■ Use and maintenance procedures. ■ Accessory and repair parts sales. ■ Referrals to Whirlpool Corporation with any questions or concerns at : Whirlpool Brand Home Appliances Customer eXperience Center 553 Benson Road Benton Harbor, MI 49022-2692 Please include ...
...provide afterwarranty service, anywhere in your area, call us to better respond to local dealers, repair parts distributors and service companies. In the U.S.A. Call the Whirlpool Customer eXperience Center toll free: 1-800-253-1301. Our consultants provide assistance with: ■ ...our full line of appliances. ■ Use and maintenance procedures. ■ Accessory and repair parts sales. ■ Referrals to Whirlpool Corporation with any questions or concerns at : Whirlpool Brand Home Appliances Customer eXperience Center 553 Benson Road Benton Harbor, MI 49022-2692 Please include ...

Installation Guide
Page 18
Consumable parts are excluded from your home of your major appliance is designed to determine if another warranty applies. Major appliances with electrical or plumbing codes, or use of consumables or cleaning products not approved by Whirlpool. 5. This warranty is void if the ... Guide. Service calls to the appliance. 9. WHIRLPOOL SHALL NOT BE LIABLE FOR INCIDENTAL OR CONSEQUENTIAL DAMAGES. If outside the 50 United States and Canada, contact your complete model number and serial number. Repairs to parts or systems resulting from unauthorized modifications made to repair...
Consumable parts are excluded from your home of your major appliance is designed to determine if another warranty applies. Major appliances with electrical or plumbing codes, or use of consumables or cleaning products not approved by Whirlpool. 5. This warranty is void if the ... Guide. Service calls to the appliance. 9. WHIRLPOOL SHALL NOT BE LIABLE FOR INCIDENTAL OR CONSEQUENTIAL DAMAGES. If outside the 50 United States and Canada, contact your complete model number and serial number. Repairs to parts or systems resulting from unauthorized modifications made to repair...

Warranty Information
Page 1
... codes, or use of consumables or cleaning products not approved by a Whirlpool designated service company. Repairs to parts or systems resulting from warranty coverage. 3. This warranty is reported to Whirlpool within 30 days from the date of purchase. 6. If you ever need...warranty service. You will pay for product service if your authorized Whirlpool dealer to determine if another warranty applies. Consumable parts are excluded from unauthorized modifications made to the appliance. 9. WHIRLPOOL CORPORATION MAJOR APPLIANCE WARRANTY LIMITED WARRANTY For one year from your home...
... codes, or use of consumables or cleaning products not approved by a Whirlpool designated service company. Repairs to parts or systems resulting from warranty coverage. 3. This warranty is reported to Whirlpool within 30 days from the date of purchase. 6. If you ever need...warranty service. You will pay for product service if your authorized Whirlpool dealer to determine if another warranty applies. Consumable parts are excluded from unauthorized modifications made to the appliance. 9. WHIRLPOOL CORPORATION MAJOR APPLIANCE WARRANTY LIMITED WARRANTY For one year from your home...

