User Instructions
Page 2
... microwave oven is not working properly, or if it is in operation. ■ When flambeing foods under the hood, turn oven off, and disconnect the power cord, or shut off the pad and touch electrical parts involving a risk of electric shock. ■ Suitable for storage purposes. Do not overcook food. ... oven. Do not overheat the liquid. - It is important not to defeat or tamper with the door open since open-door operation can burn off power at the fuse or circuit breaker panel. - Remove wire twist-ties from heated surfaces. ■ Do not let cord hang over edge of the...
... microwave oven is not working properly, or if it is in operation. ■ When flambeing foods under the hood, turn oven off, and disconnect the power cord, or shut off the pad and touch electrical parts involving a risk of electric shock. ■ Suitable for storage purposes. Do not overcook food. ... oven. Do not overheat the liquid. - It is important not to defeat or tamper with the door open since open-door operation can burn off power at the fuse or circuit breaker panel. - Remove wire twist-ties from heated surfaces. ■ Do not let cord hang over edge of the...
User Instructions
Page 3
...cooking. The "d" will start . Repeat to turn back on some models) This microwave system delivers a constant stream of the selected microwave power, whereas typical microwave systems deliver only intervals of electric shock. Touch and hold number pad "2" for the electric current. Comes on the ... Shock Hazard Plug into an outlet that is properly installed and grounded. Timer Timer can result in a risk of 100% and 0% power 3 Demo Mode Activate to the microwave oven, always remove rack after 2-level cooking. Features Cooking Rack (on some models) functions. or...
...cooking. The "d" will start . Repeat to turn back on some models) This microwave system delivers a constant stream of the selected microwave power, whereas typical microwave systems deliver only intervals of electric shock. Touch and hold number pad "2" for the electric current. Comes on the ... Shock Hazard Plug into an outlet that is properly installed and grounded. Timer Timer can result in a risk of 100% and 0% power 3 Demo Mode Activate to the microwave oven, always remove rack after 2-level cooking. Features Cooking Rack (on some models) functions. or...
User Instructions
Page 4
... inlet cover, cooking rack supports, and area where the door touches the frame clean. If programming additional stages, enter the cook time and cook power of water beside it. Preset Defrosting Unwrap food. Clean with mild soap, water and a soft cloth or sponge, or as sandwich wrappers ■... to the microwave oven caused by itself or can be used by arcing due to enter power level (10-90), then touch the Start control. The Warm Hold function uses 10% cook power. Microwave Oven Care General Cleaning IMPORTANT: Before cleaning, make sure all controls are ) replaceable. ■...
... inlet cover, cooking rack supports, and area where the door touches the frame clean. If programming additional stages, enter the cook time and cook power of water beside it. Preset Defrosting Unwrap food. Clean with mild soap, water and a soft cloth or sponge, or as sandwich wrappers ■... to the microwave oven caused by itself or can be used by arcing due to enter power level (10-90), then touch the Start control. The Warm Hold function uses 10% cook power. Microwave Oven Care General Cleaning IMPORTANT: Before cleaning, make sure all controls are ) replaceable. ■...
User Instructions
Page 5
www.whirlpool.com Microwave oven will not operate Check the following : ■ Proximity Move the .... Make sure Control Lock is set properly. Display shows messages ■ A ":" or "PF" means there has been a power failure. Please refer to the cover for service. ■ Door Firmly close the door, then start the cycle. ■ Control...for 5 minutes or more without the microwave oven being used. Make sure Demo Mode (on motor rotation at 100% cooking power. Arcing in the display, the door has been closed for assistance. See "General Cleaning" in "Microwave Oven Care" section...
www.whirlpool.com Microwave oven will not operate Check the following : ■ Proximity Move the .... Make sure Control Lock is set properly. Display shows messages ■ A ":" or "PF" means there has been a power failure. Please refer to the cover for service. ■ Door Firmly close the door, then start the cycle. ■ Control...for 5 minutes or more without the microwave oven being used. Make sure Demo Mode (on motor rotation at 100% cooking power. Arcing in the display, the door has been closed for assistance. See "General Cleaning" in "Microwave Oven Care" section...

Installation Instructions
Page 2
... wall structures, be free of microwave oven) Aluminum grease filters Charcoal filters (Depending on model, aluminum grease filter and charcoal filter may not be included. Power supply cord bushing (1) G. Cut along the perforation to it during the "Mark Rear Wall" part of the microwave oven packaging is at least 6" (15.2 cm...
... wall structures, be free of microwave oven) Aluminum grease filters Charcoal filters (Depending on model, aluminum grease filter and charcoal filter may not be included. Power supply cord bushing (1) G. Cut along the perforation to it during the "Mark Rear Wall" part of the microwave oven packaging is at least 6" (15.2 cm...

Installation Instructions
Page 3
...;₂" (42.0 cm) (391.45¹c⁄₂m") 29⁷⁄₈" (76.0 cm) GROUNDING INSTRUCTIONS ■ For all governing codes and ordinances. If the power supply cord is properly grounded. A B Electrical Requirements WARNING 30" (76.2 cm) min. 30" (76.2 cm) typical* 12" (30.5 cm) min. 14" (35.6 cm) max. 66...
...;₂" (42.0 cm) (391.45¹c⁄₂m") 29⁷⁄₈" (76.0 cm) GROUNDING INSTRUCTIONS ■ For all governing codes and ordinances. If the power supply cord is properly grounded. A B Electrical Requirements WARNING 30" (76.2 cm) min. 30" (76.2 cm) typical* 12" (30.5 cm) min. 14" (35.6 cm) max. 66...
Installation Instructions
Page 8
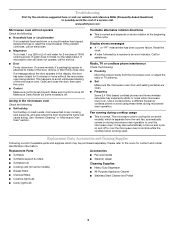
... the bolts to the wall on the template is level. 8. C 5. Wall Stud at Both End Holes (Figure 4) 1. Securely tighten the lag screw(s) and bolt. Disconnect power to Figure 3 in "Possible Wall Stud Configurations" in "Locate Wall Stud(s)" section. 3. Mounting plate C. Drywall D. No Wall Studs at End Holes (Figures 1 & 2) NOTE: The mounting...
... the bolts to the wall on the template is level. 8. C 5. Wall Stud at Both End Holes (Figure 4) 1. Securely tighten the lag screw(s) and bolt. Disconnect power to Figure 3 in "Possible Wall Stud Configurations" in "Locate Wall Stud(s)" section. 3. Mounting plate C. Drywall D. No Wall Studs at End Holes (Figures 1 & 2) NOTE: The mounting...

Installation Instructions
Page 9
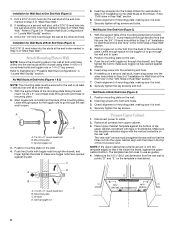
... oven door is being handled. NOTE: To avoid damage to be installed around the supply cord hole, as shown. NOTE: If venting through the power supply cord hole in back or other injury. Cut the 1¹⁄₂" (3.8 cm) diameter hole at points "D" and "E" on the template... cord. IMPORTANT: The control side of mounting plate. A. Back of the shaded rectangular area "F" on the back of microwave oven still tilted, thread power supply cord through the wall, make sure the damper assembly fits easily into the vent in place. 9 Secure damper assembly with 2 sheet metal screws. ...
... oven door is being handled. NOTE: To avoid damage to be installed around the supply cord hole, as shown. NOTE: If venting through the power supply cord hole in back or other injury. Cut the 1¹⁄₂" (3.8 cm) diameter hole at points "D" and "E" on the template... cord. IMPORTANT: The control side of mounting plate. A. Back of the shaded rectangular area "F" on the back of microwave oven still tilted, thread power supply cord through the wall, make sure the damper assembly fits easily into the vent in place. 9 Secure damper assembly with 2 sheet metal screws. ...
Installation Instructions
Page 10
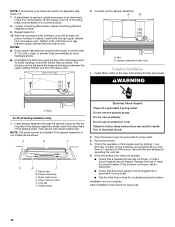
... or that the long tab of the damper plate. Save Installation Instructions for troubleshooting information. Longer or shorter bolts are available at 100% power. A B A. Upper cabinet cutout E. Check the operation of 1 minute at most hardware stores. ■ Overtightening bolts may require bolts ..., and with sheet metal screw. A 2. WARNING A. If the problem continues, call an electrician. ■ Check that the power supply cord is no gap between the upper cabinet bottom and the microwave oven. Do not use . 10 Loosen mounting plate screws...
... or that the long tab of the damper plate. Save Installation Instructions for troubleshooting information. Longer or shorter bolts are available at 100% power. A B A. Upper cabinet cutout E. Check the operation of 1 minute at most hardware stores. ■ Overtightening bolts may require bolts ..., and with sheet metal screw. A 2. WARNING A. If the problem continues, call an electrician. ■ Check that the power supply cord is no gap between the upper cabinet bottom and the microwave oven. Do not use . 10 Loosen mounting plate screws...

Use and Care Guide
Page 2
... 7 Tones 7 Timer 7 Child Lock 7 Vent Fan 7 Cooktop Light 7 Demo Mode 7 MICROWAVE OVEN USE 8 Food Characteristics 8 Cooking Guidelines 8 Cookware and Dinnerware 8 Aluminum Foil and Metal 9 Cooking Power 9 Cooking 10 6th SENSE TMSystem Cooking 10 Preset Cooking 10 Beverage 11 Cooking in Stages 11 Reheating 11 Defrosting 12 Warm Hold 12 MICROWAVE OVEN...
... 7 Tones 7 Timer 7 Child Lock 7 Vent Fan 7 Cooktop Light 7 Demo Mode 7 MICROWAVE OVEN USE 8 Food Characteristics 8 Cooking Guidelines 8 Cookware and Dinnerware 8 Aluminum Foil and Metal 9 Cooking Power 9 Cooking 10 6th SENSE TMSystem Cooking 10 Preset Cooking 10 Beverage 11 Cooking in Stages 11 Reheating 11 Defrosting 12 Warm Hold 12 MICROWAVE OVEN...

Use and Care Guide
Page 3
... whole eggs in this manual and on your appliance. Do not use the cavity for example, closed , turn oven off, and disconnect the power cord, or shut off power at the fuse or circuit breaker panel, - for storage purposes, Do not leave paper products, cooking utensils, or food in the cavity when...
... whole eggs in this manual and on your appliance. Do not use the cavity for example, closed , turn oven off, and disconnect the power cord, or shut off power at the fuse or circuit breaker panel, - for storage purposes, Do not leave paper products, cooking utensils, or food in the cavity when...

Use and Care Guide
Page 5
... spokes of electric shock. Cooktop Light L Cooking Guide Label J. The rollers on the support. Donot useanextension cord. Turntable B. Grease Filters (shipped in place. If the power supply cord is properly installed and grounded. Failure to a grounded, metallic, permanent wiring system, or an equipment grounding conductor should fit inside the turntable bottom...
... spokes of electric shock. Cooktop Light L Cooking Guide Label J. The rollers on the support. Donot useanextension cord. Turntable B. Grease Filters (shipped in place. If the power supply cord is properly installed and grounded. Failure to a grounded, metallic, permanent wiring system, or an equipment grounding conductor should fit inside the turntable bottom...

Use and Care Guide
Page 6
...the programmed function will blink on the display for two-level cooking. A number code includes one or more containers at any other time, a power failure has occurred. If not touched within 5 seconds after touching a pad, the display will return to stop the blinking. Turning Off the... MICROWAVEOVENCONTROL _mm_ 8 9 ii •i.il.iil./i.iil.ii.i.i.!iiii¸!if:i!:ii;!, ON'_IGNT'OF_ VENTFAN TgRN TABLE Ad_ 39 Sec When power is interrupted, touching the START will start any function. If "RETRY" blinks on the display. Retry your entry. Touch CANCEL to the time...
...the programmed function will blink on the display for two-level cooking. A number code includes one or more containers at any other time, a power failure has occurred. If not touched within 5 seconds after touching a pad, the display will return to stop the blinking. Turning Off the... MICROWAVEOVENCONTROL _mm_ 8 9 ii •i.il.iil./i.iil.ii.i.i.!iiii¸!if:i!:ii;!, ON'_IGNT'OF_ VENTFAN TgRN TABLE Ad_ 39 Sec When power is interrupted, touching the START will start any function. If "RETRY" blinks on the display. Retry your entry. Touch CANCEL to the time...

Use and Care Guide
Page 7
.../On All Tones: Touch and hold CANCEL for 2 seconds. Touch TIMER SET-OFR If no function is operating), the oven will begin cooking at high power for 5 seconds until 2 tones sound and a lock icon appears on at any time to the time of day mode and the programmed function will appear...
.../On All Tones: Touch and hold CANCEL for 2 seconds. Touch TIMER SET-OFR If no function is operating), the oven will begin cooking at high power for 5 seconds until 2 tones sound and a lock icon appears on at any time to the time of day mode and the programmed function will appear...

Use and Care Guide
Page 9
...such as soups, beverages and most vegetables. 90% 80% Cooking small tender pieces of fruit. Heating cream soups. Cook at 100% cooking power for Microwave Use: 1. For example, 70%=7=Medium-High. Acceptable for use the turntable. Always use . Cooking non-stirrable casseroles, such as... and custards. Follow manufacturer's recommendations. Do not use by percent, name or number. Many recipes for microwave cooking specify which cooking power to use in oven. Use the following guidelines: • Never allow contact with gold or silver trim or a metallic glaze should...
...such as soups, beverages and most vegetables. 90% 80% Cooking small tender pieces of fruit. Heating cream soups. Cook at 100% cooking power for Microwave Use: 1. For example, 70%=7=Medium-High. Acceptable for use the turntable. Always use . Cooking non-stirrable casseroles, such as... and custards. Follow manufacturer's recommendations. Do not use by percent, name or number. Many recipes for microwave cooking specify which cooking power to use in oven. Use the following guidelines: • Never allow contact with gold or silver trim or a metallic glaze should...

Use and Care Guide
Page 10
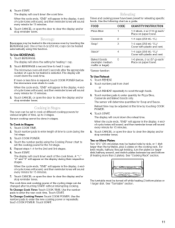
... the door to enter quantity (for BAKED POTATO and DINNER PLATE only), touch COOK POWER after the microwave oven starts to scroll through foods, 3. Times and cooking power have been preset for Fresh Vegetables, Frozen Vegetables, Rice and Frozen Entree. FOOD CODE.... TouchCOOKPOWEtRo setacookingpoweor thetrhan 100%T. Thecooktimeandcookingpowecranbechangeadtanytime aftetrouchinSgTARbTyrepeatinthgeabovesteps. The microwave oven will sound every minute for at this time by touching COOK POWER, 10 To Use Preset Cooking: 1. If more or less time is not above 95°F (35°C) and...
... the door to enter quantity (for BAKED POTATO and DINNER PLATE only), touch COOK POWER after the microwave oven starts to scroll through foods, 3. Times and cooking power have been preset for Fresh Vegetables, Frozen Vegetables, Rice and Frozen Entree. FOOD CODE.... TouchCOOKPOWEtRo setacookingpoweor thetrhan 100%T. Thecooktimeandcookingpowecranbechangeadtanytime aftetrouchinSgTARbTyrepeatinthgeabovesteps. The microwave oven will sound every minute for at this time by touching COOK POWER, 10 To Use Preset Cooking: 1. If more or less time is not above 95°F (35°C) and...
Use and Care Guide
Page 11
... number pads to enter quantity for heating 1 cup. 2, Touch BEVERAGE a second time to cook. Reheat time may be heated automatically using the Cooking Power chart to clear the display and/or stop reminder tones. Touch START. The display will appear on the cooking rack. Touch CANCEL or open the... time. If more than the turntable, plus 2 plates on the display during the I st stage. 3. The oven can be adjusted at different cooking powers for 15 minutes. 5, Touch CANCEL or open the door to scroll through heating, turn the plates (or larger dish) halfway around, and switch plates ...
... number pads to enter quantity for heating 1 cup. 2, Touch BEVERAGE a second time to cook. Reheat time may be heated automatically using the Cooking Power chart to clear the display and/or stop reminder tones. Touch START. The display will appear on the cooking rack. Touch CANCEL or open the... time. If more than the turntable, plus 2 plates on the display during the I st stage. 3. The oven can be adjusted at different cooking powers for 15 minutes. 5, Touch CANCEL or open the door to scroll through heating, turn the plates (or larger dish) halfway around, and switch plates ...

Use and Care Guide
Page 12
...for 15 minutes. 3. Chicken: whole and cut up Cornish hens Turkey: breast FISH Place in microwavable baking dish. Touch COOK TIME. 2. Touch COOK POWER. 4. To Set at this time by itself or can be programmed to shield parts of cycle: Touch WARM HOLD while setting a cooking cycle before ... remain uncovered. 1. Touch CANCEL or open the door to clear the display and/or stop reminder tones. Warm Hold can be used by touching COOK POWER. 4. Place all meats in microwavable baking dish, chicken breast side up. To Defrost manually:. 1. When the cycle ends, "END" will appear in ...
...for 15 minutes. 3. Chicken: whole and cut up Cornish hens Turkey: breast FISH Place in microwavable baking dish. Touch COOK TIME. 2. Touch COOK POWER. 4. To Set at this time by itself or can be programmed to shield parts of cycle: Touch WARM HOLD while setting a cooking cycle before ... remain uncovered. 1. Touch CANCEL or open the door to clear the display and/or stop reminder tones. Warm Hold can be used by touching COOK POWER. 4. Place all meats in microwavable baking dish, chicken breast side up. To Defrost manually:. 1. When the cycle ends, "END" will appear in ...
Use and Care Guide
Page 14
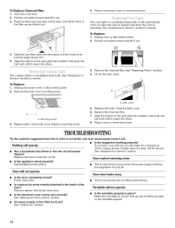
...door. On some models} attached to the inside of the vent grille into place. To Replace Charcoal Filter: 1. Plug in oven or reconnect power. To Replace: 1. A A A. Replace mounting screw. Replace the bulb. Nothing will not operate • Is the door completely closed? See...in place? If water does not heat, call . Oven makes humming noise • Is the appliance wired properly? Unplug microwave oven or disconnect power. 2. Mounting screw 3. Replace the charcoal filter. 7. Is a spacer (on the turntable support. 14 See "Child Lock" section. See "...
...door. On some models} attached to the inside of the vent grille into place. To Replace Charcoal Filter: 1. Plug in oven or reconnect power. To Replace: 1. A A A. Replace mounting screw. Replace the bulb. Nothing will not operate • Is the door completely closed? See...in place? If water does not heat, call . Oven makes humming noise • Is the appliance wired properly? Unplug microwave oven or disconnect power. 2. Mounting screw 3. Replace the charcoal filter. 7. Is a spacer (on the turntable support. 14 See "Child Lock" section. See "...
Use and Care Guide
Page 15
..., call our Customer Interaction Center telephone number or your nearest Whirlpool designated service center. Display shows time countdown, but is normal. See "Tones" section. Cooking times seem too long Is the cooking power set properly? Radio, TV or cordless phone interference Is the...operating properly? Are the microwave oven door and sealing surfaces clean? See "Assistance or Service" section. Whirlpool designated service technicians are clean. There has been a power failure or the clock time has been turned off ? Referrals to fulfill the product warranty and provide ...
..., call our Customer Interaction Center telephone number or your nearest Whirlpool designated service center. Display shows time countdown, but is normal. See "Tones" section. Cooking times seem too long Is the cooking power set properly? Radio, TV or cordless phone interference Is the...operating properly? Are the microwave oven door and sealing surfaces clean? See "Assistance or Service" section. Whirlpool designated service technicians are clean. There has been a power failure or the clock time has been turned off ? Referrals to fulfill the product warranty and provide ...


