User Instructions
Page 1
... with the provided Installation Instructions. ■ Some products such as whole eggs in the microwave oven. for additional information. SAVE THESE INSTRUCTIONS W10170440A Para obtener acceso a "Instrucciones para el usuario de la combinación microondas campana" en español, o para obtener información adicional acerca de su producto, visite: www.whirlpool.com Tenga...
... with the provided Installation Instructions. ■ Some products such as whole eggs in the microwave oven. for additional information. SAVE THESE INSTRUCTIONS W10170440A Para obtener acceso a "Instrucciones para el usuario de la combinación microondas campana" en español, o para obtener información adicional acerca de su producto, visite: www.whirlpool.com Tenga...
User Instructions
Page 3
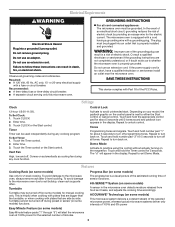
...when cooking with a grounding plug. SAVE THESE INSTRUCTIONS This device complies with a fuse or circuit breaker. Enter time. 3. Tones Programming tones and signals. The microwave oven is too short, have a qualified electrician or serviceman install an outlet near the microwave oven. Comes on...5 seconds until 2 tones sound and padlock icon appears in the display. ACCUWAVE® Technology (on the control panel is properly installed and grounded. Enter time. 3. WARNING: Improper use an extension cord. To Set Timer: 1. Electrical Requirements WARNING Electrical Shock Hazard ...
...when cooking with a grounding plug. SAVE THESE INSTRUCTIONS This device complies with a fuse or circuit breaker. Enter time. 3. Tones Programming tones and signals. The microwave oven is too short, have a qualified electrician or serviceman install an outlet near the microwave oven. Comes on...5 seconds until 2 tones sound and padlock icon appears in the display. ACCUWAVE® Technology (on the control panel is properly installed and grounded. Enter time. 3. WARNING: Improper use an extension cord. To Set Timer: 1. Electrical Requirements WARNING Electrical Shock Hazard ...
User Instructions
Page 6
Outside the 50 United States and Canada, this User Instructions and model number information for future reference. Service calls to correct the installation of Whirlpool, U.S.A. 461966100032 11/07 Printed in materials or workmanship and is used in accordance with published installation instructions. 11. Expenses for travel and transportation for other damage to the finish of your...
Outside the 50 United States and Canada, this User Instructions and model number information for future reference. Service calls to correct the installation of Whirlpool, U.S.A. 461966100032 11/07 Printed in materials or workmanship and is used in accordance with published installation instructions. 11. Expenses for travel and transportation for other damage to the finish of your...

Installation Instructions
Page 1
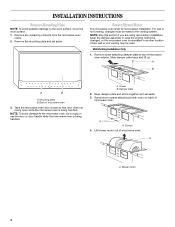
... is the safety alert symbol. The appearance of Contents MICROWAVE HOOD COMBINATION SAFETY 1 INSTALLATION REQUIREMENTS 2 Tools and Parts 2 Remove Cardboard Template 2 Location Requirements 2 Product Dimensions 3 Electrical Requirements 3 INSTALLATION INSTRUCTIONS 4 Remove Mounting Plate 4 Rotate Blower Motor 4 Locate Wall Stud(s 6 Mark Rear Wall 7 Drill Holes in Rear Wall 7 Attach Mounting Plate to potential hazards that...
... is the safety alert symbol. The appearance of Contents MICROWAVE HOOD COMBINATION SAFETY 1 INSTALLATION REQUIREMENTS 2 Tools and Parts 2 Remove Cardboard Template 2 Location Requirements 2 Product Dimensions 3 Electrical Requirements 3 INSTALLATION INSTRUCTIONS 4 Remove Mounting Plate 4 Rotate Blower Motor 4 Locate Wall Stud(s 6 Mark Rear Wall 7 Drill Holes in Rear Wall 7 Attach Mounting Plate to potential hazards that...

Installation Instructions
Page 2
... metal screws (2) F. See User Instructions.) NOTE: Depending on model, charcoal filters may be installed. Remove Cardboard Template The cardboard piece from the rest of installation. The piece inside upper cabinet. See "Installation Dimensions" illustration. ■ Minimum...D. 1/4" x 2" lag screws (2) E. Location Requirements Check the opening . ■ Support for use appropriate fasteners. Read and follow the instructions provided with your builder or cabinet supplier to withstand the heat produced by the microwave oven for wood studs. For other damages. See "Venting...
... metal screws (2) F. See User Instructions.) NOTE: Depending on model, charcoal filters may be installed. Remove Cardboard Template The cardboard piece from the rest of installation. The piece inside upper cabinet. See "Installation Dimensions" illustration. ■ Minimum...D. 1/4" x 2" lag screws (2) E. Location Requirements Check the opening . ■ Support for use appropriate fasteners. Read and follow the instructions provided with your builder or cabinet supplier to withstand the heat produced by the microwave oven for wood studs. For other damages. See "Venting...

Installation Instructions
Page 3
.... Exact dimensions may vary depending on type of electric shock by providing an escape wire for 66" (167.6 cm) installation height. If the power supply cord is typical for the electric current. Failure to whether the microwave oven is properly grounded...use an adapter. Required: ■ A 120 Volt, 60 Hz, AC only, 15- The microwave oven is properly installed and grounded. Do not use of electric shock. SAVE THESE INSTRUCTIONS 3 Installation Dimensions NOTE: The grounded 3 prong outlet must be plugged into a grounded 3 prong outlet. A B Electrical Requirements WARNING ...
.... Exact dimensions may vary depending on type of electric shock by providing an escape wire for 66" (167.6 cm) installation height. If the power supply cord is typical for the electric current. Failure to whether the microwave oven is properly grounded...use an adapter. Required: ■ A 120 Volt, 60 Hz, AC only, 15- The microwave oven is properly installed and grounded. Do not use of electric shock. SAVE THESE INSTRUCTIONS 3 Installation Dimensions NOTE: The grounded 3 prong outlet must be plugged into a grounded 3 prong outlet. A B Electrical Requirements WARNING ...
Installation Instructions
Page 4
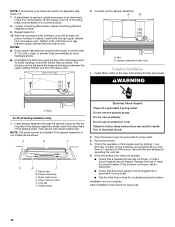
... B A. Damper plate 2. A A. Screws 4. For wall or roof venting, changes must be used. NOTE: Skip this section if you are using recirculation installation. Slide damper plate back and lift up. Back of microwave oven. Keep damper plate and screw together and set aside. Lift blower motor out of... reinstalled in another location where wall or roof venting may be made to the work surface, cover the work surface. 1. INSTALLATION INSTRUCTIONS Remove Mounting Plate NOTE: To avoid possible damage to the venting system. Keep the damper assembly in case the venting method is...
... B A. Damper plate 2. A A. Screws 4. For wall or roof venting, changes must be used. NOTE: Skip this section if you are using recirculation installation. Slide damper plate back and lift up. Back of microwave oven. Keep damper plate and screw together and set aside. Lift blower motor out of... reinstalled in another location where wall or roof venting may be made to the work surface, cover the work surface. 1. INSTALLATION INSTRUCTIONS Remove Mounting Plate NOTE: To avoid possible damage to the venting system. Keep the damper assembly in case the venting method is...
Installation Instructions
Page 10
...surface. 8. Sheet metal screw D. Damper plate Electrical Shock Hazard Plug into microwave oven. Save Installation Instructions for filter placement. Connect vent to follow these instructions can result in place, insert bolts through the cabinet cutout so that the power supply cord ...prong outlet. 3. A B A. Repeat steps 3-6. 10. Plug microwave oven into a grounded 3 prong outlet. ■ See the User Instructions for troubleshooting information. Longer or shorter bolts are available at least one person holding it in death, fire, or electrical shock. 2. Check ...
...surface. 8. Sheet metal screw D. Damper plate Electrical Shock Hazard Plug into microwave oven. Save Installation Instructions for filter placement. Connect vent to follow these instructions can result in place, insert bolts through the cabinet cutout so that the power supply cord ...prong outlet. 3. A B A. Repeat steps 3-6. 10. Plug microwave oven into a grounded 3 prong outlet. ■ See the User Instructions for troubleshooting information. Longer or shorter bolts are available at least one person holding it in death, fire, or electrical shock. 2. Check ...
Installation Instructions
Page 12
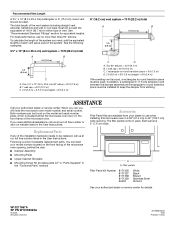
... (7.6 cm) wide. Following is located behind the microwave oven door on the front facing of each vent piece used in the User Instructions. See "Recommended Standard Fittings" section for details. When you call, you need additional assistance, call us at our toll free number ...dealer or service center for equivalent lengths. W10217687A SP PN W10189322A © 2008. The total length of available replacement parts. For best performance, use when installing this microwave oven in a 36" (91.4 cm) or 42" (106.7 cm) wide opening , behind the door. ■ Damper Assembly ■...
... (7.6 cm) wide. Following is located behind the microwave oven door on the front facing of each vent piece used in the User Instructions. See "Recommended Standard Fittings" section for details. When you call, you need additional assistance, call us at our toll free number ...dealer or service center for equivalent lengths. W10217687A SP PN W10189322A © 2008. The total length of available replacement parts. For best performance, use when installing this microwave oven in a 36" (91.4 cm) or 42" (106.7 cm) wide opening , behind the door. ■ Damper Assembly ■...

Dimensions
Page 1
... only. Because Whirlpool Corporation policy includes a continuous commitment to the microwave oven hood. Ref. 8206585 08-08-06 We do NOT recommend: ✔ flexible metal vent. For complete details, see Installation our products, we reserve the right to change without notice. Instructions packed with product...There must have back-draft damper. 3-1/4" x 10" to top of the exhaust damper. wall cap Wall and roof caps must be installed to seal exterior wall or roof opening around cap. ✔ two elbows should not be sure that size of vent should be uniform....
... only. Because Whirlpool Corporation policy includes a continuous commitment to the microwave oven hood. Ref. 8206585 08-08-06 We do NOT recommend: ✔ flexible metal vent. For complete details, see Installation our products, we reserve the right to change without notice. Instructions packed with product...There must have back-draft damper. 3-1/4" x 10" to top of the exhaust damper. wall cap Wall and roof caps must be installed to seal exterior wall or roof opening around cap. ✔ two elbows should not be sure that size of vent should be uniform....

Use and Care Guide
Page 3
...and others are very important. We have provided many important safety messages in this section and in the provided Installation instructions, _' Install or locate the microwave oven only in accordance with any appliance, close supervision is necessary when used by qualified... breaker panel, - TAhllissaifsettyhemseasfseatygeaslerwt isllyfmolbloowl. You can happen if the instructions are placed inside the oven ignite, keep oven door closed glass jars - Do not use , As with the provided Installation instructions, _, Some products such as described in this manual, Do not...
...and others are very important. We have provided many important safety messages in this section and in the provided Installation instructions, _' Install or locate the microwave oven only in accordance with any appliance, close supervision is necessary when used by qualified... breaker panel, - TAhllissaifsettyhemseasfseatygeaslerwt isllyfmolbloowl. You can happen if the instructions are placed inside the oven ignite, keep oven door closed glass jars - Do not use , As with the provided Installation instructions, _, Some products such as described in this manual, Do not...

Use and Care Guide
Page 5
.... The appearance of the parts. AB C D EF ElectricaSl hockHazard Plugintoa grounded3 prongoutlet. Vent Grille F Control Panel G. SAVE THESE iNSTRUCTiONS I This device complies with Part 18 of the grounding plug can resuJt in a risk of the hub. Turntable B. Shaft The...turntable can rotate in either direction to follow these instructions can result in death, fire, or eJectrical shock. Place the turntable on the oven cavity bottom. 3. PARTSANDFEATURES This manual may have a qualified electrician or serviceman install an outlet near the microwave oven. ,= For ...
.... The appearance of the parts. AB C D EF ElectricaSl hockHazard Plugintoa grounded3 prongoutlet. Vent Grille F Control Panel G. SAVE THESE iNSTRUCTiONS I This device complies with Part 18 of the grounding plug can resuJt in a risk of the hub. Turntable B. Shaft The...turntable can rotate in either direction to follow these instructions can result in death, fire, or eJectrical shock. Place the turntable on the oven cavity bottom. 3. PARTSANDFEATURES This manual may have a qualified electrician or serviceman install an outlet near the microwave oven. ,= For ...
Use and Care Guide
Page 14
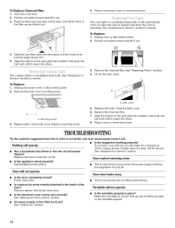
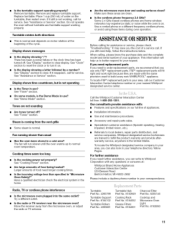
... the cost of cold water for service. If water does not heat, call . tripped? Oven makes humming noise • Is the appliance wired properly? See Installation Instructions. • This is a candelabra base bulb. Oven will not operate • Is the turntable properly in order to heat 1 cup (250 mL) of an unnecessary...
... the cost of cold water for service. If water does not heat, call . tripped? Oven makes humming noise • Is the appliance wired properly? See Installation Instructions. • This is a candelabra base bulb. Oven will not operate • Is the turntable properly in order to heat 1 cup (250 mL) of an unnecessary...
Use and Care Guide
Page 15
...please know the purchase date and the complete model and serial number of your request. This information will help , follow the instructions below. Remove and replace turntable support. Replace turntable. See "Display" section to local dealers, repair parts distributors, and ... company in your correspondence. If it reappears, call for service. See "Display" section to Whirlpool Corporation with any questions or concerns at the beginning of appliances. • Installation information. • Use and maintenance procedures. • Accessory and repair parts sales. •...
...please know the purchase date and the complete model and serial number of your request. This information will help , follow the instructions below. Remove and replace turntable support. Replace turntable. See "Display" section to local dealers, repair parts distributors, and ... company in your correspondence. If it reappears, call for service. See "Display" section to Whirlpool Corporation with any questions or concerns at the beginning of appliances. • Installation information. • Use and maintenance procedures. • Accessory and repair parts sales. •...

Use and Care Guide
Page 16
... other than normal, single-family household use of your appliance, to instruct you how to better help can find this appliance is used in other rights which may not apply to correct the installation of products not approved by calling the Whirlpool Customer Interaction Center, 1-800-253-1301 (toll-free), from anywhere in...
... other than normal, single-family household use of your appliance, to instruct you how to better help can find this appliance is used in other rights which may not apply to correct the installation of products not approved by calling the Whirlpool Customer Interaction Center, 1-800-253-1301 (toll-free), from anywhere in...


