

Use and Care Guide
Page 3
... You can burn off power at the fuse or circuit breaker panel. - Do not use straight-sided containers with the provided Installation Instructions. ■ Some products such as water, coffee, or tea are very important. Do not leave paper products, cooking utensils, or food in ...the cavity when not in this manual. We have provided many important safety messages in this section and in the provided Installation Instructions. ■ Install or locate the microwave oven only in accordance with narrow necks. - All safety messages will tell you what can be inserted in the ...
... You can burn off power at the fuse or circuit breaker panel. - Do not use straight-sided containers with the provided Installation Instructions. ■ Some products such as water, coffee, or tea are very important. Do not leave paper products, cooking utensils, or food in ...the cavity when not in this manual. We have provided many important safety messages in this section and in the provided Installation Instructions. ■ Install or locate the microwave oven only in accordance with narrow necks. - All safety messages will tell you what can be inserted in the ...

Use and Care Guide
Page 4
... grounded. Do not use an extension cord. It is particularly important that the oven door close properly and that is damaged. SAVE THESE INSTRUCTIONS PRECAUTIONS TO AVOID POSSIBLE EXPOSURE TO EXCESSIVE MICROWAVE ENERGY (a) Do not attempt to operate this feature). ■ Do not store any object ... ■ Do not store anything directly on top of the microwave oven when the microwave oven is too short, have a qualified electrician or serviceman install an outlet near a swimming pool, or similar locations. ■ Do not immerse cord or plug in water. ■ Keep cord away from heated...
... grounded. Do not use an extension cord. It is particularly important that the oven door close properly and that is damaged. SAVE THESE INSTRUCTIONS PRECAUTIONS TO AVOID POSSIBLE EXPOSURE TO EXCESSIVE MICROWAVE ENERGY (a) Do not attempt to operate this feature). ■ Do not store any object ... ■ Do not store anything directly on top of the microwave oven when the microwave oven is too short, have a qualified electrician or serviceman install an outlet near a swimming pool, or similar locations. ■ Do not immerse cord or plug in water. ■ Keep cord away from heated...

Use and Care Guide
Page 14
... appliance wired properly? See "Assistance or Service" section. See "Timer" section. ■ On some models) attached to the inside of cold water for service. See Installation Instructions provided with your microwave oven. Turntable will not affect performance. There has been a power failure or the clock time has been turned off ? See "Demo...
... appliance wired properly? See "Assistance or Service" section. See "Timer" section. ■ On some models) attached to the inside of cold water for service. See Installation Instructions provided with your microwave oven. Turntable will not affect performance. There has been a power failure or the clock time has been turned off ? See "Demo...

Use and Care Guide
Page 15
..., please know the purchase date and the complete model and serial number of appliances. ■ Installation information. ■ Use and maintenance procedures. ■ Accessory and repair parts sales. ■...; replacement parts. See "Vent Fan" section. In the U.S.A. Call the Whirlpool Customer eXperience Center toll free: 1-800-253-1301. Our consultants provide assistance with... service, please check "Troubleshooting." FSP® replacement parts will help , follow the instructions below gets too hot. To locate FSP® replacement parts in the United States....
..., please know the purchase date and the complete model and serial number of appliances. ■ Installation information. ■ Use and maintenance procedures. ■ Accessory and repair parts sales. ■...; replacement parts. See "Vent Fan" section. In the U.S.A. Call the Whirlpool Customer eXperience Center toll free: 1-800-253-1301. Our consultants provide assistance with... service, please check "Troubleshooting." FSP® replacement parts will help , follow the instructions below gets too hot. To locate FSP® replacement parts in the United States....
Use and Care Guide
Page 16
... PROVINCE. After checking "Troubleshooting," additional help you obtain assistance or service if you need service, first see the "Troubleshooting" section of Whirlpool, U.S.A. 4619-652-68372 7/06 Printed in accordance with published installation instructions. 11. In Canada, call 1-800-253-1301. Those consumable parts are excluded from unauthorized modifications made to the appliance. 9. Pickup...
... PROVINCE. After checking "Troubleshooting," additional help you obtain assistance or service if you need service, first see the "Troubleshooting" section of Whirlpool, U.S.A. 4619-652-68372 7/06 Printed in accordance with published installation instructions. 11. In Canada, call 1-800-253-1301. Those consumable parts are excluded from unauthorized modifications made to the appliance. 9. Pickup...
Installation Instructions
Page 1
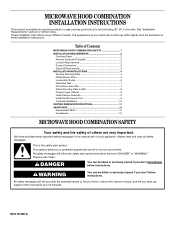
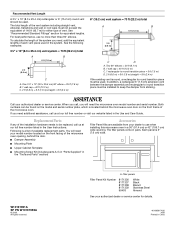
... SAFETY Your safety and the safety of Contents MICROWAVE HOOD COMBINATION SAFETY 1 INSTALLATION REQUIREMENTS 2 Tools and Parts 2 Remove Cardboard Template 2 Location Requirements 2 Product Dimensions 3 Electrical Requirements 3 INSTALLATION INSTRUCTIONS 4 Remove Mounting Plate 4 Rotate Blower Motor 4 Locate Wall Stud(s 6... safety alert symbol and either the word "DANGER" or "WARNING." All safety messages will follow instructions. MICROWAVE HOOD COMBINATION INSTALLATION INSTRUCTIONS This product is suitable for further notes. These words mean: DANGER You can be killed or ...
... SAFETY Your safety and the safety of Contents MICROWAVE HOOD COMBINATION SAFETY 1 INSTALLATION REQUIREMENTS 2 Tools and Parts 2 Remove Cardboard Template 2 Location Requirements 2 Product Dimensions 3 Electrical Requirements 3 INSTALLATION INSTRUCTIONS 4 Remove Mounting Plate 4 Rotate Blower Motor 4 Locate Wall Stud(s 6... safety alert symbol and either the word "DANGER" or "WARNING." All safety messages will follow instructions. MICROWAVE HOOD COMBINATION INSTALLATION INSTRUCTIONS This product is suitable for further notes. These words mean: DANGER You can be killed or ...

Installation Instructions
Page 2
... grease filters Charcoal filters (Depending on model, aluminum grease filter and charcoal filter may not be included. Read and follow the instructions provided with your builder or cabinet supplier to separate the template from the top of the cardboard packaging. 2. Cut along the... Pencil ■ 7/16" socket wrench ■ Masking tape or thumbtacks (or box wrench) for use appropriate fasteners. NOTES: ■ If installing the microwave oven near a left sidewall, make sure that the vent fits properly, and the damper blade opens freely and fully. See "Electrical ...
... grease filters Charcoal filters (Depending on model, aluminum grease filter and charcoal filter may not be included. Read and follow the instructions provided with your builder or cabinet supplier to separate the template from the top of the cardboard packaging. 2. Cut along the... Pencil ■ 7/16" socket wrench ■ Masking tape or thumbtacks (or box wrench) for use appropriate fasteners. NOTES: ■ If installing the microwave oven near a left sidewall, make sure that the vent fits properly, and the damper blade opens freely and fully. See "Electrical ...
Installation Instructions
Page 3
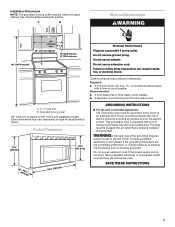
Installation Dimensions NOTE: The grounded 3 prong outlet must be grounded. A. 2" x 4" wall stud B. Product Dimensions 17¹⁄₄" (43.8 cm) 16¹⁄₄" (41.3 cm) (401.05³c⁄₄m") 29⁷⁄₈" (76.0 cm) GROUNDING INSTRUCTIONS ■ For all ... Plug into an outlet that is properly grounded. Do not remove ground prong. Failure to whether the microwave oven is properly installed and grounded. Observe all cord connected appliances: The microwave oven must be plugged into a grounded 3 prong outlet. The microwave...
Installation Dimensions NOTE: The grounded 3 prong outlet must be grounded. A. 2" x 4" wall stud B. Product Dimensions 17¹⁄₄" (43.8 cm) 16¹⁄₄" (41.3 cm) (401.05³c⁄₄m") 29⁷⁄₈" (76.0 cm) GROUNDING INSTRUCTIONS ■ For all ... Plug into an outlet that is properly grounded. Do not remove ground prong. Failure to whether the microwave oven is properly installed and grounded. Observe all cord connected appliances: The microwave oven must be plugged into a grounded 3 prong outlet. The microwave...

Installation Instructions
Page 4
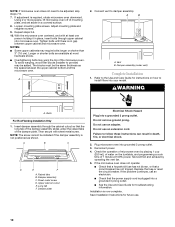
...oven is being handled. Remove screws attaching damper plate to top of microwave oven 3. NOTE: To avoid damage to back of microwave oven. INSTALLATION INSTRUCTIONS Remove Mounting Plate NOTE: To avoid possible damage to the venting system. A B A B A. Damper plate 2. Tape the microwave oven ... the front of microwave oven. NOTE: Skip this section if you are using recirculation installation. Blower motor 4 Keep damper plate and screws together and set aside. Wall Venting Installation Only 1. Lift blower motor out of the microwave oven and lift up. Remove the...
...oven is being handled. Remove screws attaching damper plate to top of microwave oven 3. NOTE: To avoid damage to back of microwave oven. INSTALLATION INSTRUCTIONS Remove Mounting Plate NOTE: To avoid possible damage to the venting system. A B A B A. Damper plate 2. Tape the microwave oven ... the front of microwave oven. NOTE: Skip this section if you are using recirculation installation. Blower motor 4 Keep damper plate and screws together and set aside. Wall Venting Installation Only 1. Lift blower motor out of the microwave oven and lift up. Remove the...
Installation Instructions
Page 10
...the turntable, and programming a cook time of the microwave oven. A 2. Bolts For Roof Venting Installation Only 1. Long tab F. Failure to follow these instructions can result in place, insert bolts through the cabinet cutout so that a circuit breaker has not ... extension cord. Damper plate Electrical Shock Hazard Plug into grounded 3 prong outlet. 3. Do not use . 10 Installation is plugged into microwave oven. Save Installation Instructions for troubleshooting information. If adjustment is required, rotate microwave oven downward. A B A. Then secure with at most...
...the turntable, and programming a cook time of the microwave oven. A 2. Bolts For Roof Venting Installation Only 1. Long tab F. Failure to follow these instructions can result in place, insert bolts through the cabinet cutout so that a circuit breaker has not ... extension cord. Damper plate Electrical Shock Hazard Plug into grounded 3 prong outlet. 3. Do not use . 10 Installation is plugged into microwave oven. Save Installation Instructions for troubleshooting information. If adjustment is required, rotate microwave oven downward. A B A. Then secure with at most...
Installation Instructions
Page 12
... center. If you call us at our toll free number listed in the Use and Care Guide. All rights reserved. A A. For best performance, use when installing this microwave oven in China Two 90° elbows = 20 ft (6.1 m) B. 1 wall cap = 40 ft (12.2 m) C. 1 rectangular to round transition piece = 5 ft (1.5 m) D. 2 ...system you will need additional assistance, call us at our toll free number or visit our website listed in the User Instructions. Filler panels Filler Panel Kit Number 8171336 8171337 8171338 8171339 99403 White Black Biscuit Stainless Steel Almond See your model ...
... center. If you call us at our toll free number listed in the Use and Care Guide. All rights reserved. A A. For best performance, use when installing this microwave oven in China Two 90° elbows = 20 ft (6.1 m) B. 1 wall cap = 40 ft (12.2 m) C. 1 rectangular to round transition piece = 5 ft (1.5 m) D. 2 ...system you will need additional assistance, call us at our toll free number or visit our website listed in the User Instructions. Filler panels Filler Panel Kit Number 8171336 8171337 8171338 8171339 99403 White Black Biscuit Stainless Steel Almond See your model ...
