User Instructions
Page 1
...for in the U.S.A., or write: Whirlpool Corporation Customer Interaction Center 553 Benson Road Benton Harbor, MI 49022-2692. Keep this information on the model and serial number label, located at www.whirlpool.com. You can find this book and your correspondence. To order parts and accessories, call 1-800-442...-9991 or visit our website at the top inside dryer door well. You will need to know your appliance to ...
...for in the U.S.A., or write: Whirlpool Corporation Customer Interaction Center 553 Benson Road Benton Harbor, MI 49022-2692. Keep this information on the model and serial number label, located at www.whirlpool.com. You can find this book and your correspondence. To order parts and accessories, call 1-800-442...-9991 or visit our website at the top inside dryer door well. You will need to know your appliance to ...
User Instructions
Page 2
...with controls. rounding areas free from service or discarded, remove the door to the weather. s Do not repair or replace any part of the dryer or attempt any servicing unless specifically recommended in this Use and Care Guide or in published user-repair instructions that could cause a... or spotted with gasoline, drycleaning solvents, other flammable, or explosive substances as they give off vapors that you and others are not followed. DRYER SAFETY Your safety and the safety of others . s Keep area around the exhaust opening and adjacent sur- s Do not dry articles that...
...with controls. rounding areas free from service or discarded, remove the door to the weather. s Do not repair or replace any part of the dryer or attempt any servicing unless specifically recommended in this Use and Care Guide or in published user-repair instructions that could cause a... or spotted with gasoline, drycleaning solvents, other flammable, or explosive substances as they give off vapors that you and others are not followed. DRYER SAFETY Your safety and the safety of others . s Keep area around the exhaust opening and adjacent sur- s Do not dry articles that...
User Instructions
Page 4
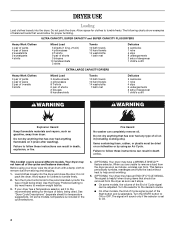
... bath towels 10 hand towels 14 washcloths 1 bath mat Delicates 3 camisoles 1 robe 4 slips 8 undergarments 2 sets of sleepwear 1 child's outfit EXTRA LARGE CAPACITY DRYERS Heavy Work Clothes 3 pair of pants 4 pair of jeans 2 pair of overalls 3 shirts Mixed Load 3 double sheets 4 pillowcases 8 T-shirts 6 pair of...had anything that would allow for clothes to remove a load from storing and shipping. 1. s On some models, temperature is part of balanced loads that has ever had any type of sleepwear 1 child's outfit WARNING WARNING Explosion Hazard Keep flammable materials and vapors...
... bath towels 10 hand towels 14 washcloths 1 bath mat Delicates 3 camisoles 1 robe 4 slips 8 undergarments 2 sets of sleepwear 1 child's outfit EXTRA LARGE CAPACITY DRYERS Heavy Work Clothes 3 pair of pants 4 pair of jeans 2 pair of overalls 3 shirts Mixed Load 3 double sheets 4 pillowcases 8 T-shirts 6 pair of...had anything that would allow for clothes to remove a load from storing and shipping. 1. s On some models, temperature is part of balanced loads that has ever had any type of sleepwear 1 child's outfit WARNING WARNING Explosion Hazard Keep flammable materials and vapors...
Installation Instructions
Page 1
... INSTRUCTIONS INSTRUCCIONES DE INSTALACIÓN PARA LA SECADORA ELÉCTRICA DE 29" (73,7 CM) Table of Contents / Índice DRYER SAFETY ...1 INSTALLATION INSTRUCTIONS ...2 Tools and Parts ...2 Location Requirements ...2 Electrical Requirements ...4 Electrical Connection ...5 Venting Requirements...10 Plan Vent System ...11 Install Vent System...12 Install Leveling Legs...12 Connect Vent ...12 Level...
... INSTRUCTIONS INSTRUCCIONES DE INSTALACIÓN PARA LA SECADORA ELÉCTRICA DE 29" (73,7 CM) Table of Contents / Índice DRYER SAFETY ...1 INSTALLATION INSTRUCTIONS ...2 Tools and Parts ...2 Location Requirements ...2 Electrical Requirements ...4 Electrical Connection ...5 Venting Requirements...10 Plan Vent System ...11 Install Vent System...12 Install Leveling Legs...12 Connect Vent ...12 Level...
Installation Instructions
Page 2
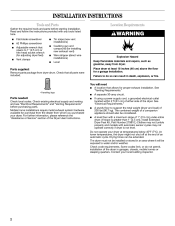
...61 cm) of either side of a companion appliance should also be extended. The combined weight of the dryer. s s Parts needed: Check local codes. At lower temperatures, the dryer might not shut off at least 18 inches (46 cm) above the floor for proper exhaust installation.... #2 Phillips screwdriver Adjustable wrench that opens to do not permit, installation of 1" (2.5 cm) under entire dryer. (If slope is greater than 1" [2.5 cm], install Extended Dryer Feet Kit, Part Number 279810.) Clothes may not tumble properly and models with automatic sensor cycles may not operate correctly if...
...61 cm) of either side of a companion appliance should also be extended. The combined weight of the dryer. s s Parts needed: Check local codes. At lower temperatures, the dryer might not shut off at least 18 inches (46 cm) above the floor for proper exhaust installation.... #2 Phillips screwdriver Adjustable wrench that opens to do not permit, installation of 1" (2.5 cm) under entire dryer. (If slope is greater than 1" [2.5 cm], install Extended Dryer Feet Kit, Part Number 279810.) Clothes may not tumble properly and models with automatic sensor cycles may not operate correctly if...
Installation Instructions
Page 3
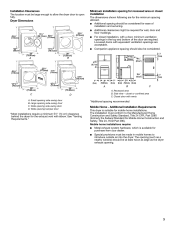
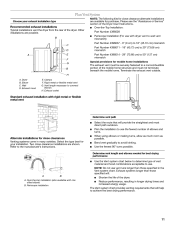
...door D A. See "Venting Requirements." The installation must be large enough to allow the dryer door to the Manufactured Home Construction and Safety Standard, Title 24 CFR, Part 3280 (formerly the Federal Standard for mobile home installations. s Additional spacing should also be... at least twice as large as the dryer exhaust opening (such as a nearby window) should be considered. 14" max....
...door D A. See "Venting Requirements." The installation must be large enough to allow the dryer door to the Manufactured Home Construction and Safety Standard, Title 24 CFR, Part 3280 (formerly the Federal Standard for mobile home installations. s Additional spacing should also be... at least twice as large as the dryer exhaust opening (such as a nearby window) should be considered. 14" max....
Installation Instructions
Page 10
... the risk of the Dryer User Instructions. DURASAFE™ venting products are recommended. Exhaust hood must be connected or secured with lint. Flexible metal vent must not be at least 12" (30.5 cm) from your dealer or by calling Whirlpool Parts and Accessories. Improper venting... metal vent s For best drying performance, rigid metal vents are recommended. Housecleaning problems and health problems. 10 IMPORTANT: Observe all joints. The dryer exhaust must be connected into the interior of a building. If using an existing vent system s s s s s Clamps Use clamps to...
... the risk of the Dryer User Instructions. DURASAFE™ venting products are recommended. Exhaust hood must be connected or secured with lint. Flexible metal vent must not be at least 12" (30.5 cm) from your dealer or by calling Whirlpool Parts and Accessories. Improper venting... metal vent s For best drying performance, rigid metal vents are recommended. Housecleaning problems and health problems. 10 IMPORTANT: Observe all joints. The dryer exhaust must be connected into the interior of a building. If using an existing vent system s s s s s Clamps Use clamps to...
Installation Instructions
Page 11
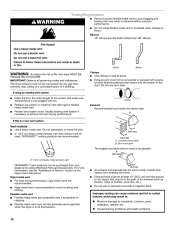
... vent G. Exhaust outlet Periscope Installation (For use with dryer vent to wall vent mismatch): Part Number 4396037 - 0" (0 cm) to 18" (45.72 cm) mismatch Part Number 4396011 - 18" (45.72 cm) to 29" (73.66 cm) mismatch Part Number 4396014 - 29" (73.66 cm) to .... Periscope installation The Vent system chart provides venting requirements that will : A B s s Shorten the life of elbows and turns. s Over-the-Top Installation: Part Number 4396028 s B C D A E F G B H A. Standard exhaust installation with one offset elbow) B. Determine vent length and elbows needed for best drying...
... vent G. Exhaust outlet Periscope Installation (For use with dryer vent to wall vent mismatch): Part Number 4396037 - 0" (0 cm) to 18" (45.72 cm) mismatch Part Number 4396011 - 18" (45.72 cm) to 29" (73.66 cm) mismatch Part Number 4396014 - 29" (73.66 cm) to .... Periscope installation The Vent system chart provides venting requirements that will : A B s s Shorten the life of elbows and turns. s Over-the-Top Installation: Part Number 4396028 s B C D A E F G B H A. Standard exhaust installation with one offset elbow) B. Determine vent length and elbows needed for best drying...
Installation Instructions
Page 12
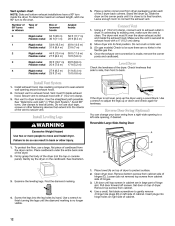
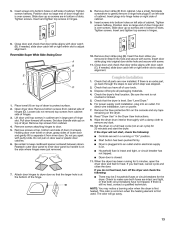
... m) 28 ft (8.5 m) 48 ft (14.6 m) 23 ft (7 m) 38 ft (11.6 m) 19 ft (5.8 m) 29 ft (8.8 m) 17 ft (5.2 m) 21 ft (6.4 m) 15 ft (4.6 m) 5. If the dryer is no kinks in dryer. Failure to seal all joints. Place cardboard under each of hinges (C). Lift door until the diamond marking is not level, prop up . Remove... add one 90º turn inside exhaust hood. Make sure the vent is close to finish turning the legs until top screws in large part of the dryer. Connect vent to existing vent, make sure the vent is made, remove the corner posts and cardboard. Gently lay the...
... m) 28 ft (8.5 m) 48 ft (14.6 m) 23 ft (7 m) 38 ft (11.6 m) 19 ft (5.8 m) 29 ft (8.8 m) 17 ft (5.2 m) 21 ft (6.4 m) 15 ft (4.6 m) 5. If the dryer is no kinks in dryer. Failure to seal all joints. Place cardboard under each of hinges (C). Lift door until the diamond marking is not level, prop up . Remove... add one 90º turn inside exhaust hood. Make sure the vent is close to finish turning the legs until top screws in large part of the dryer. Connect vent to existing vent, make sure the vent is made, remove the corner posts and cardboard. Gently lay the...
Installation Instructions
Page 13
... Use a small, flat-blade screwdriver to gently remove 4 hinge hole plugs (F) on dryer, grasp sides of cabinet. If needed , slide door catch left side of door hinge slot is an extra part, go away. 13 For power supply cord installation, plug into bottom holes on top ... Wide Side-Swing Door A B C E F D 10. Check the dryer's final location. Place towel (A) on power. 7. Open dryer door. Loosen (do not feel for the dryer. Dryer is plugged into hole and secure with door catch (C). If you removed in large part of door (4 screws). This odor is common when the heating element...
... Use a small, flat-blade screwdriver to gently remove 4 hinge hole plugs (F) on dryer, grasp sides of cabinet. If needed , slide door catch left side of door hinge slot is an extra part, go away. 13 For power supply cord installation, plug into bottom holes on top ... Wide Side-Swing Door A B C E F D 10. Check the dryer's final location. Place towel (A) on power. 7. Open dryer door. Loosen (do not feel for the dryer. Dryer is plugged into hole and secure with door catch (C). If you removed in large part of door (4 screws). This odor is common when the heating element...


