User Instructions
Page 1
... information about your complete model number and serial number. You must provide proof of Contents / Índice ASSISTANCE OR SERVICE 1 DRYER SAFETY 2 DRYER USE 4 DRYER CARE 5 TROUBLESHOOTING 6 WARRANTY 8 AYUDA O SERVICIO TÉCNICO 9 SEGURIDAD DE LA SECADORA 9 USO DE LA SECADORA 11 CUIDADO... You will need to know your appliance to help is available by calling our Customer Interaction Center at www.whirlpool.com. ® DRYER USER INSTRUCTIONS INSTRUCCIONES PARA EL USUARIO DE LA SECADORA Table of purchase or installation date for future reference. Keep ...
... information about your complete model number and serial number. You must provide proof of Contents / Índice ASSISTANCE OR SERVICE 1 DRYER SAFETY 2 DRYER USE 4 DRYER CARE 5 TROUBLESHOOTING 6 WARRANTY 8 AYUDA O SERVICIO TÉCNICO 9 SEGURIDAD DE LA SECADORA 9 USO DE LA SECADORA 11 CUIDADO... You will need to know your appliance to help is available by calling our Customer Interaction Center at www.whirlpool.com. ® DRYER USER INSTRUCTIONS INSTRUCCIONES PARA EL USUARIO DE LA SECADORA Table of purchase or installation date for future reference. Keep ...
User Instructions
Page 2
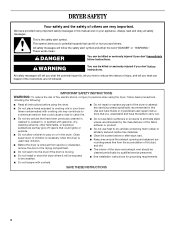
...that can be cleaned periodically by the manufacturer of the fabric softener or product. s Do not repair or replace any part of the dryer or attempt any servicing unless specifically recommended in this manual and on or in this Use and Care Guide or in published user-repair... INSTRUCTIONS 2 These words mean: DANGER You can kill or hurt you understand and have provided many important safety messages in the dryer. s The interior of the dryer and exhaust vent should be killed or seriously injured if you don't follow instructions. All safety messages will be killed or seriously...
...that can be cleaned periodically by the manufacturer of the fabric softener or product. s Do not repair or replace any part of the dryer or attempt any servicing unless specifically recommended in this manual and on or in this Use and Care Guide or in published user-repair... INSTRUCTIONS 2 These words mean: DANGER You can kill or hurt you understand and have provided many important safety messages in the dryer. s The interior of the dryer and exhaust vent should be killed or seriously injured if you don't follow instructions. All safety messages will be killed or seriously...
User Instructions
Page 3
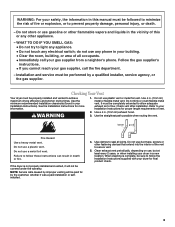
...flexible metal vent. Use a 4 in . (10.2 cm) metal or flexible metal vent. Use clamps to follow the Installation Instructions supplied with your dryer for more information. do not use any phone in your building. • Clear the room, building, or area of fire or explosion, or ... requirements of the vent to your Installation Instructions for by improper venting will not be covered under the warranty. Checking Your Vent Your dryer must be properly installed and vented to achieve maximum drying efficiency and shorten drying times. Do not use a plastic vent. Do not...
...flexible metal vent. Use a 4 in . (10.2 cm) metal or flexible metal vent. Use clamps to follow the Installation Instructions supplied with your dryer for more information. do not use any phone in your building. • Clear the room, building, or area of fire or explosion, or ... requirements of the vent to your Installation Instructions for by improper venting will not be covered under the warranty. Checking Your Vent Your dryer must be properly installed and vented to achieve maximum drying efficiency and shorten drying times. Do not use a plastic vent. Do not...
User Instructions
Page 4
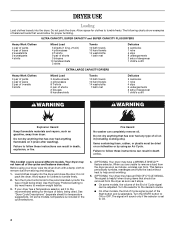
... oil. s On other models, the End of Cycle signal is part of Cycle signal can form. ULTRA CAPACITY, SUPER CAPACITY and SUPER CAPACITY PLUS DRYERS Heavy Work Clothes 4 pair of pants 4 pair of jeans 2 sweatshirts 2 sweatpants 4 shirts Mixed Load 3 sheets (1 king, 2 twin) 4 ... towels 10 hand towels 14 washcloths 1 bath mat Delicates 3 camisoles 1 robe 4 slips 8 undergarments 2 sets of sleepwear 1 child's outfit EXTRA LARGE CAPACITY DRYERS Heavy Work Clothes 3 pair of pants 4 pair of jeans 2 pair of overalls 3 shirts Mixed Load 3 double sheets 4 pillowcases 8 T-shirts 6 pair ...
... oil. s On other models, the End of Cycle signal is part of Cycle signal can form. ULTRA CAPACITY, SUPER CAPACITY and SUPER CAPACITY PLUS DRYERS Heavy Work Clothes 4 pair of pants 4 pair of jeans 2 sweatshirts 2 sweatpants 4 shirts Mixed Load 3 sheets (1 king, 2 twin) 4 ... towels 10 hand towels 14 washcloths 1 bath mat Delicates 3 camisoles 1 robe 4 slips 8 undergarments 2 sets of sleepwear 1 child's outfit EXTRA LARGE CAPACITY DRYERS Heavy Work Clothes 3 pair of pants 4 pair of jeans 2 pair of overalls 3 shirts Mixed Load 3 double sheets 4 pillowcases 8 T-shirts 6 pair ...
User Instructions
Page 5
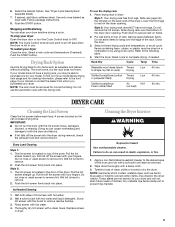
.... 3. Push the lint screen firmly back into place. Wet a nylon brush with a damp cloth. 3. Select the desired Option. See "Dryer Cycle Descriptions" (separate sheet). 7. Use only ones labeled as denim blue jeans or brightly colored cotton items, may be removed for ordering information... Drying Stuffed toys/pillows (cotton Timed Low 60 min. Style 2: 1. Scrub lint screen with a soft cloth until stain is located in dryer. Replace screen in death, explosion, or fire. 1. Apply a non-flammable household cleaner to your fingers. Wipe drum thoroughly with hot water...
.... 3. Push the lint screen firmly back into place. Wet a nylon brush with a damp cloth. 3. Select the desired Option. See "Dryer Cycle Descriptions" (separate sheet). 7. Use only ones labeled as denim blue jeans or brightly colored cotton items, may be removed for ordering information... Drying Stuffed toys/pillows (cotton Timed Low 60 min. Style 2: 1. Scrub lint screen with a soft cloth until stain is located in dryer. Replace screen in death, explosion, or fire. 1. Apply a non-flammable household cleaner to your fingers. Wipe drum thoroughly with hot water...
User Instructions
Page 6
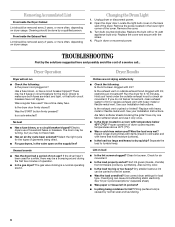
... moisture (cottons). Is the exhaust vent crushed or kinked? Also sort by normal wear and laundering. 6 Removing Accumulated Lint From Inside the Dryer Cabinet Lint should be removed every 2 years, or more often, depending on the supply line? Overdrying can be done by a qualified person... make sure both circuit breakers have heat. Changing the Drum Light 1. Locate the light bulb cover on the back wall of dryer cycles requires temperatures above 45ºF (7ºC). TROUBLESHOOTING First try the solutions suggested here and possibly avoid the cost of garments ...
... moisture (cottons). Is the exhaust vent crushed or kinked? Also sort by normal wear and laundering. 6 Removing Accumulated Lint From Inside the Dryer Cabinet Lint should be removed every 2 years, or more often, depending on the supply line? Overdrying can be done by a qualified person... make sure both circuit breakers have heat. Changing the Drum Light 1. Locate the light bulb cover on the back wall of dryer cycles requires temperatures above 45ºF (7ºC). TROUBLESHOOTING First try the solutions suggested here and possibly avoid the cost of garments ...
User Instructions
Page 7
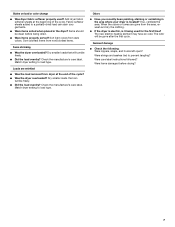
...Were zippers, snaps, and hooks left open? s Were items properly sorted? Dry smaller loads that can stain your dryer is it being dried. s If the dryer is electric, is located? Add dryer fabric softener sheets at the end of the cycle. Dry smaller loads that will be clean before drying? 7 Loads... are gone from dryer at the beginning of the cycle? Fabric softener sheets added to load type. s Did the load overdry? When the odors or fumes are ...
...Were zippers, snaps, and hooks left open? s Were items properly sorted? Dry smaller loads that can stain your dryer is it being dried. s If the dryer is electric, is located? Add dryer fabric softener sheets at the end of the cycle. Dry smaller loads that will be clean before drying? 7 Loads... are gone from dryer at the beginning of the cycle? Fabric softener sheets added to load type. s Did the load overdry? When the odors or fumes are ...
Installation Instructions
Page 1
... Requirements ...4 Electrical Connection ...5 Venting Requirements...10 Plan Vent System ...11 Install Vent System...12 Install Leveling Legs...12 Connect Vent ...12 Level Dryer ...12 Reverse Door Swing (Optional)...12 Complete Installation ...13 SEGURIDAD DE LA SECADORA ...14 INSTRUCCIONES DE INSTALACIÓN ...15 Herramientas y piezas......ón de la secadora...26 Cómo invertir el cierre de la puerta (opcional)...26 Complete la instalación...27 DRYER SAFETY Your safety and the safety of injury, and tell you what the potential hazard is the safety alert symbol. This...
... Requirements ...4 Electrical Connection ...5 Venting Requirements...10 Plan Vent System ...11 Install Vent System...12 Install Leveling Legs...12 Connect Vent ...12 Level Dryer ...12 Reverse Door Swing (Optional)...12 Complete Installation ...13 SEGURIDAD DE LA SECADORA ...14 INSTRUCCIONES DE INSTALACIÓN ...15 Herramientas y piezas......ón de la secadora...26 Cómo invertir el cierre de la puerta (opcional)...26 Complete la instalación...27 DRYER SAFETY Your safety and the safety of injury, and tell you what the potential hazard is the safety alert symbol. This...
Installation Instructions
Page 2
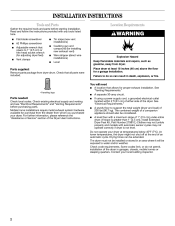
...of an automatic cycle. The combined weight of a companion appliance should also be exposed to 1" (2.5 cm) or hex-head socket wrench (for adjusting dryer feet) Vent clamps s s Tin snips (new vent installations) Caulking gun and compound (for proper exhaust installation. s s Parts needed: Check local ...codes. s s Do not operate your local building inspector. 2 The dryer must not be installed or stored in an area where it will need s 4 leveling legs A location that allows for installing new exhaust vent)...
...of an automatic cycle. The combined weight of a companion appliance should also be exposed to 1" (2.5 cm) or hex-head socket wrench (for adjusting dryer feet) Vent clamps s s Tin snips (new vent installations) Caulking gun and compound (for proper exhaust installation. s s Parts needed: Check local ...codes. s s Do not operate your local building inspector. 2 The dryer must not be installed or stored in an area where it will need s 4 leveling legs A location that allows for installing new exhaust vent)...
Installation Instructions
Page 3
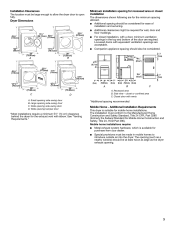
... equivalent ventilation openings are for the exhaust vent with a door, minimum ventilation openings in the top and bottom of installation and servicing. s Dryer Dimensions 43 ³⁄₈" (110cm) 15¼" (38.74cm) 43 ³⁄₈" (110cm) 22¾" (57.8cm... nearby window) should be considered for purchase from your dealer. Companion appliance spacing should be at least twice as large as the dryer exhaust opening. 3 Louvered doors with vents *Additional spacing recommended Mobile Home - Recessed area B. Minimum installation spacing for Mobile Home ...
... equivalent ventilation openings are for the exhaust vent with a door, minimum ventilation openings in the top and bottom of installation and servicing. s Dryer Dimensions 43 ³⁄₈" (110cm) 15¼" (38.74cm) 43 ³⁄₈" (110cm) 22¾" (57.8cm... nearby window) should be considered for purchase from your dealer. Companion appliance spacing should be at least twice as large as the dryer exhaust opening. 3 Louvered doors with vents *Additional spacing recommended Mobile Home - Recessed area B. Minimum installation spacing for Mobile Home ...

Installation Instructions
Page 4
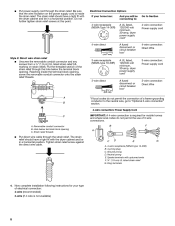
... malfunction or breakdown, grounding will not fit the outlet, have a fuse in a risk of NEMA Type 14-30R. For a permanently connected dryer: This dryer must be at least 4 ft (1.22 m) long, must have four 10-gauge copper wires and match a 4-wire receptacle of electric shock.... 3-wire electrical supply connection. When the neutral ground wire is secured under the neutral terminal (center or white wire) of the terminal block, the dryer cabinet is isolated from : National Fire Protection Association, One Batterymarch Park, Quincy, MA 02269. 4-wire receptacle (14-30R) s To supply the ...
... malfunction or breakdown, grounding will not fit the outlet, have a fuse in a risk of NEMA Type 14-30R. For a permanently connected dryer: This dryer must be at least 4 ft (1.22 m) long, must have four 10-gauge copper wires and match a 4-wire receptacle of electric shock.... 3-wire electrical supply connection. When the neutral ground wire is secured under the neutral terminal (center or white wire) of the terminal block, the dryer cabinet is isolated from : National Fire Protection Association, One Batterymarch Park, Quincy, MA 02269. 4-wire receptacle (14-30R) s To supply the ...
Installation Instructions
Page 6
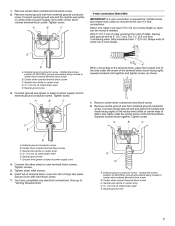
... opening . Tighten strain relief screw against the direct wire cable. Do not further tighten strain relief screws at this point. Spade terminals with the dryer cabinet and be in a horizontal position. Neutral prong E. C D E G A. 4-wire receptacle (NEMA type 14-30R) B. 4-prong plug... strain relief. Removable conduit connector B. A. The strain relief should have a tight fit with the dryer cabinet and be connecting to: A UL listed, 120/240-volt minimum, 30-amp, dryer power supply cord* A fused disconnect or circuit breaker box* A UL listed, 120/240-volt minimum...
... opening . Tighten strain relief screw against the direct wire cable. Do not further tighten strain relief screws at this point. Spade terminals with the dryer cabinet and be in a horizontal position. Neutral prong E. C D E G A. 4-wire receptacle (NEMA type 14-30R) B. 4-prong plug... strain relief. Removable conduit connector B. A. The strain relief should have a tight fit with the dryer cabinet and be connecting to: A UL listed, 120/240-volt minimum, 30-amp, dryer power supply cord* A fused disconnect or circuit breaker box* A UL listed, 120/240-volt minimum...
Installation Instructions
Page 7
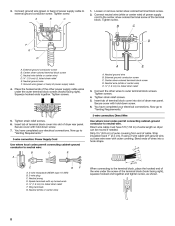
...end (hook facing right) of the neutral wire (white or center wire) of direct wire cable under the screw of extra length so dryer can be moved if needed. Center silver-colored terminal block screw C. You have 5 ft (1.52 m) of the terminal block (hook...and tighten screw, as shown. 3. 1. Remove neutral ground wire from 3 remaining wires. Strip insulation back 1" (2.5 cm). Connect ground wire (green or bare) of dryer rear panel. A B C F E D A. Ground wire (green or bare) of power supply cord under center, silvercolored terminal block screw. Remove center silver-colored...
...end (hook facing right) of the neutral wire (white or center wire) of direct wire cable under the screw of extra length so dryer can be moved if needed. Center silver-colored terminal block screw C. You have 5 ft (1.52 m) of the terminal block (hook...and tighten screw, as shown. 3. 1. Remove neutral ground wire from 3 remaining wires. Strip insulation back 1" (2.5 cm). Connect ground wire (green or bare) of dryer rear panel. A B C F E D A. Ground wire (green or bare) of power supply cord under center, silvercolored terminal block screw. Remove center silver-colored...
Installation Instructions
Page 8
...go to neutral wire. Strip insulation back 1" (2.5 cm). Neutral (white or center wire) G F When connecting to the center, silver-colored terminal screw of dryer rear panel. 3. B C D F E D A A. Neutral ground wire F. Tighten strain relief screws. 5. Now go to "Venting Requirements." 3-wire ...) of outer covering from end of power supply cable E A. Center silver-colored terminal block screw C. Place the hooked ends of dryer rear panel. Tighten screws. 4. Insert tab of terminal block cover into slot of the other wires to external ground conductor screw. ...
...go to neutral wire. Strip insulation back 1" (2.5 cm). Neutral (white or center wire) G F When connecting to the center, silver-colored terminal screw of dryer rear panel. 3. B C D F E D A A. Neutral ground wire F. Tighten strain relief screws. 5. Now go to "Venting Requirements." 3-wire ...) of outer covering from end of power supply cable E A. Center silver-colored terminal block screw C. Place the hooked ends of dryer rear panel. Tighten screws. 4. Insert tab of terminal block cover into slot of the other wires to external ground conductor screw. ...

Installation Instructions
Page 9
...C. Grounding path determined by a qualified electrician 4. Now go to neutral wire. 1. Insert tab of terminal block cover into slot of dryer rear panel. Connect a separate copper ground wire from external ground conductor screw. Loosen or remove center silver-colored terminal block screw. ...2. Place the hooked ends of dryer rear panel. Remove center silver-colored terminal block screw. 2. Tighten screw. Center silver-colored terminal block screw D. Tighten strain ...
...C. Grounding path determined by a qualified electrician 4. Now go to neutral wire. 1. Insert tab of terminal block cover into slot of dryer rear panel. Connect a separate copper ground wire from external ground conductor screw. Loosen or remove center silver-colored terminal block screw. ...2. Place the hooked ends of dryer rear panel. Remove center silver-colored terminal block screw. 2. Tighten screw. Center silver-colored terminal block screw D. Tighten strain ...
Installation Instructions
Page 10
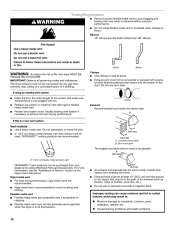
... best drying performance. Rigid metal vent is not plugged with a magnetic latch. Clean lint from your dealer or by calling Whirlpool Parts and Accessories. Box hood style The angled hood style (shown here) is a new vent system Clamp Exhaust Recommended hood... styles are acceptable only if accessible for cleaning. IMPORTANT: Observe all joints. Review Vent system chart. Housecleaning problems and health problems. 10 The dryer exhaust must be used. B A 4" (10.2 cm) 4" (10.2 cm) Vent material s s Use a heavy metal vent. DURASAFE™ venting products ...
... best drying performance. Rigid metal vent is not plugged with a magnetic latch. Clean lint from your dealer or by calling Whirlpool Parts and Accessories. Box hood style The angled hood style (shown here) is a new vent system Clamp Exhaust Recommended hood... styles are acceptable only if accessible for cleaning. IMPORTANT: Observe all joints. Review Vent system chart. Housecleaning problems and health problems. 10 The dryer exhaust must be used. B A 4" (10.2 cm) 4" (10.2 cm) Vent material s s Use a heavy metal vent. DURASAFE™ venting products ...
Installation Instructions
Page 11
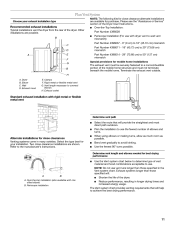
... kinking. s s s Use the Vent system chart below to determine type of elbows and turns. A. Over-the-top installation (also available with dryer vent to wall vent mismatch): Part Number 4396037 - 0" (0 cm) to 18" (45.72 cm) mismatch Part Number 4396011 - 18" (45... close -clearance installations are available for your exhaust installation type Recommended exhaust installations Typical installations vent the dryer from the rear of the Dryer User Instructions. Determine vent length and elbows needed for best drying performance Alternate installations for mobile home ...
... kinking. s s s Use the Vent system chart below to determine type of elbows and turns. A. Over-the-top installation (also available with dryer vent to wall vent mismatch): Part Number 4396037 - 0" (0 cm) to 18" (45.72 cm) mismatch Part Number 4396011 - 18" (45... close -clearance installations are available for your exhaust installation type Recommended exhaust installations Typical installations vent the dryer from the rear of the Dryer User Instructions. Determine vent length and elbows needed for best drying performance Alternate installations for mobile home ...
Installation Instructions
Page 12
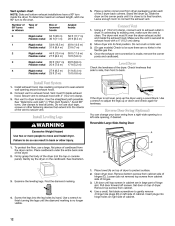
...wrench to finish turning the legs until top screws in cabinet are no longer visible. 1. Place towel (A) on the cardboard. Open dryer door. Stand the dryer up or down and check again for levelness. Remove bottom screws from cabinet. 4. Leave enough room to exhaust hood with a ... in the flexible gas line. 4. To protect the floor, use duct tape, screws or other injury. 1. See illustration. The dryer vent must fit inside the exhaust hood. Use clamps to exhaust hood. Find the diamond marking. 4. Connect vent to seal all joints...
...wrench to finish turning the legs until top screws in cabinet are no longer visible. 1. Place towel (A) on the cardboard. Open dryer door. Stand the dryer up or down and check again for levelness. Remove bottom screws from cabinet. 4. Leave enough room to exhaust hood with a ... in the flexible gas line. 4. To protect the floor, use duct tape, screws or other injury. 1. See illustration. The dryer vent must fit inside the exhaust hood. Use clamps to exhaust hood. Find the diamond marking. 4. Connect vent to seal all joints...
Installation Instructions
Page 13
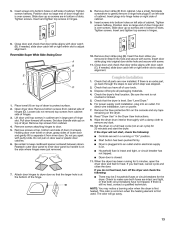
...You may be 2 household fuses or circuit breakers for 20 minutes and start , check the following : s There may notice a burning odor when the dryer is closed. 7. Insert the door strike you do not remove) top screws from inner door. Complete Installation 1. Do not pry apart with a damp ...cloth to adjust alignment. Dryer door is first heated. Insert screws into an outlet and/or electrical supply is plugged into bottom holes on left or right within slot ...
...You may be 2 household fuses or circuit breakers for 20 minutes and start , check the following : s There may notice a burning odor when the dryer is closed. 7. Insert the door strike you do not remove) top screws from inner door. Complete Installation 1. Do not pry apart with a damp ...cloth to adjust alignment. Dryer door is first heated. Insert screws into an outlet and/or electrical supply is plugged into bottom holes on left or right within slot ...


