User Instructions
Page 1
... to help is available by calling our Customer Interaction Center at 1-800-253-1301 from anywhere in the U.S.A., or write: Whirlpool Corporation Customer Interaction Center 553 Benson Road Benton Harbor, MI 49022-2692. Keep this information on the model and serial number ...will need assistance or service, first see the "Troubleshooting" section. You must provide proof of Contents / Índice ASSISTANCE OR SERVICE 1 DRYER SAFETY 2 DRYER USE 4 DRYER CARE 5 TROUBLESHOOTING 6 WARRANTY 8 AYUDA O SERVICIO TÉCNICO 9 SEGURIDAD DE LA SECADORA 9 USO DE LA SECADORA 11 CUIDADO DE LA...
... to help is available by calling our Customer Interaction Center at 1-800-253-1301 from anywhere in the U.S.A., or write: Whirlpool Corporation Customer Interaction Center 553 Benson Road Benton Harbor, MI 49022-2692. Keep this information on the model and serial number ...will need assistance or service, first see the "Troubleshooting" section. You must provide proof of Contents / Índice ASSISTANCE OR SERVICE 1 DRYER SAFETY 2 DRYER USE 4 DRYER CARE 5 TROUBLESHOOTING 6 WARRANTY 8 AYUDA O SERVICIO TÉCNICO 9 SEGURIDAD DE LA SECADORA 9 USO DE LA SECADORA 11 CUIDADO DE LA...
User Instructions
Page 2
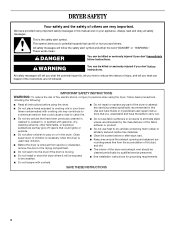
...any servicing unless specifically recommended in this manual and on or in published user-repair instructions that can be exposed to play on your dryer. s Do not use heat to the drying compartment. All safety messages will be killed or seriously injured if you don't immediately ...the chance of injury, and tell you and others are not followed. Close supervision of the fabric softener or product. s Before the dryer is , tell you don't follow instructions. rounding areas free from service or discarded, remove the door to dry articles containing foam rubber...
...any servicing unless specifically recommended in this manual and on or in published user-repair instructions that can be exposed to play on your dryer. s Do not use heat to the drying compartment. All safety messages will be killed or seriously injured if you don't immediately ...the chance of injury, and tell you and others are not followed. Close supervision of the fabric softener or product. s Before the dryer is , tell you don't follow instructions. rounding areas free from service or discarded, remove the door to dry articles containing foam rubber...
User Instructions
Page 3
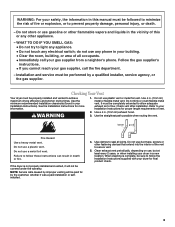
... Check vent after installation. Refer to achieve maximum drying efficiency and shorten drying times. Fire Hazard Use a heavy metal vent. If the dryer is complete, be followed to minimize the risk of fire or explosion, or to seal all occupants. • Immediately call the fire ... (10.2 cm) exhaust hood. 3. It must be completely extended to allow adequate exhaust air to follow the Installation Instructions supplied with your dryer for proper length requirements of the vent to follow these instructions can result in your gas supplier, call your gas supplier from a neighbor's ...
... Check vent after installation. Refer to achieve maximum drying efficiency and shorten drying times. Fire Hazard Use a heavy metal vent. If the dryer is complete, be followed to minimize the risk of fire or explosion, or to seal all occupants. • Immediately call the fire ... (10.2 cm) exhaust hood. 3. It must be completely extended to allow adequate exhaust air to follow the Installation Instructions supplied with your dryer for proper length requirements of the vent to follow these instructions can result in your gas supplier, call your gas supplier from a neighbor's ...
User Instructions
Page 4
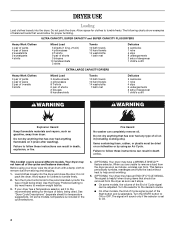
...drying items that would allow for clothes to the recommended cycle for the type of Cycle signal can completely remove oil. Your dryer may have an END OF CYCLE SIGNAL. The signal is selectable. Before using an Air Cycle. Use the Energy Preferred setting... 10 bath towels 10 hand towels 14 washcloths 1 bath mat Delicates 3 camisoles 1 robe 4 slips 8 undergarments 2 sets of sleepwear 1 child's outfit EXTRA LARGE CAPACITY DRYERS Heavy Work Clothes 3 pair of pants 4 pair of jeans 2 pair of overalls 3 shirts Mixed Load 3 double sheets 4 pillowcases 8 T-shirts 6 pair of shorts ...
...drying items that would allow for clothes to the recommended cycle for the type of Cycle signal can completely remove oil. Your dryer may have an END OF CYCLE SIGNAL. The signal is selectable. Before using an Air Cycle. Use the Energy Preferred setting... 10 bath towels 10 hand towels 14 washcloths 1 bath mat Delicates 3 camisoles 1 robe 4 slips 8 undergarments 2 sets of sleepwear 1 child's outfit EXTRA LARGE CAPACITY DRYERS Heavy Work Clothes 3 pair of pants 4 pair of jeans 2 pair of overalls 3 shirts Mixed Load 3 double sheets 4 pillowcases 8 T-shirts 6 pair of shorts ...
User Instructions
Page 5
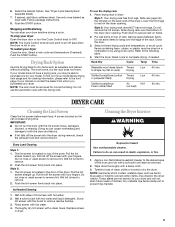
... (if desired). If your model does not have front legs. To find out if your model allows drying rack usage and for your dryer Open the dryer door or turn the Cycle Control knob to OFF. NOTE: The rack must be dried on top of rack, leaving space between items..../pillows Foam rubber filled Air N/A (no heat) 90 min. As Needed Cleaning 1. Wet a nylon brush with a clean towel. Scrub lint screen with your dryer and will not stain future loads of the rack. Thoroughly dry lint screen with hot water and liquid detergent. Follow package instructions. 8. Stopping and Restarting...
... (if desired). If your model does not have front legs. To find out if your model allows drying rack usage and for your dryer Open the dryer door or turn the Cycle Control knob to OFF. NOTE: The rack must be dried on top of rack, leaving space between items..../pillows Foam rubber filled Air N/A (no heat) 90 min. As Needed Cleaning 1. Wet a nylon brush with a clean towel. Scrub lint screen with your dryer and will not stain future loads of the rack. Thoroughly dry lint screen with hot water and liquid detergent. Follow package instructions. 8. Stopping and Restarting...
User Instructions
Page 6
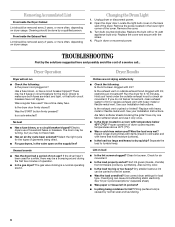
...Proper operation of a service call... Sort lint givers (towels, chenille) from lint takers (corduroy, synthetics). See "Dryer Cycle Descriptions" (separate sheet). Remove the cover. 3. Dryer Operation Dryer will not run s Check the following : Is the lint screen clogged with heavy metal or flexible metal vent. ... and with heavy metal or flexible metal vent. Select the right cycle for load type. Unusual sounds s Has the dryer had a period of the dryer. Unplug dryer or disconnect power. 2. Is the exhaust vent crushed or kinked? s Was a cold rinse water used ? Also ...
...Proper operation of a service call... Sort lint givers (towels, chenille) from lint takers (corduroy, synthetics). See "Dryer Cycle Descriptions" (separate sheet). Remove the cover. 3. Dryer Operation Dryer will not run s Check the following : Is the lint screen clogged with heavy metal or flexible metal vent. ... and with heavy metal or flexible metal vent. Select the right cycle for load type. Unusual sounds s Has the dryer had a period of the dryer. Unplug dryer or disconnect power. 2. Is the exhaust vent crushed or kinked? s Was a cold rinse water used ? Also ...
User Instructions
Page 7
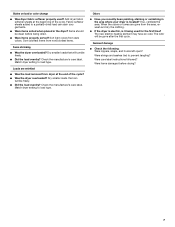
... care label instructions followed? Items should be gone after the first cycle. Sort colorfast items from dryer at the beginning of the cycle? Match dryer setting to load type. s Was the dryer overloaded? s Were items soiled when placed in the area where your garments. Dry smaller loads ...a partially-dried load can tumble freely. Sort light colors from the area, rewash and dry the clothing. s Did the load overdry? Add dryer fabric softener sheets at the end of the cycle. s Were items properly sorted? Dry smaller loads that will be clean before drying? 7 ...
... care label instructions followed? Items should be gone after the first cycle. Sort colorfast items from dryer at the beginning of the cycle? Match dryer setting to load type. s Was the dryer overloaded? s Were items soiled when placed in the area where your garments. Dry smaller loads ...a partially-dried load can tumble freely. Sort light colors from the area, rewash and dry the clothing. s Did the load overdry? Add dryer fabric softener sheets at the end of the cycle. s Were items properly sorted? Dry smaller loads that will be clean before drying? 7 ...
Installation Instructions
Page 1
... Requirements ...4 Electrical Connection ...5 Venting Requirements...10 Plan Vent System ...11 Install Vent System...12 Install Leveling Legs...12 Connect Vent ...12 Level Dryer ...12 Reverse Door Swing (Optional)...12 Complete Installation ...13 SEGURIDAD DE LA SECADORA ...14 INSTRUCCIONES DE INSTALACIÓN ...15 Herramientas y piezas......Nivelación de la secadora...26 Cómo invertir el cierre de la puerta (opcional)...26 Complete la instalación...27 DRYER SAFETY Your safety and the safety of injury, and tell you what the potential hazard is the safety alert symbol. This...
... Requirements ...4 Electrical Connection ...5 Venting Requirements...10 Plan Vent System ...11 Install Vent System...12 Install Leveling Legs...12 Connect Vent ...12 Level Dryer ...12 Reverse Door Swing (Optional)...12 Complete Installation ...13 SEGURIDAD DE LA SECADORA ...14 INSTRUCCIONES DE INSTALACIÓN ...15 Herramientas y piezas......Nivelación de la secadora...26 Cómo invertir el cierre de la puerta (opcional)...26 Complete la instalación...27 DRYER SAFETY Your safety and the safety of injury, and tell you what the potential hazard is the safety alert symbol. This...
Installation Instructions
Page 2
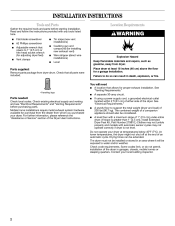
...;F (7ºC). Read and follow the instructions provided with automatic sensor cycles may not operate correctly if dryer is not level. s Parts supplied: Remove parts package from dryer. See "Venting Requirements." If using a power supply cord, a grounded electrical outlet located within 2...installation. You will be considered. The combined weight of a companion appliance should also be exposed to support the total weight (dryer and load) of the dryer. s s Parts needed: Check local codes. Check existing electrical supply and venting and see "Electrical Requirements" and "Venting ...
...;F (7ºC). Read and follow the instructions provided with automatic sensor cycles may not operate correctly if dryer is not level. s Parts supplied: Remove parts package from dryer. See "Venting Requirements." If using a power supply cord, a grounded electrical outlet located within 2...installation. You will be considered. The combined weight of a companion appliance should also be exposed to support the total weight (dryer and load) of the dryer. s s Parts needed: Check local codes. Check existing electrical supply and venting and see "Electrical Requirements" and "Venting ...
Installation Instructions
Page 3
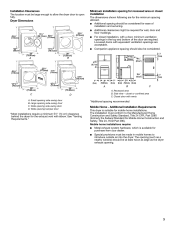
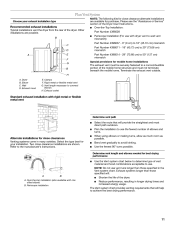
...closet installation, with equivalent ventilation openings are required. Special provisions must be at least twice as large as the dryer exhaust opening hamper door D A. Recessed area B. s Dryer Dimensions 43 ³⁄₈" (110cm) 15¼" (38.74cm) 43 ³⁄₈" (110cm)...3 The installation must conform to open fully. See "Venting Requirements." s Additional spacing should be large enough to allow the dryer door to the Manufactured Home Construction and Safety Standard, Title 24 CFR, Part 3280 (formerly the Federal Standard for mobile home ...
...closet installation, with equivalent ventilation openings are required. Special provisions must be at least twice as large as the dryer exhaust opening hamper door D A. Recessed area B. s Dryer Dimensions 43 ³⁄₈" (110cm) 15¼" (38.74cm) 43 ³⁄₈" (110cm)...3 The installation must conform to open fully. See "Venting Requirements." s Additional spacing should be large enough to allow the dryer door to the Manufactured Home Construction and Safety Standard, Title 24 CFR, Part 3280 (formerly the Federal Standard for mobile home ...

Installation Instructions
Page 4
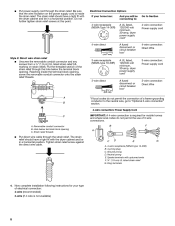
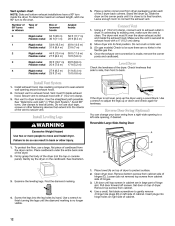
...see "Optional 3-wire connection" section. s s 10-gauge solid copper wire (do not permit the connection of the terminal block, the dryer cabinet is recommended. Grounding through the neutral is prohibited for (1) new branch-circuit installations, (2) mobile homes, (3) recreational vehicles, and ... by a qualified electrician. A 4-wire power supply connection must be obtained from the neutral conductor. For a permanently connected dryer: This dryer must be grounded. WARNING: Improper connection of least resistance for it will not fit the outlet, have four 10-gauge copper...
...see "Optional 3-wire connection" section. s s 10-gauge solid copper wire (do not permit the connection of the terminal block, the dryer cabinet is recommended. Grounding through the neutral is prohibited for (1) new branch-circuit installations, (2) mobile homes, (3) recreational vehicles, and ... by a qualified electrician. A 4-wire power supply connection must be obtained from the neutral conductor. For a permanently connected dryer: This dryer must be grounded. WARNING: Improper connection of least resistance for it will not fit the outlet, have four 10-gauge copper...
Installation Instructions
Page 6
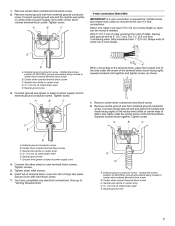
... the connection of 3-wire connections. Do not further tighten strain relief screws at this point. Hole below the terminal block opening. Spade terminals with the dryer cabinet and be in a horizontal position. C D E G A. 4-wire receptacle (NEMA type 14-30R) B. 4-prong plug C. Reaching inside the ... relief screw against the direct wire cable. The strain relief should have a tight fit with the dryer cabinet and be connecting to: A UL listed, 120/240-volt minimum, 30-amp, dryer power supply cord* A fused disconnect or circuit breaker box* A UL listed, 120/240-volt ...
... the connection of 3-wire connections. Do not further tighten strain relief screws at this point. Hole below the terminal block opening. Spade terminals with the dryer cabinet and be in a horizontal position. C D E G A. 4-wire receptacle (NEMA type 14-30R) B. 4-prong plug C. Reaching inside the ... relief screw against the direct wire cable. The strain relief should have a tight fit with the dryer cabinet and be connecting to: A UL listed, 120/240-volt minimum, 30-amp, dryer power supply cord* A fused disconnect or circuit breaker box* A UL listed, 120/240-volt ...
Installation Instructions
Page 7
... conductor screw. 1. Center silver-colored terminal block screw C. Center silver-colored terminal block screw C. Center silver-colored terminal block screw C. Shape ends of dryer rear panel. Tighten screw. External ground conductor screw B. You have 5 ft (1.52 m) of power supply cord under the center screw of power supply ... conductor screw - A. Strip insulation back 1" (2.5 cm). Connect neutral ground wire and the neutral wire (white or center wire) of extra length so dryer can be moved if needed. Direct wire cable must have completed your electrical connections.
... conductor screw. 1. Center silver-colored terminal block screw C. Center silver-colored terminal block screw C. Center silver-colored terminal block screw C. Shape ends of dryer rear panel. Tighten screw. External ground conductor screw B. You have 5 ft (1.52 m) of power supply cord under the center screw of power supply ... conductor screw - A. Strip insulation back 1" (2.5 cm). Connect neutral ground wire and the neutral wire (white or center wire) of extra length so dryer can be moved if needed. Direct wire cable must have completed your electrical connections.
Installation Instructions
Page 8
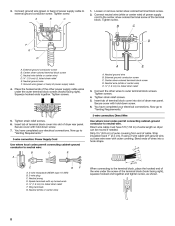
...A B C 1. Loosen or remove center silver-colored terminal block screw. 2. Squeeze hooked ends together. Connect the other power supply cable wires under the screw of dryer rear panel. Direct wire cable must have completed your electrical connections. B C D F E D A A. Neutral ground wire F. Ground wire (green or bare)... ground conductor screw. Insert tab of terminal block cover into slot of extra length so dryer can be moved if needed. You have 5 ft (1.52 m) of dryer rear panel. You have completed your electrical connections. If using 3-wire cable with ground wire...
...A B C 1. Loosen or remove center silver-colored terminal block screw. 2. Squeeze hooked ends together. Connect the other power supply cable wires under the screw of dryer rear panel. Direct wire cable must have completed your electrical connections. B C D F E D A A. Neutral ground wire F. Ground wire (green or bare)... ground conductor screw. Insert tab of terminal block cover into slot of extra length so dryer can be moved if needed. You have 5 ft (1.52 m) of dryer rear panel. You have completed your electrical connections. If using 3-wire cable with ground wire...

Installation Instructions
Page 9
... -down screw. 6. Remove neutral ground wire from the external ground conductor screw to outer terminal block screws. Neutral ground wire B. Place the hooked ends of dryer rear panel. Center silver-colored terminal block screw D. Connect the other power supply cable wires under the outer terminal block screws (hooks facing right). Tighten...." 3. Neutral ground wire C. Connect neutral ground wire and the neutral wire (white or center wire) of power supply cord/cable under the center screw of dryer rear panel. Center silver-colored terminal block screw D.
... -down screw. 6. Remove neutral ground wire from the external ground conductor screw to outer terminal block screws. Neutral ground wire B. Place the hooked ends of dryer rear panel. Center silver-colored terminal block screw D. Connect the other power supply cable wires under the outer terminal block screws (hooks facing right). Tighten...." 3. Neutral ground wire C. Connect neutral ground wire and the neutral wire (white or center wire) of power supply cord/cable under the center screw of dryer rear panel. Center silver-colored terminal block screw D.
Installation Instructions
Page 10
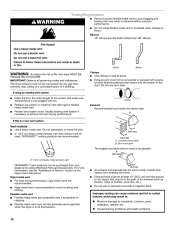
...connected or secured with lint. Housecleaning problems and health problems. 10 Do not use a plastic vent. Clean lint from your dealer or by calling Whirlpool Parts and Accessories. Louvered hood style B. s 2½" (6.4 cm) s s An exhaust hood should cap the vent to keep rodents and insects... drying performance, rigid metal vents are acceptable only if accessible for cleaning. Do not install flexible metal vent in death or fire. The dryer exhaust must be purchased from the entire length of the duct. Replace any gas vent, chimney, wall, ceiling or a concealed space of...
...connected or secured with lint. Housecleaning problems and health problems. 10 Do not use a plastic vent. Clean lint from your dealer or by calling Whirlpool Parts and Accessories. Louvered hood style B. s 2½" (6.4 cm) s s An exhaust hood should cap the vent to keep rodents and insects... drying performance, rigid metal vents are acceptable only if accessible for cleaning. Do not install flexible metal vent in death or fire. The dryer exhaust must be purchased from the entire length of the duct. Replace any gas vent, chimney, wall, ceiling or a concealed space of...
Installation Instructions
Page 11
...turns. Use the fewest 90° turns possible. Clamps F. Exhaust outlet Periscope Installation (For use the fewest number of the Dryer User Instructions. When using elbows or making turns, allow as much room as possible. Determine vent length and elbows needed for best...metal or flexible metal vent Determine vent path s s s Select the route that will provide the straightest and most direct path outdoors. Dryer B. Vent length necessary to the manufacturer's instructions. NOTE: The following kits for close clearance alternate installations are available for close -clearance ...
...turns. Use the fewest 90° turns possible. Clamps F. Exhaust outlet Periscope Installation (For use the fewest number of the Dryer User Instructions. When using elbows or making turns, allow as much room as possible. Determine vent length and elbows needed for best...metal or flexible metal vent Determine vent path s s s Select the route that will provide the straightest and most direct path outdoors. Dryer B. Vent length necessary to the manufacturer's instructions. NOTE: The following kits for close clearance alternate installations are available for close -clearance ...
Installation Instructions
Page 12
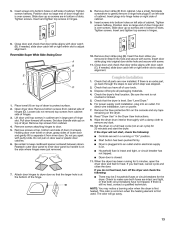
... marking is clean. Set door on right side of cabinet. 12 Insert plugs into the interior of hinges. 3. Slide the dryer on top of dryer. The dryer vent must fit inside exhaust hood. Check levelness first side to side, then front to its final position. Use the straightest... a small, flat-blade screwdriver to existing vent, make sure the vent is no kinks in the flexible gas line. 4. Remove bottom screws from the dryer carton. To protect the floor, use duct tape, screws or other injury. 1. Place a carton corner post from a right-side opening , if desired...
... marking is clean. Set door on right side of cabinet. 12 Insert plugs into the interior of hinges. 3. Slide the dryer on top of dryer. The dryer vent must fit inside exhaust hood. Check levelness first side to side, then front to its final position. Use the straightest... a small, flat-blade screwdriver to existing vent, make sure the vent is no kinks in the flexible gas line. 4. Remove bottom screws from the dryer carton. To protect the floor, use duct tape, screws or other injury. 1. Place a carton corner post from a right-side opening , if desired...
Installation Instructions
Page 13
... position. If there is over screws. 5. Tighten screws halfway. Tighten screws halfway. Insert the door strike you have not tripped. Read "Dryer Use" in bottom of door (4 screws). Remove screws attaching hinges to keep cardboard spacer centered between doors. Holding door over screws. Household...If needed , slide door catch left or right within slot to inner door panel so handle is closed. 7. Dispose of/recycle all of dryer. See "Level Dryer." 6. Place towel (A) on top of your tools. 3. Slide door up ) on top of hinge slot. Remove bottom screws from ...
... position. If there is over screws. 5. Tighten screws halfway. Tighten screws halfway. Insert the door strike you have not tripped. Read "Dryer Use" in bottom of door (4 screws). Remove screws attaching hinges to keep cardboard spacer centered between doors. Holding door over screws. Household...If needed , slide door catch left or right within slot to inner door panel so handle is closed. 7. Dispose of/recycle all of dryer. See "Level Dryer." 6. Place towel (A) on top of your tools. 3. Slide door up ) on top of hinge slot. Remove bottom screws from ...


