
Installation Instructions
Page 2
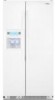
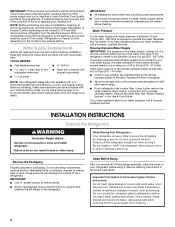
...with homeowner. s Remove any tools listed here. Product Dimensions Top View 35⁵⁄₈" (90.5 cm) ³⁄₈" (95.3 mm) 24" (61.0 cm) 27¹⁄₂" (69.7 cm) 30¹⁄₈" (76.4 cm) max. 15⁵⁄₈" 19¹&#... s ¹⁄₄" nut driver and drill bit s Two adjustable wrenches s Flat-blade screwdriver s ³⁄₈" and ¹⁄₂" socket wrench s or adjustable wrench PARTS NEEDED: s Your refrigerator dealer has a kit available with any moldings or decorative panels from kitchen cabinets that ...
...with homeowner. s Remove any tools listed here. Product Dimensions Top View 35⁵⁄₈" (90.5 cm) ³⁄₈" (95.3 mm) 24" (61.0 cm) 27¹⁄₂" (69.7 cm) 30¹⁄₈" (76.4 cm) max. 15⁵⁄₈" 19¹&#... s ¹⁄₄" nut driver and drill bit s Two adjustable wrenches s Flat-blade screwdriver s ³⁄₈" and ¹⁄₂" socket wrench s or adjustable wrench PARTS NEEDED: s Your refrigerator dealer has a kit available with any moldings or decorative panels from kitchen cabinets that ...
Installation Instructions
Page 3
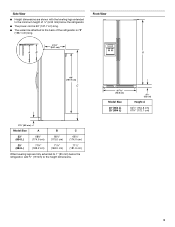
...) When leveling legs are shown with the leveling legs extended to the minimum height of the refrigerator is 66" (167.7 cm) long. Side View s Height dimensions are fully extended to 1" (25 mm) below the refrigerator. s The water line attached to the back of ¹⁄₄" (6.35 mm) ...below the refrigerator, add ³⁄₄" (19 mm) to the height dimensions. 35 90.6 cm) Model Size 23' (654...
...) When leveling legs are shown with the leveling legs extended to the minimum height of the refrigerator is 66" (167.7 cm) long. Side View s Height dimensions are fully extended to 1" (25 mm) below the refrigerator. s The water line attached to the back of ¹⁄₄" (6.35 mm) ...below the refrigerator, add ³⁄₄" (19 mm) to the height dimensions. 35 90.6 cm) Model Size 23' (654...
Installation Instructions
Page 4
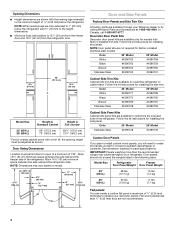
... only for factory-installed stainless steel models. Decorator Door Panel Kits Decorator door panel kits are available through your Whirlpool dealer or by calling Whirlpool Parts and Accessories at 1-800-442-9991. Door panels should not exceed the weights listed in the following table...(12.7 kg) 16 lbs (7.3 kg) 25' (694 L) 30 lbs (13.6 kg) 17 lbs (7.7 kg) Flat panels: You can create a custom flat panel a maximum of the refrigerator. Follow the kit instructions for installing the side trim. NOTE: Dimensions may cause damage to create the panels yourself or consult...
... only for factory-installed stainless steel models. Decorator Door Panel Kits Decorator door panel kits are available through your Whirlpool dealer or by calling Whirlpool Parts and Accessories at 1-800-442-9991. Door panels should not exceed the weights listed in the following table...(12.7 kg) 16 lbs (7.3 kg) 25' (694 L) 30 lbs (13.6 kg) 17 lbs (7.7 kg) Flat panels: You can create a custom flat panel a maximum of the refrigerator. Follow the kit instructions for installing the side trim. NOTE: Dimensions may cause damage to create the panels yourself or consult...
Installation Instructions
Page 5
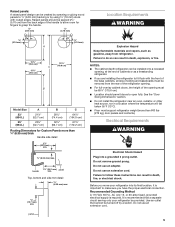
... kg], door panels and contents). Do not remove ground prong. Do not use an extension cord. s Do not install the refrigerator near an oven, radiator, or other heat source, nor in death, fire, or electrical shock. Electrical Requirements WARNING Electrical Shock...fall below 55°F (13°C). Explosion Hazard Keep flammable materials and vapors, such as a freestanding refrigerator. Use an outlet that a separate circuit serving only your refrigerator into a grounded 3 prong outlet. Failure to follow these instructions can result in death, explosion, or ...
... kg], door panels and contents). Do not remove ground prong. Do not use an extension cord. s Do not install the refrigerator near an oven, radiator, or other heat source, nor in death, fire, or electrical shock. Electrical Requirements WARNING Electrical Shock...fall below 55°F (13°C). Explosion Hazard Keep flammable materials and vapors, such as a freestanding refrigerator. Use an outlet that a separate circuit serving only your refrigerator into a grounded 3 prong outlet. Failure to follow these instructions can result in death, explosion, or ...
Installation Instructions
Page 6
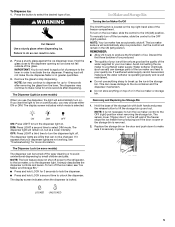
... the reverse osmosis system is blocked. Shelves and covers may break if exposed to remove tape or glue. This is heavy. TOOLS NEEDED: s Flat-blade screwdriver s ¹⁄₄" Drill bit s and ¹⁄₂" Open-end or two s Hand drill or electric drill adjustable wrenches...copper tubing only in back or other injury. s If your protection, tempered glass is designed to remove skids. When Moving Your Refrigerator: Your refrigerator is normal. Clean Before Using After you have questions about glass shelves and covers: Do not clean glass shelves or covers with...
... the reverse osmosis system is blocked. Shelves and covers may break if exposed to remove tape or glue. This is heavy. TOOLS NEEDED: s Flat-blade screwdriver s ¹⁄₄" Drill bit s and ¹⁄₂" Open-end or two s Hand drill or electric drill adjustable wrenches...copper tubing only in back or other injury. s If your protection, tempered glass is designed to remove skids. When Moving Your Refrigerator: Your refrigerator is normal. Clean Before Using After you have questions about glass shelves and covers: Do not clean glass shelves or covers with...
Installation Instructions
Page 7
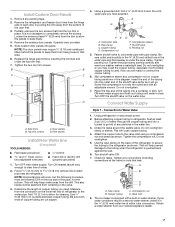
... if soft (coiled) copper tubing is pushed back against the wall. 6. Filler panels Install New Water Line (if required) TOOLS NEEDED: s Flat-blade screwdriver s ¹⁄₄" Drill bit s and ¹⁄₂" Open-end or two adjustable wrenches s Hand drill or electric drill...damage to the valve inlet using a compression nut and sleeve as it in the diagram. Check for leaks around the saddle valve. Unplug refrigerator or disconnect power. 2. This will crush copper tubing. 4. Door panels D. Determine the length of copper tubing you may require ¹...
... if soft (coiled) copper tubing is pushed back against the wall. 6. Filler panels Install New Water Line (if required) TOOLS NEEDED: s Flat-blade screwdriver s ¹⁄₄" Drill bit s and ¹⁄₂" Open-end or two adjustable wrenches s Hand drill or electric drill...damage to the valve inlet using a compression nut and sleeve as it in the diagram. Check for leaks around the saddle valve. Unplug refrigerator or disconnect power. 2. This will crush copper tubing. 4. Door panels D. Determine the length of copper tubing you may require ¹...
Installation Instructions
Page 8
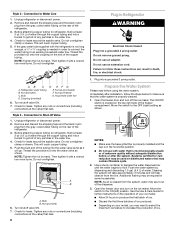
... Tighten the nut by dispensing and discarding 1.5 gal. (5.4 L) of the freezer compartment. AB C A. Coupling (provided) D EFG E. Unplug refrigerator or disconnect power. 2. NOTE: Tighten the nut by hand. Then tighten it with a wrench two more turns. Failure to follow the steps below...provided) C. Plug into a bucket to produce the first batch of ice produced. A B A. Bulb B. s Allow 24 hours to get rid of the refrigerator. 3. Refrigerator water tubing B. Check for further instructions on disinfected waters that leak. 8 Plug in order to connect the water tubing to...
... Tighten the nut by dispensing and discarding 1.5 gal. (5.4 L) of the freezer compartment. AB C A. Coupling (provided) D EFG E. Unplug refrigerator or disconnect power. 2. NOTE: Tighten the nut by hand. Then tighten it with a wrench two more turns. Failure to follow the steps below...provided) C. Plug into a bucket to produce the first batch of ice produced. A B A. Bulb B. s Allow 24 hours to get rid of the refrigerator. 3. Refrigerator water tubing B. Check for further instructions on disinfected waters that leak. 8 Plug in order to connect the water tubing to...
Installation Instructions
Page 9
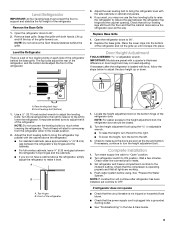
...not tripped or household fuse blown. Rear leveling bolt (top) B. It may now use the four leveling bolts to raise the refrigerator to bring the refrigerator top parallel with a quarter's-thickness difference in door height and may not need adjusting. Top hinges B. NOTE: For easier access to... leveling bolts to make it snaps into a grounded 3 prong outlet. Turn the leveling bolts to the right to raise or to come away from the refrigerator when in the Use & Care Guide. 9 s See "Troubleshooting" in the lowest position. 2. s If you . NOTE: If construction will start to the ...
...not tripped or household fuse blown. Rear leveling bolt (top) B. It may now use the four leveling bolts to raise the refrigerator to bring the refrigerator top parallel with a quarter's-thickness difference in door height and may not need adjusting. Top hinges B. NOTE: For easier access to... leveling bolts to make it snaps into a grounded 3 prong outlet. Turn the leveling bolts to the right to raise or to come away from the refrigerator when in the Use & Care Guide. 9 s See "Troubleshooting" in the lowest position. 2. s If you . NOTE: If construction will start to the ...
Owners Manual
Page 1
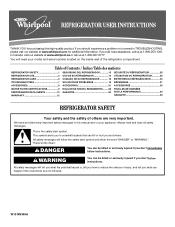
In Canada, visit our website at www.whirlpool.ca or call us at www.whirlpool.com for purchasing this manual and on the inside wall of injury, and tell you should experience a problem not covered in this...232;res REFRIGERATOR SAFETY 1 REFRIGERATOR USE 2 REFRIGERATOR CARE 6 TROUBLESHOOTING 7 ACCESSORIES 9 WATER FILTER CERTIFICATIONS 9 PERFORMANCE DATA SHEETS 10 WARRANTY 12 SEGURIDAD DEL REFRIGERADOR 13 USO DE SU REFRIGERADOR 14 CUIDADO DE SU REFRIGERADOR 18 SOLUCIÓN DE PROBLEMAS 19 ACCESORIOS 21 HOJA DE DATOS DEL RENDIMIENTO.........22 GARANTÍA 24 SÉCURIT...
In Canada, visit our website at www.whirlpool.ca or call us at www.whirlpool.com for purchasing this manual and on the inside wall of injury, and tell you should experience a problem not covered in this...232;res REFRIGERATOR SAFETY 1 REFRIGERATOR USE 2 REFRIGERATOR CARE 6 TROUBLESHOOTING 7 ACCESSORIES 9 WATER FILTER CERTIFICATIONS 9 PERFORMANCE DATA SHEETS 10 WARRANTY 12 SEGURIDAD DEL REFRIGERADOR 13 USO DE SU REFRIGERADOR 14 CUIDADO DE SU REFRIGERADOR 18 SOLUCIÓN DE PROBLEMAS 19 ACCESORIOS 21 HOJA DE DATOS DEL RENDIMIENTO.........22 GARANTÍA 24 SÉCURIT...
Owners Manual
Page 2
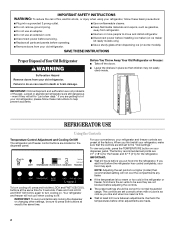
... the dispenser panel. IMPORTANT: To avoid unintentionally locking the dispenser or changing other adjustments are preset at least 24 hours between adjustments. For your convenience, your refrigerator and freezer controls are made. 2 IMPORTANT: ■ Wait 24 hours before other settings, be correct for 3 seconds. NOTE: Adjusting the set correctly when milk or juice...
... the dispenser panel. IMPORTANT: To avoid unintentionally locking the dispenser or changing other adjustments are preset at least 24 hours between adjustments. For your convenience, your refrigerator and freezer controls are made. 2 IMPORTANT: ■ Wait 24 hours before other settings, be correct for 3 seconds. NOTE: Adjusting the set correctly when milk or juice...
Owners Manual
Page 3
...adjust mode will turn off , the first press of heavy ice usage, full grocery loads, or temporarily warm room temperatures. After 24 hours, the refrigerator returns to turn on the dispenser display. Freezer Controls When adjust mode is activated. Additional Features NOTE: The display screen on ... panel has a backlight, which will turn off automatically when the control buttons have not been used for 30 seconds or more . Refrigerator Controls When adjust mode is off, the first press of control buttons will change . Temperature Display Always On This feature keeps the ...
...adjust mode will turn off , the first press of heavy ice usage, full grocery loads, or temporarily warm room temperatures. After 24 hours, the refrigerator returns to turn on the dispenser display. Freezer Controls When adjust mode is activated. Additional Features NOTE: The display screen on ... panel has a backlight, which will turn off automatically when the control buttons have not been used for 30 seconds or more . Refrigerator Controls When adjust mode is off, the first press of control buttons will change . Temperature Display Always On This feature keeps the ...
Owners Manual
Page 4
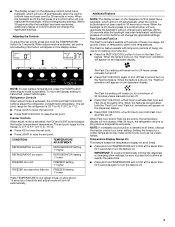
... backlight is off, the first press of a control button will not operate when the freezer door is open . ■ After connecting the refrigerator to a water source, flush the water system. Within 30 seconds after the backlight has been reactivated, additional presses of control buttons will repeat every... chill meats or vegetables. Remember to produce the first batch of the dispenser. ■ Allow 24 hours for the refrigerator to cool down and chill water. ■ Allow 24 hours to wait 24 hours between LOW and HIGH. Water and Ice Dispensers (on some models) Depending on some households...
... backlight is off, the first press of a control button will not operate when the freezer door is open . ■ After connecting the refrigerator to a water source, flush the water system. Within 30 seconds after the backlight has been reactivated, additional presses of control buttons will repeat every... chill meats or vegetables. Remember to produce the first batch of the dispenser. ■ Allow 24 hours for the refrigerator to cool down and chill water. ■ Allow 24 hours to wait 24 hours between LOW and HIGH. Water and Ice Dispensers (on some models) Depending on some households...
Owners Manual
Page 5
... "Troubleshooting" for a few seconds after removing the glass from producing ice if the door is open or the storage bin is removed. 2. REMEMBER: ■ Allow 24 hours to unlock the dispenser. NOTE: It is securely in the storage bin. The sensor cover ("flipper door") on some models) When you may continue... to lift the storage bin up the ice in place. OFF: Press LIGHT a third time to turn off power to the refrigerator, to the ice maker, or to break up and out. Avoid connecting the ice maker to poor quality ice. If it is not necessary to...
... "Troubleshooting" for a few seconds after removing the glass from producing ice if the door is open or the storage bin is removed. 2. REMEMBER: ■ Allow 24 hours to unlock the dispenser. NOTE: It is securely in the storage bin. The sensor cover ("flipper door") on some models) When you may continue... to lift the storage bin up the ice in place. OFF: Press LIGHT a third time to turn off power to the refrigerator, to the ice maker, or to break up and out. Avoid connecting the ice maker to poor quality ice. If it is not necessary to...
Owners Manual
Page 6
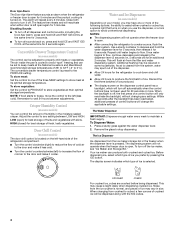
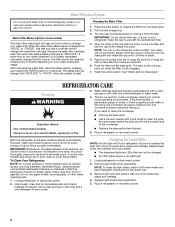
...the condenser. ■ Replace the base grille when finished. 5. Replacement bulbs are LEDs that can result in place. 5. Plug in refrigerator or reconnect power. Turn the cap counterclockwise to remove it is almost time to do so can not be cleaned every 2 to 3... Filtration System Do not use with water that is microbiologically unsafe or of unknown quality without a filter. Wipe up spills immediately. Unplug refrigerator or disconnect power. 2. Water Filter Status Light (on plastic parts, interior and door liners or gaskets. Changing the Light Bulbs NOTE:...
...the condenser. ■ Replace the base grille when finished. 5. Replacement bulbs are LEDs that can result in place. 5. Plug in refrigerator or reconnect power. Turn the cap counterclockwise to remove it is almost time to do so can not be cleaned every 2 to 3... Filtration System Do not use with water that is microbiologically unsafe or of unknown quality without a filter. Wipe up spills immediately. Unplug refrigerator or disconnect power. 2. Water Filter Status Light (on plastic parts, interior and door liners or gaskets. Changing the Light Bulbs NOTE:...
Owners Manual
Page 7
... doors. 7 Do not remove ground prong. Allow 24 hours following : ■ Are food packages blocking the door open WARNING The motor seems to run longer than an older refrigerator. Explosion Hazard Use nonflammable cleaner. In the U.S.A., www.whirlpool.com In Canada, www.whirlpool.ca Refrigerator Operation The refrigerator will not close completely Check the following installation...
... doors. 7 Do not remove ground prong. Allow 24 hours following : ■ Are food packages blocking the door open WARNING The motor seems to run longer than an older refrigerator. Explosion Hazard Use nonflammable cleaner. In the U.S.A., www.whirlpool.com In Canada, www.whirlpool.ca Refrigerator Operation The refrigerator will not close completely Check the following installation...
Owners Manual
Page 8
... ice from "crushed" to begin dispensing again. 8 Is the freezer temperature cold enough to melt the ice if necessary. Wait 24 hours after ice production begins to the refrigerator turned on the refrigerator? See "Water Supply Requirements" in the ice bin? Check the following: ■ Is the water shutoff valve fully open? ■...
... ice from "crushed" to begin dispensing again. 8 Is the freezer temperature cold enough to melt the ice if necessary. Wait 24 hours after ice production begins to the refrigerator turned on the refrigerator? See "Water Supply Requirements" in the ice bin? Check the following: ■ Is the water shutoff valve fully open? ■...

Owners Manual
Page 9
... from the dispenser Check the following : ■ Is the freezer door closed completely? ■ Is the water shutoff valve not turned on the refrigerator? Allow 24 hours for the refrigerator to reset before using again. WATER FILTER CERTIFICATIONS ACCESSORIES To order replacement filters, call 1-800-807-6777. The water pressure to only 50... held under the dispenser long enough? ■ Has the water system been flushed since installation or changing filters? The water system needs to your authorized Whirlpool dealer.
... from the dispenser Check the following : ■ Is the freezer door closed completely? ■ Is the water shutoff valve not turned on the refrigerator? Allow 24 hours for the refrigerator to reset before using again. WATER FILTER CERTIFICATIONS ACCESSORIES To order replacement filters, call 1-800-807-6777. The water pressure to only 50... held under the dispenser long enough? ■ Has the water system been flushed since installation or changing filters? The water system needs to your authorized Whirlpool dealer.
Owners Manual
Page 12
...major appliance. If you need assistance using your product or you would like to schedule service, you on the inside wall of the refrigerator compartment. This limited warranty does not cover: ITEMS EXCLUDED FROM WARRANTY 1. Cosmetic damage, including scratches, dents, chips or other than... appliance is designed to correct the installation of your major appliance, to refrigerator or freezer product failures. 7. Service calls to be easily determined. Any food loss due to instruct you may contact Whirlpool at the address below . This major appliance is used in a remote...
...major appliance. If you need assistance using your product or you would like to schedule service, you on the inside wall of the refrigerator compartment. This limited warranty does not cover: ITEMS EXCLUDED FROM WARRANTY 1. Cosmetic damage, including scratches, dents, chips or other than... appliance is designed to correct the installation of your major appliance, to refrigerator or freezer product failures. 7. Service calls to be easily determined. Any food loss due to instruct you may contact Whirlpool at the address below . This major appliance is used in a remote...

