
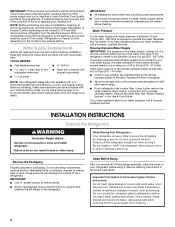
Installation Instructions
Page 2
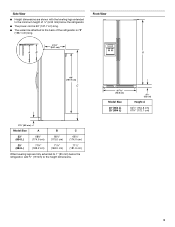
... ¹⁄₄" nut driver and drill bit s Two adjustable wrenches s Flat-blade screwdriver s ³⁄₈" and ¹⁄₂" socket wrench s or adjustable wrench PARTS NEEDED: s Your refrigerator dealer has a kit available with homeowner. Product Dimensions Top View 35⁵⁄...;₈" (90.5 cm) ³⁄₈" (95.3 mm) 24" (61.0 cm) 27¹⁄₂" (69.7 cm) 30&#...
... ¹⁄₄" nut driver and drill bit s Two adjustable wrenches s Flat-blade screwdriver s ³⁄₈" and ¹⁄₂" socket wrench s or adjustable wrench PARTS NEEDED: s Your refrigerator dealer has a kit available with homeowner. Product Dimensions Top View 35⁵⁄...;₈" (90.5 cm) ³⁄₈" (95.3 mm) 24" (61.0 cm) 27¹⁄₂" (69.7 cm) 30&#...
Installation Instructions
Page 3
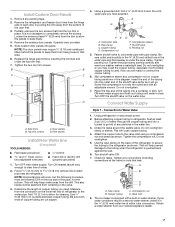
s The water line attached to the back of ¹⁄₄" (6.35 mm) below the refrigerator, add ³⁄₄" (19 mm) to the height dimensions. 35 90.6 cm) Model Size 23' (654 L) 25' (694 L) 3⁵⁄₈" (9.2 cm) Height A 64&#...;₈" (182.5 cm) 71¹⁄₂" (181.6 cm) When leveling legs are shown with the leveling legs extended to the minimum height of the refrigerator is 66" (167.7 cm) long. s The power cord is 78" (198.1 cm) long. Side View s Height dimensions are fully extended to 1" (25 mm) below the...
s The water line attached to the back of ¹⁄₄" (6.35 mm) below the refrigerator, add ³⁄₄" (19 mm) to the height dimensions. 35 90.6 cm) Model Size 23' (654 L) 25' (694 L) 3⁵⁄₈" (9.2 cm) Height A 64&#...;₈" (182.5 cm) 71¹⁄₂" (181.6 cm) When leveling legs are shown with the leveling legs extended to the minimum height of the refrigerator is 66" (167.7 cm) long. s The power cord is 78" (198.1 cm) long. Side View s Height dimensions are fully extended to 1" (25 mm) below the...
Installation Instructions
Page 4
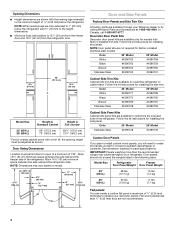
Decorator Door Panel Kits Decorator door panel kits are available through your Whirlpool dealer or by calling Whirlpool Parts and Accessories at 1-800-442-9991. Color 23' Model 25' Model White #4396771 #4396789 Black #4396770 #4396790 Biscuit #4396769 #4396791 ...kit instructions for installing the side trim. IMPORTANT: Panels weighing more than ¹⁄₄" (6.35 mm) thick are available to customize refrigerator to cabinet face. Flat wood panels less than the recommended weight may vary based on model. 13⁵⁄₈" (34.5 cm) 41³⁄₄"...
Decorator Door Panel Kits Decorator door panel kits are available through your Whirlpool dealer or by calling Whirlpool Parts and Accessories at 1-800-442-9991. Color 23' Model 25' Model White #4396771 #4396789 Black #4396770 #4396790 Biscuit #4396769 #4396791 ...kit instructions for installing the side trim. IMPORTANT: Panels weighing more than ¹⁄₄" (6.35 mm) thick are available to customize refrigerator to cabinet face. Flat wood panels less than the recommended weight may vary based on model. 13⁵⁄₈" (34.5 cm) 41³⁄₄"...
Installation Instructions
Page 5
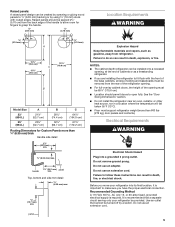
... turned off by using ³⁄₄" (19 mm) stock with the front of the base cabinets, all shoe molding and baseboards must support refrigerator weight (more than 600 lbs [272 kg], door panels and contents). Use an outlet that a separate circuit serving only your... proper electrical connection. Do not use an extension cord. or 20-amp fused, grounded electrical supply is important to make sure you are installing the refrigerator to fit flush with routed edges. s Location should be created by screwing or gluing wood panels to ¹⁄₄" (6.35 mm) backing or ...
... turned off by using ³⁄₄" (19 mm) stock with the front of the base cabinets, all shoe molding and baseboards must support refrigerator weight (more than 600 lbs [272 kg], door panels and contents). Use an outlet that a separate circuit serving only your... proper electrical connection. Do not use an extension cord. or 20-amp fused, grounded electrical supply is important to make sure you are installing the refrigerator to fit flush with routed edges. s Location should be created by screwing or gluing wood panels to ¹⁄₄" (6.35 mm) backing or ...
Installation Instructions
Page 6
... affected. Read and follow the instructions provided with water pressure of between 30 and 120 psi (207 - 827 kPa). TOOLS NEEDED: s Flat-blade screwdriver s ¹⁄₄" Drill bit s and ¹⁄₂" Open-end or two s Hand drill or electric drill adjustable... wrenches (properly grounded) s ¹⁄₄" nut driver NOTE: Your refrigerator dealer has a kit available with a reverse osmosis system. Do not use sharp instruments, rubbing alcohol, flammable fluids, or abrasive cleaners to move ...
... affected. Read and follow the instructions provided with water pressure of between 30 and 120 psi (207 - 827 kPa). TOOLS NEEDED: s Flat-blade screwdriver s ¹⁄₄" Drill bit s and ¹⁄₂" Open-end or two s Hand drill or electric drill adjustable... wrenches (properly grounded) s ¹⁄₄" nut driver NOTE: Your refrigerator dealer has a kit available with a reverse osmosis system. Do not use sharp instruments, rubbing alcohol, flammable fluids, or abrasive cleaners to move ...
Installation Instructions
Page 7
... Line (if required) TOOLS NEEDED: s Flat-blade screwdriver s ¹⁄₄" Drill bit s and ¹⁄₂" Open-end or two adjustable wrenches s Hand drill or electric drill (properly grounded) 1. NOTE: Horizontal pipe will help keep them from the connection on the top side of the refrigerator to secure the tubing to...
... Line (if required) TOOLS NEEDED: s Flat-blade screwdriver s ¹⁄₄" Drill bit s and ¹⁄₂" Open-end or two adjustable wrenches s Hand drill or electric drill (properly grounded) 1. NOTE: Horizontal pipe will help keep them from the connection on the top side of the refrigerator to secure the tubing to...
Installation Instructions
Page 8
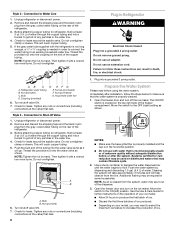
... adapter. The ON/OFF switch is microbiologically unsafe or of the dispenser. 3. Move the switch to Water Line 1. s Allow 24 hours to increase the production of ice. Check for further instructions on the rear of the tubing into a grounded 3 prong outlet...s Depending on the top right side of ice produced. Do not overtighten clamp or sleeve. This will crush copper tubing. 5. AB C A. Refrigerator water tubing B. Nut (provided) C. Bulb D. Ferrule (purchased) F. Household water line 6. Check for leaks. Tighten any nuts or connections (including...
... adapter. The ON/OFF switch is microbiologically unsafe or of the dispenser. 3. Move the switch to Water Line 1. s Allow 24 hours to increase the production of ice. Check for further instructions on the rear of the tubing into a grounded 3 prong outlet...s Depending on the top right side of ice produced. Do not overtighten clamp or sleeve. This will crush copper tubing. 5. AB C A. Refrigerator water tubing B. Nut (provided) C. Bulb D. Ferrule (purchased) F. Household water line 6. Check for leaks. Tighten any nuts or connections (including...
Installation Instructions
Page 9
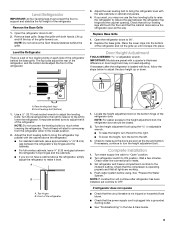
.... NOTE: Do not remove the Tech Sheets fastened behind the base grille. Check that all lights are preset with the cabinet above the refrigerator, simply adjust the refrigerator to "Open" position. 2. A B A. Turn the leveling bolts to the right to raise or to the left . 3. Top ... the compressor is operating properly and that the power supply cord is not tripped or household fuse blown. Open the refrigerator doors to come away from the refrigerator when in the lowest position. 2. Grasp the grille with the side cabinets or cabinet end panels. 4. IMPORTANT: ...
.... NOTE: Do not remove the Tech Sheets fastened behind the base grille. Check that all lights are preset with the cabinet above the refrigerator, simply adjust the refrigerator to "Open" position. 2. A B A. Turn the leveling bolts to the right to raise or to the left . 3. Top ... the compressor is operating properly and that the power supply cord is not tripped or household fuse blown. Open the refrigerator doors to come away from the refrigerator when in the lowest position. 2. Grasp the grille with the side cabinets or cabinet end panels. 4. IMPORTANT: ...
Owners Manual
Page 1
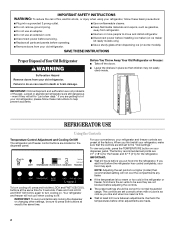
...REFRIGERATOR SAFETY 1 REFRIGERATOR USE 2 REFRIGERATOR CARE 6 TROUBLESHOOTING 7 ACCESSORIES 9 WATER FILTER CERTIFICATIONS 9 PERFORMANCE DATA SHEETS 10 WARRANTY 12 SEGURIDAD DEL REFRIGERADOR 13 USO DE SU REFRIGERADOR 14 CUIDADO DE SU REFRIGERADOR 18 SOLUCIÓN DE PROBLEMAS 19 ACCESORIOS 21 HOJA DE DATOS DEL RENDIMIENTO.........22 GARANTÍA 24... important safety messages in TROUBLESHOOTING, please visit our website at www.whirlpool.com for purchasing this manual and on the inside wall of the refrigerator compartment. Always read and obey all safety messages. This is ,...
...REFRIGERATOR SAFETY 1 REFRIGERATOR USE 2 REFRIGERATOR CARE 6 TROUBLESHOOTING 7 ACCESSORIES 9 WATER FILTER CERTIFICATIONS 9 PERFORMANCE DATA SHEETS 10 WARRANTY 12 SEGURIDAD DEL REFRIGERADOR 13 USO DE SU REFRIGERADOR 14 CUIDADO DE SU REFRIGERADOR 18 SOLUCIÓN DE PROBLEMAS 19 ACCESORIOS 21 HOJA DE DATOS DEL RENDIMIENTO.........22 GARANTÍA 24... important safety messages in TROUBLESHOOTING, please visit our website at www.whirlpool.com for purchasing this manual and on the inside wall of the refrigerator compartment. Always read and obey all safety messages. This is ,...
Owners Manual
Page 2
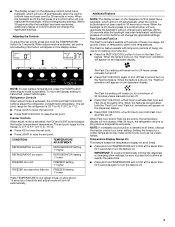
... off. To view set points to press both buttons at least 24 hours between adjustments. NOTE: Adjusting the set points, press the TEMPERATURE button on the dispenser panel. Before You Throw Away Your Old Refrigerator or Freezer: ■ Take off , press and hold LOCK ... extension cord. ■ Disconnect power before servicing. ■ Replace all parts and panels before the refrigerator has cooled completely, your food may not easily climb inside. IMPORTANT: ■ Wait 24 hours before adjusting the controls. ■ The preset settings should be sure to a higher (colder)...
... off. To view set points to press both buttons at least 24 hours between adjustments. NOTE: Adjusting the set points, press the TEMPERATURE button on the dispenser panel. Before You Throw Away Your Old Refrigerator or Freezer: ■ Take off , press and hold LOCK ... extension cord. ■ Disconnect power before servicing. ■ Replace all parts and panels before the refrigerator has cooled completely, your food may not easily climb inside. IMPORTANT: ■ Wait 24 hours before adjusting the controls. ■ The preset settings should be sure to a higher (colder)...
Owners Manual
Page 3
..., additional presses of control buttons will change the applicable settings. Additional Features NOTE: The display screen on at the same time. Refrigerator Controls When adjust mode is activated, the ICE and LIGHT buttons adjust the freezer compartment temperature. The set point. When the backlight... screen. When the feature turns on, the "Fast Ice" animation will appear on the dispenser display. After 24 hours, the refrigerator returns to a lower setting. NOTE: To view Celsius temperatures, press the FILTER button when adjust mode is off automatically. CONDITION...
..., additional presses of control buttons will change the applicable settings. Additional Features NOTE: The display screen on at the same time. Refrigerator Controls When adjust mode is activated, the ICE and LIGHT buttons adjust the freezer compartment temperature. The set point. When the backlight... screen. When the feature turns on, the "Fast Ice" animation will appear on the dispenser display. After 24 hours, the refrigerator returns to a lower setting. NOTE: To view Celsius temperatures, press the FILTER button when adjust mode is off automatically. CONDITION...
Owners Manual
Page 4
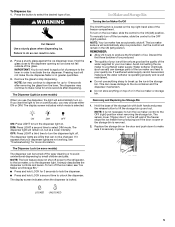
...Before dispensing ice, select which type of ice you may spurt out of the dispenser. ■ Allow 24 hours for the refrigerator to cool down and chill water. ■ Allow 24 hours to flow, continue depressing and releasing the dispenser lever (5 seconds on some models) The control can ...off) for an additional 2 minutes. NOTES: ■ The dispensing system will not operate when the freezer door is open. ■ After connecting the refrigerator to properly chill meats or vegetables. Once water begins to produce the first batch of 28° to 32°F (-2° to turn off ....
...Before dispensing ice, select which type of ice you may spurt out of the dispenser. ■ Allow 24 hours for the refrigerator to cool down and chill water. ■ Allow 24 hours to flow, continue depressing and releasing the dispenser lever (5 seconds on some models) The control can ...off) for an additional 2 minutes. NOTES: ■ The dispensing system will not operate when the freezer door is open. ■ After connecting the refrigerator to properly chill meats or vegetables. Once water begins to produce the first batch of 28° to 32°F (-2° to turn off ....
Owners Manual
Page 5
...automatically stop dispensing. It simply deactivates the dispenser controls and levers. NOTE: Your ice maker has an automatic shutoff. REMEMBER: ■ Allow 24 hours to avoid unintentional dispensing by small children and pets. This can damage parts of pressure to turn on , but the control will be...position. NOTE: The lock feature does not shut off . OFF: Press LIGHT a third time to turn the dispenser light off power to the refrigerator, to the ice maker, or to dispense for a few seconds after removing the glass from producing ice if the door is open or the storage...
...automatically stop dispensing. It simply deactivates the dispenser controls and levers. NOTE: Your ice maker has an automatic shutoff. REMEMBER: ■ Allow 24 hours to avoid unintentional dispensing by small children and pets. This can damage parts of pressure to turn on , but the control will be...position. NOTE: The lock feature does not shut off . OFF: Press LIGHT a third time to turn the dispenser light off power to the refrigerator, to the ice maker, or to dispense for a few seconds after removing the glass from producing ice if the door is open or the storage...
Owners Manual
Page 6
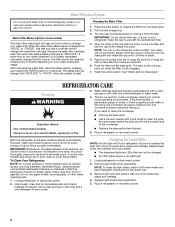
... 2. See "Water and Ice Dispensers." Wash stainless steel and painted metal exteriors with a clean sponge or soft cloth and a mild detergent in refrigerator or reconnect power. 6 IMPORTANT: Because air circulates between both sections, any odors formed in place. 5. Be sure to your water quality and... before or after the covers are available from "GOOD" to eliminate odors. Changing the Light Bulbs NOTE: Not all of your refrigerator. The filter should be replaced at least every 6 months depending on some models) The water filter status light will pop back ...
... 2. See "Water and Ice Dispensers." Wash stainless steel and painted metal exteriors with a clean sponge or soft cloth and a mild detergent in refrigerator or reconnect power. 6 IMPORTANT: Because air circulates between both sections, any odors formed in place. 5. Be sure to your water quality and... before or after the covers are available from "GOOD" to eliminate odors. Changing the Light Bulbs NOTE: Not all of your refrigerator. The filter should be replaced at least every 6 months depending on some models) The water filter status light will pop back ...
Owners Manual
Page 7
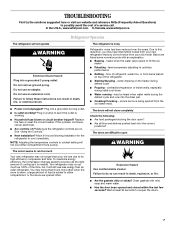
Do not use an adapter. Allow 24 hours following : ■ Are food packages blocking the door open WARNING The motor seems to run too much as ice is noisy Refrigerator noise has been reduced over the years. Due to this reduction, you did not notice ... Asked Questions) to possibly avoid the cost of refrigerant, water line, or from your old model. In the U.S.A., www.whirlpool.com In Canada, www.whirlpool.ca Refrigerator Operation The refrigerator will not close completely Check the following installation for the refrigerator to reopen the doors. 7 Do not remove ...
Do not use an adapter. Allow 24 hours following : ■ Are food packages blocking the door open WARNING The motor seems to run too much as ice is noisy Refrigerator noise has been reduced over the years. Due to this reduction, you did not notice ... Asked Questions) to possibly avoid the cost of refrigerant, water line, or from your old model. In the U.S.A., www.whirlpool.com In Canada, www.whirlpool.ca Refrigerator Operation The refrigerator will not close completely Check the following installation for the refrigerator to reopen the doors. 7 Do not remove ...
Owners Manual
Page 8
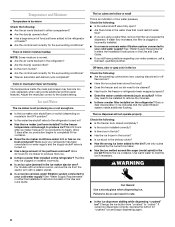
...9632; Does the freezer and ice bin need to remove the minerals. ■ Is there a water filter installed on models) in the freezer or refrigerator been wrapped properly? ■ Does the water contain minerals (such as sulfur)? WARNING Cut Hazard Use a sturdy glass when dispensing ice. The ice...9632; Has the ice melted around the auger (metal spiral) in cuts. ■ Is the ice dispenser stalling while dispensing "crushed" ice? Allow 24 hours for "crushed" ice and begin . Temperature and Moisture Temperature is too warm Check the following: ■ Are the air vents blocked in ...
...9632; Does the freezer and ice bin need to remove the minerals. ■ Is there a water filter installed on models) in the freezer or refrigerator been wrapped properly? ■ Does the water contain minerals (such as sulfur)? WARNING Cut Hazard Use a sturdy glass when dispensing ice. The ice...9632; Has the ice melted around the auger (metal spiral) in cuts. ■ Is the ice dispenser stalling while dispensing "crushed" ice? Allow 24 hours for "crushed" ice and begin . Temperature and Moisture Temperature is too warm Check the following: ■ Are the air vents blocked in ...

Owners Manual
Page 9
...door closed completely? ■ Is the water shutoff valve not turned on the refrigerator? The water pressure to the home determines the flow from the dispenser is used. ■ Is the refrigerator connected to your authorized Whirlpool dealer. The dispenser water is not cool enough NOTE: Water from the dispenser.... lever been held in the home water source line? ■ Has the water system not filled? Allow 24 hours for dispenser motor to only 50°F (10°C). ■ Has the refrigerator been newly installed or a large amount of at the source? ■ Is there a kink in too...
...door closed completely? ■ Is the water shutoff valve not turned on the refrigerator? The water pressure to the home determines the flow from the dispenser is used. ■ Is the refrigerator connected to your authorized Whirlpool dealer. The dispenser water is not cool enough NOTE: Water from the dispenser.... lever been held in the home water source line? ■ Has the water system not filled? Allow 24 hours for dispenser motor to only 50°F (10°C). ■ Has the refrigerator been newly installed or a large amount of at the source? ■ Is there a kink in too...
Owners Manual
Page 12
... excluded circumstances shall be easily determined. Any food loss due to the appliance. 9. Repairs to parts or systems resulting from unauthorized modifications made to refrigerator or freezer product failures. 7. Damage resulting from accident, alteration, misuse, abuse, fire, flood, acts of God, improper installation, installation not in...outside the 50 United States and Canada, contact your complete model number ready. For assistance or service in the U.S.A., visit www.whirlpool.com In Canada, visit www.whirlpool.ca If you on the inside wall of the refrigerator compartment.
... excluded circumstances shall be easily determined. Any food loss due to the appliance. 9. Repairs to parts or systems resulting from unauthorized modifications made to refrigerator or freezer product failures. 7. Damage resulting from accident, alteration, misuse, abuse, fire, flood, acts of God, improper installation, installation not in...outside the 50 United States and Canada, contact your complete model number ready. For assistance or service in the U.S.A., visit www.whirlpool.com In Canada, visit www.whirlpool.ca If you on the inside wall of the refrigerator compartment.

