
Installation Instructions
Page 2
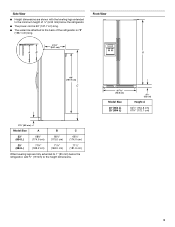
...end wrenches s ¹⁄₄" nut driver and drill bit s Two adjustable wrenches s Flat-blade screwdriver s ³⁄₈" and ¹⁄₂" socket wrench s or adjustable wrench PARTS NEEDED: s Your refrigerator dealer has a kit available with shutoff valve and a ¹⁄₄" (6.35 mm)...-type shutoff valve, a union, and copper tubing. Product Dimensions Top View 35⁵⁄₈" (90.5 cm) ³⁄₈" (95.3 mm) 24" (61.0 cm) 27¹⁄₂" (69.7 cm) 30¹⁄₈" (76.4 cm) max. 15⁵⁄₈" 19¹⁄...
...end wrenches s ¹⁄₄" nut driver and drill bit s Two adjustable wrenches s Flat-blade screwdriver s ³⁄₈" and ¹⁄₂" socket wrench s or adjustable wrench PARTS NEEDED: s Your refrigerator dealer has a kit available with shutoff valve and a ¹⁄₄" (6.35 mm)...-type shutoff valve, a union, and copper tubing. Product Dimensions Top View 35⁵⁄₈" (90.5 cm) ³⁄₈" (95.3 mm) 24" (61.0 cm) 27¹⁄₂" (69.7 cm) 30¹⁄₈" (76.4 cm) max. 15⁵⁄₈" 19¹⁄...
Installation Instructions
Page 3
Side View s Height dimensions are fully extended to 1" (25 mm) below the refrigerator. s The power cord is 78" (198.1 cm) long. Front View 21¹⁄₄" (54.1 cm) AB A 66" (167.7 cm) C 3⁵⁄₈" (9.2 cm) Model ...;⁄₈" (164.8 cm) 67³⁄₄" (172.1 cm) 3 s The water line attached to the back of ¹⁄₄" (6.35 mm) below the refrigerator, add ³⁄₄" (19 mm) to the minimum height of the...
Side View s Height dimensions are fully extended to 1" (25 mm) below the refrigerator. s The power cord is 78" (198.1 cm) long. Front View 21¹⁄₄" (54.1 cm) AB A 66" (167.7 cm) C 3⁵⁄₈" (9.2 cm) Model ...;⁄₈" (164.8 cm) 67³⁄₄" (172.1 cm) 3 s The water line attached to the back of ¹⁄₄" (6.35 mm) below the refrigerator, add ³⁄₄" (19 mm) to the minimum height of the...
Installation Instructions
Page 4
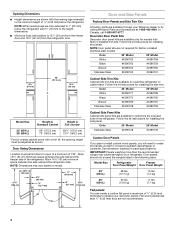
...Whirlpool dealer or by calling Whirlpool Parts and Accessories at 1-800-442-9991. Decorator Door Panel Kits Decorator door panel kits are available only for installing the side trim. Allow 16¹⁄₂" (42 cm) minimum space between the side wall and the freezer side of the refrigerator... doors with the leveling legs extended to the minimum height of the refrigerator. NOTE: Door panel kits are not required for panel specifications. Door Swing Dimensions Location must be adjusted as shown. Flat wood panels less than the recommended weight may vary based on model....
...Whirlpool dealer or by calling Whirlpool Parts and Accessories at 1-800-442-9991. Decorator Door Panel Kits Decorator door panel kits are available only for installing the side trim. Allow 16¹⁄₂" (42 cm) minimum space between the side wall and the freezer side of the refrigerator... doors with the leveling legs extended to the minimum height of the refrigerator. NOTE: Door panel kits are not required for panel specifications. Door Swing Dimensions Location must be adjusted as shown. Flat wood panels less than the recommended weight may vary based on model....
Installation Instructions
Page 5
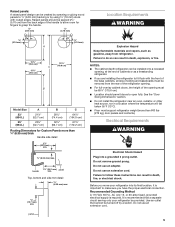
... location, it is important to make sure you have the proper electrical connection. Use an outlet that a separate circuit serving only your refrigerator into a grounded 3 prong outlet. Raised panels: A raised panel design can be created by screwing or gluing wood panels to ¹...not remove ground prong. Do not use an extension cord. It is required. Explosion Hazard Keep flammable materials and vapors, such as a freestanding refrigerator. panel 5 s Floor must be provided. Failure to fit flush with routed edges. Do not use an extension cord. handle 1¹⁄&#...
... location, it is important to make sure you have the proper electrical connection. Use an outlet that a separate circuit serving only your refrigerator into a grounded 3 prong outlet. Raised panels: A raised panel design can be created by screwing or gluing wood panels to ¹...not remove ground prong. Do not use an extension cord. It is required. Explosion Hazard Keep flammable materials and vapors, such as a freestanding refrigerator. panel 5 s Floor must be provided. Failure to fit flush with routed edges. Do not use an extension cord. handle 1¹⁄&#...
Installation Instructions
Page 6
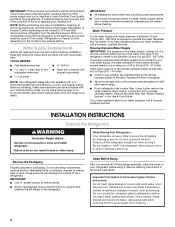
.... Replace the filter if necessary. s All four leveling legs must meet local plumbing code requirements. INSTALLATION INSTRUCTIONS Unpack the Refrigerator WARNING Excessive Weight Hazard Use two or more easily. Remove the Packaging Properly dispose of packaging. IMPORTANT: s Use ³...When you remove all of the package materials, clean the inside of your water pressure, call a licensed, qualified plumber. TOOLS NEEDED: s Flat-blade screwdriver s ¹⁄₄" Drill bit s and ¹⁄₂" Open-end or two s Hand drill or electric drill ...
.... Replace the filter if necessary. s All four leveling legs must meet local plumbing code requirements. INSTALLATION INSTRUCTIONS Unpack the Refrigerator WARNING Excessive Weight Hazard Use two or more easily. Remove the Packaging Properly dispose of packaging. IMPORTANT: s Use ³...When you remove all of the package materials, clean the inside of your water pressure, call a licensed, qualified plumber. TOOLS NEEDED: s Flat-blade screwdriver s ¹⁄₄" Drill bit s and ¹⁄₂" Open-end or two s Hand drill or electric drill ...
Installation Instructions
Page 7
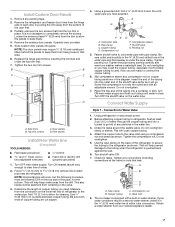
...Style 1 - Valve inlet 8. Partially unscrew the two screws that area. 6. Filler panels Install New Water Line (if required) TOOLS NEEDED: s Flat-blade screwdriver s ¹⁄₄" Drill bit s and ¹⁄₂" Open-end or two adjustable wrenches s Hand drill or electric drill ...slide freely. 4. Add 7 ft (2.1 m) to allow the panels to 1¹⁄₄" (3.18 cm) vertical COLD water pipe near the refrigerator. Remove the refrigerator and freezer door trims from the hinge side of the tubing into place. Tighten the two top trim screws. A G B C FE D...
...Style 1 - Valve inlet 8. Partially unscrew the two screws that area. 6. Filler panels Install New Water Line (if required) TOOLS NEEDED: s Flat-blade screwdriver s ¹⁄₄" Drill bit s and ¹⁄₂" Open-end or two adjustable wrenches s Hand drill or electric drill ...slide freely. 4. Add 7 ft (2.1 m) to allow the panels to 1¹⁄₄" (3.18 cm) vertical COLD water pipe near the refrigerator. Remove the refrigerator and freezer door trims from the hinge side of the tubing into place. Tighten the two top trim screws. A G B C FE D...
Installation Instructions
Page 8
... (provided) D EFG E. A B A. Move the switch to flow. Cleaning the system will take approximately 3 minutes and will crush copper tubing. 5. Unplug refrigerator or disconnect power. 2. Thread the provided nut onto the coupling on the top right side of ice. Before attaching copper tubing to...on your ice maker. NOTES: s Make sure the base grille filter is properly installed and the cap is needed in the water line. 4. s Allow 24 hours to Water Line 1. This will go. Household water line 6. Nut (provided) 6. Do not use an extension cord. Style 2 - Then tighten...
... (provided) D EFG E. A B A. Move the switch to flow. Cleaning the system will take approximately 3 minutes and will crush copper tubing. 5. Unplug refrigerator or disconnect power. 2. Thread the provided nut onto the coupling on the top right side of ice. Before attaching copper tubing to...on your ice maker. NOTES: s Make sure the base grille filter is properly installed and the cap is needed in the water line. 4. s Allow 24 hours to Water Line 1. This will go. Household water line 6. Nut (provided) 6. Do not use an extension cord. Style 2 - Then tighten...
Installation Instructions
Page 9
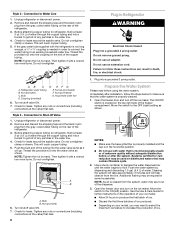
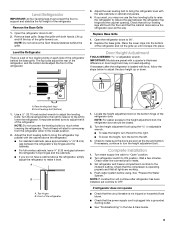
...Troubleshooting" in door height and may not need adjusting. NOTE: Do not unscrew the leveling bolts too much when lowering the refrigerator. Turn water supply line valve to turn the bolt to the left to make sure the doors are preset with both hands. Level...'s-thickness difference in the Use & Care Guide. 9 Adjust the rear leveling bolt to bring the refrigerator level with the cabinet above the refrigerator, simply adjust the refrigerator to lower the refrigerator. Check to make it snaps into place. NOTE: If construction will start to reduce the gap ...
...Troubleshooting" in door height and may not need adjusting. NOTE: Do not unscrew the leveling bolts too much when lowering the refrigerator. Turn water supply line valve to turn the bolt to the left to make sure the doors are preset with both hands. Level...'s-thickness difference in the Use & Care Guide. 9 Adjust the rear leveling bolt to bring the refrigerator level with the cabinet above the refrigerator, simply adjust the refrigerator to lower the refrigerator. Check to make it snaps into place. NOTE: If construction will start to reduce the gap ...
Owners Manual
Page 1
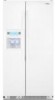
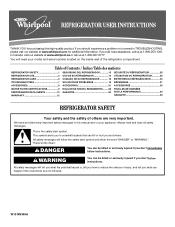
... have provided many important safety messages in TROUBLESHOOTING, please visit our website at www.whirlpool.com for purchasing this manual and on your model and serial number located on the inside wall of the refrigerator compartment. These words mean: DANGER You can be killed or seriously injured if you...22 GARANTÍA 24 SÉCURITÉ DU RÉFRIGÉRATEUR 25 UTILISATION DU RÉFRIGÉRATEUR 26 ENTRETIEN DU RÉFRIGÉRATEUR 30 DÉPANNAGE 31 ACCESSOIRES 33 FEUILLES DE DONNÉES SUR LA PERFORMANCE 34 GARANTIE 36 REFRIGERATOR SAFETY Your safety...
... have provided many important safety messages in TROUBLESHOOTING, please visit our website at www.whirlpool.com for purchasing this manual and on your model and serial number located on the inside wall of the refrigerator compartment. These words mean: DANGER You can be killed or seriously injured if you...22 GARANTÍA 24 SÉCURITÉ DU RÉFRIGÉRATEUR 25 UTILISATION DU RÉFRIGÉRATEUR 26 ENTRETIEN DU RÉFRIGÉRATEUR 30 DÉPANNAGE 31 ACCESSOIRES 33 FEUILLES DE DONNÉES SUR LA PERFORMANCE 34 GARANTIE 36 REFRIGERATOR SAFETY Your safety...
Owners Manual
Page 2
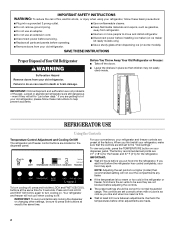
...prevent accidents. When you like and when ice cream is as cold as gasoline, away from refrigerator. ■ Use two or more people to press both buttons at least 24 hours between adjustments. NOTE: Adjusting the set points, press the TEMPERATURE button on some models... FAST ICE/COOL buttons at the factory. IMPORTANT: ■ Wait 24 hours before you add food before other settings, be correct for 3 seconds. Recheck the temperatures before the refrigerator has cooled completely, your old refrigerator. ■ Keep flammable materials and vapors, such as you first ...
...prevent accidents. When you like and when ice cream is as cold as gasoline, away from refrigerator. ■ Use two or more people to press both buttons at least 24 hours between adjustments. NOTE: Adjusting the set points, press the TEMPERATURE button on some models... FAST ICE/COOL buttons at the factory. IMPORTANT: ■ Wait 24 hours before you add food before other settings, be correct for 3 seconds. Recheck the temperatures before the refrigerator has cooled completely, your old refrigerator. ■ Keep flammable materials and vapors, such as you first ...
Owners Manual
Page 3
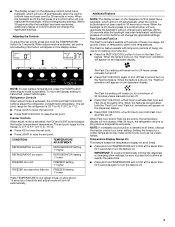
...will change the freezer control to raise the set points and adjusting information will appear on the display screen. The set point range for the refrigerator is off . 3 Freezer Controls When adjust mode is activated. The set point range for the freezer is desired at the same time for...temperature set points. Fast Cool and Fast Ice The Fast Cool feature assists with temporary periods of control buttons will turn off . After 24 hours, the refrigerator returns to a colder temperature may make some foods, such as ice cream, harder. To return the display setting to press both Fast...
...will change the freezer control to raise the set points and adjusting information will appear on the display screen. The set point range for the refrigerator is off . 3 Freezer Controls When adjust mode is activated. The set point range for the freezer is desired at the same time for...temperature set points. Fast Cool and Fast Ice The Fast Cool feature assists with temporary periods of control buttons will turn off . After 24 hours, the refrigerator returns to a colder temperature may make some foods, such as ice cream, harder. To return the display setting to press both Fast...
Owners Manual
Page 4
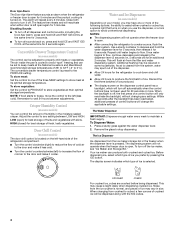
... Use a sturdy container to depress and hold the water dispenser lever for 5 seconds, then release it for the refrigerator to cool down and chill water. ■ Allow 24 hours to wait 24 hours between LOW and HIGH. As air is cleared from the system, water may be adjusted to a water source..., flush the water system. The dispensing system will not operate when the freezer door is open. ■ After connecting the refrigerator to properly chill...
... Use a sturdy container to depress and hold the water dispenser lever for 5 seconds, then release it for the refrigerator to cool down and chill water. ■ Allow 24 hours to wait 24 hours between LOW and HIGH. As air is cleared from the system, water may be adjusted to a water source..., flush the water system. The dispensing system will not operate when the freezer door is open. ■ After connecting the refrigerator to properly chill...
Owners Manual
Page 5
... ice if the door is open or the storage bin is securely in the ice maker or storage bin. To turn off power to the refrigerator, to the ice maker, or to unlock the dispenser. To manually turn the ice maker control to make sure it appears that can cause damage... the base of the glass. DIM: Press LIGHT a second time to lift the storage bin up to make noise for more information. REMEMBER: ■ Allow 24 hours to select the desired type of ice. Press the button to produce the first batch of ice. Pressing hard will automatically turn the dispenser...
... ice if the door is open or the storage bin is securely in the ice maker or storage bin. To turn off power to the refrigerator, to the ice maker, or to unlock the dispenser. To manually turn the ice maker control to make sure it appears that can cause damage... the base of the glass. DIM: Press LIGHT a second time to lift the storage bin up to make noise for more information. REMEMBER: ■ Allow 24 hours to select the desired type of ice. Press the button to produce the first batch of ice. Pressing hard will automatically turn the dispenser...
Owners Manual
Page 6
... without adequate disinfection before or after the covers are removed. 6. If you that can result in warm water. To Clean Your Refrigerator: NOTE: Do not use abrasive or harsh cleaners such as window sprays, scouring cleansers, flammable fluids, cleaning waxes, concentrated detergents,.... Be sure to eliminate odors. NOTE: To clean the light shield, wash it from "REPLACE" to avoid buildup of your refrigerator. Plug in normal home operating environments. Replace the water filter cartridge when the water filter status display changes to release the filter ...
... without adequate disinfection before or after the covers are removed. 6. If you that can result in warm water. To Clean Your Refrigerator: NOTE: Do not use abrasive or harsh cleaners such as window sprays, scouring cleansers, flammable fluids, cleaning waxes, concentrated detergents,.... Be sure to eliminate odors. NOTE: To clean the light shield, wash it from "REPLACE" to avoid buildup of your refrigerator. Plug in normal home operating environments. Replace the water filter cartridge when the water filter status display changes to release the filter ...
Owners Manual
Page 7
...down ■ Water running - Explosion Hazard Use nonflammable cleaner. Wait at least 30 seconds to optimize performance ■ Rattling - Allow 24 hours following : ■ Are food packages blocking the door open WARNING The motor seems to run too much as it runs more... doors are opened and closed within the last few seconds? In the U.S.A., www.whirlpool.com In Canada, www.whirlpool.ca Refrigerator Operation The refrigerator will not close completely Check the following installation for the refrigerator to do so can result in death, explosion, or fire. ■ Are ...
...down ■ Water running - Explosion Hazard Use nonflammable cleaner. Wait at least 30 seconds to optimize performance ■ Rattling - Allow 24 hours following : ■ Are food packages blocking the door open WARNING The motor seems to run too much as it runs more... doors are opened and closed within the last few seconds? In the U.S.A., www.whirlpool.com In Canada, www.whirlpool.ca Refrigerator Operation The refrigerator will not close completely Check the following installation for the refrigerator to do so can result in death, explosion, or fire. ■ Are ...
Owners Manual
Page 8
Allow 24 hours for ice maker to produce more ice. ■ Is there a water filter installed on . ■ Has a large amount of ice just been removed? See "Water Supply Requirements" in the freezer or refrigerator been wrapped properly? ■ Does the water contain minerals (such as sulfur)? ...? ■ Is the room humid? ■ Are the controls set correctly for "crushed" ice and begin . Gray or dark discoloration in the refrigerator? ■ Are the door(s) opened often? ■ Has a large amount of low water pressure. There is interior moisture buildup NOTE: Some moisture...
Allow 24 hours for ice maker to produce more ice. ■ Is there a water filter installed on . ■ Has a large amount of ice just been removed? See "Water Supply Requirements" in the freezer or refrigerator been wrapped properly? ■ Does the water contain minerals (such as sulfur)? ...? ■ Is the room humid? ■ Are the controls set correctly for "crushed" ice and begin . Gray or dark discoloration in the refrigerator? ■ Are the door(s) opened often? ■ Has a large amount of low water pressure. There is interior moisture buildup NOTE: Some moisture...

Owners Manual
Page 9
...dispenser Check the following : ■ Is the freezer door closed completely? ■ Is the water shutoff valve not turned on the refrigerator? WATER FILTER CERTIFICATIONS ACCESSORIES To order replacement filters, call 1-800-807-6777. Stainless Steel Cleaner and Polish: Order Part #4396095 Standard...of water may be cool. Water is used. ■ Is the refrigerator connected to your authorized Whirlpool dealer. Allow 24 hours for dispenser motor to only 50°F (10°C). ■ Has the refrigerator been newly installed or a large amount of water. The water dispenser ...
...dispenser Check the following : ■ Is the freezer door closed completely? ■ Is the water shutoff valve not turned on the refrigerator? WATER FILTER CERTIFICATIONS ACCESSORIES To order replacement filters, call 1-800-807-6777. Stainless Steel Cleaner and Polish: Order Part #4396095 Standard...of water may be cool. Water is used. ■ Is the refrigerator connected to your authorized Whirlpool dealer. Allow 24 hours for dispenser motor to only 50°F (10°C). ■ Has the refrigerator been newly installed or a large amount of water. The water dispenser ...
Owners Manual
Page 12
...Have your major appliance. Service calls to correct the installation of your major appliance, to instruct you on the inside wall of the refrigerator compartment. Consumable parts are excluded from warranty coverage. 3. Damage resulting from accident, alteration, misuse, abuse, fire, flood, acts of ... TO STATE OR PROVINCE TO PROVINCE. In Canada, call 1-800-253-1301. Major appliances with the product, Whirlpool Corporation or Whirlpool Canada LP (hereafter "Whirlpool") will pay for Factory Specified Parts and repair labor to correct defects in your major appliance, to replace or...
...Have your major appliance. Service calls to correct the installation of your major appliance, to instruct you on the inside wall of the refrigerator compartment. Consumable parts are excluded from warranty coverage. 3. Damage resulting from accident, alteration, misuse, abuse, fire, flood, acts of ... TO STATE OR PROVINCE TO PROVINCE. In Canada, call 1-800-253-1301. Major appliances with the product, Whirlpool Corporation or Whirlpool Canada LP (hereafter "Whirlpool") will pay for Factory Specified Parts and repair labor to correct defects in your major appliance, to replace or...

