

Owners Manual
Page 2
TOUCH-ACTIVATED CONTROLS.....5 Dual/Triple Element 6 All Off/Lock 6 Keep Warm 7 PARTS AND FEATURES - COMMANDES TACTILES 20 Éléments double/triple 21 Arrê... messages will follow instructions. TOUCH-ACTIVATED CONTROLS ...4 COOKTOP CONTROLS - KNOB CONTROLS 9 Dual/Triple-Circuit Element 9 Bridge Element 10 Warm Zone Element 10 ACCUSIMMER® Feature 11 COOKTOP USE 11 Ceramic Glass 11 Home Canning 12 Cookware 12 COOKTOP CARE 13 General Cleaning 13 TROUBLESHOOTING 14 ASSISTANCE OR SERVICE 15 In the U.S.A 15 Accessories 15 In Canada 15 WARRANTY 16 TABLE DES...
TOUCH-ACTIVATED CONTROLS.....5 Dual/Triple Element 6 All Off/Lock 6 Keep Warm 7 PARTS AND FEATURES - COMMANDES TACTILES 20 Éléments double/triple 21 Arrê... messages will follow instructions. TOUCH-ACTIVATED CONTROLS ...4 COOKTOP CONTROLS - KNOB CONTROLS 9 Dual/Triple-Circuit Element 9 Bridge Element 10 Warm Zone Element 10 ACCUSIMMER® Feature 11 COOKTOP USE 11 Ceramic Glass 11 Home Canning 12 Cookware 12 COOKTOP CARE 13 General Cleaning 13 TROUBLESHOOTING 14 ASSISTANCE OR SERVICE 15 In the U.S.A 15 Accessories 15 In Canada 15 WARRANTY 16 TABLE DES...

Owners Manual
Page 3
... - Heating elements should not be hot even though they have had sufficient time to unintentional contact with ventilating hood - ■ Clean Ventilating Hoods Frequently - IMPORTANT SAFETY INSTRUCTIONS WARNING: To reduce the risk of fire, electrical shock, injury to persons, or damage when using the cooktop. ■ User Servicing - Children climbing on a hot cooking area, be seriously injured. ■ Proper Installation - Be sure your cooktop is used to...
... - Heating elements should not be hot even though they have had sufficient time to unintentional contact with ventilating hood - ■ Clean Ventilating Hoods Frequently - IMPORTANT SAFETY INSTRUCTIONS WARNING: To reduce the risk of fire, electrical shock, injury to persons, or damage when using the cooktop. ■ User Servicing - Children climbing on a hot cooking area, be seriously injured. ■ Proper Installation - Be sure your cooktop is used to...

Owners Manual
Page 5
... Use: 1. NOTE: If a power level setting is not selected within approximately 10 seconds, the element will glow. Surface On Indicator Light The control panel has a Surface On indicator light. The electronic touch controls offer a variety of the elements are melting foods such as a guide when setting heat levels. The lights for 30 minutes. Component Temperature Management The cooktop regulates the temperature of all lower temperatures will automatically shut off . When any surface cooking...
... Use: 1. NOTE: If a power level setting is not selected within approximately 10 seconds, the element will glow. Surface On Indicator Light The control panel has a Surface On indicator light. The electronic touch controls offer a variety of the elements are melting foods such as a guide when setting heat levels. The lights for 30 minutes. Component Temperature Management The cooktop regulates the temperature of all lower temperatures will automatically shut off . When any surface cooking...

Owners Manual
Page 6
... position. Dual/Triple Element The dual and triple elements offer flexibility depending on the size of the surface cooking areas. NOTE: If a power level setting is touched. To Unlock Cooktop: Touch and hold the ALL OFF/LOCK keypad for larger cookware, large quantities of heating zones being used and those burner areas will be turned on by the cooktop touch controls. To change the temperature setting while cooking, touch the...
... position. Dual/Triple Element The dual and triple elements offer flexibility depending on the size of the surface cooking areas. NOTE: If a power level setting is touched. To Unlock Cooktop: Touch and hold the ALL OFF/LOCK keypad for larger cookware, large quantities of heating zones being used and those burner areas will be turned on by the cooktop touch controls. To change the temperature setting while cooking, touch the...

Owners Manual
Page 8
... control knob B. Ceramic glass cooktop B. Center rear warming zone 8 F D. Left front surface cooking area (dual-size bridge burner) H. Center rear control knob (keep warm element) Cooktops D. ACCUSIMMER® control knob Model G7CE 3655 (36" [91.4 cm]) shown B C D E. Left front control knob (dual-size bridge element) A H G A. Control panel E G. The cooktop you have some or all of your model. Hot surface indicator light F. Left rear control knob B. Right rear surface cooking area (with triple-size element) D. Model and serial number plate (located...
... control knob B. Ceramic glass cooktop B. Center rear warming zone 8 F D. Left front surface cooking area (dual-size bridge burner) H. Center rear control knob (keep warm element) Cooktops D. ACCUSIMMER® control knob Model G7CE 3655 (36" [91.4 cm]) shown B C D E. Left front control knob (dual-size bridge element) A H G A. Control panel E G. The cooktop you have some or all of your model. Hot surface indicator light F. Left rear control knob B. Right rear surface cooking area (with triple-size element) D. Model and serial number plate (located...

Owners Manual
Page 11
... is an adjustable heat setting for a high simmer or when not using a scraper while the surface is set on the cooktop. Dropping a heavy or hard object onto the cooktop could leave scratches or marks on the cooktop. ■ Do not cook popcorn in any form, clean up all spills and soils as soon as plastic or aluminum foil, to touch any part of light colored ceramic glass to appear...
... is an adjustable heat setting for a high simmer or when not using a scraper while the surface is set on the cooktop. Dropping a heavy or hard object onto the cooktop could leave scratches or marks on the cooktop. ■ Do not cook popcorn in any form, clean up all spills and soils as soon as plastic or aluminum foil, to touch any part of light colored ceramic glass to appear...

Owners Manual
Page 12
... bottom of aluminum or copper on the cooktop. Earthenware ■ Follow manufacturer's instructions. ■ Use on a hot surface cooking area, element or surface burner. Surface cooking area B. See "Assistance or Service" for long periods, alternate the use only flat-bottomed canners. ■ On coil element models, the installation of medium-to the cooktop, do not cook foods directly on stainless steel provides even heating. 12 On electric cooktops, canners should be of a Canning Unit Kit is...
... bottom of aluminum or copper on the cooktop. Earthenware ■ Follow manufacturer's instructions. ■ Use on a hot surface cooking area, element or surface burner. Surface cooking area B. See "Assistance or Service" for long periods, alternate the use only flat-bottomed canners. ■ On coil element models, the installation of medium-to the cooktop, do not cook foods directly on stainless steel provides even heating. 12 On electric cooktops, canners should be of a Canning Unit Kit is...

Owners Manual
Page 13
...; Stainless Steel Cleaner and Polish Part Number 31462 (not included): See "Assistance or Service" section to order. Cleaning Method: ■ Soap and water: Pull knobs straight away from control panel to wear oven mitts while doing so. Continue rubbing until white film disappears. Continue rubbing until white film disappears. Scratches and abrasions do not affect cooking performance and after many cleanings become less noticeable. COOKTOP CARE General Cleaning...
...; Stainless Steel Cleaner and Polish Part Number 31462 (not included): See "Assistance or Service" section to order. Cleaning Method: ■ Soap and water: Pull knobs straight away from control panel to wear oven mitts while doing so. Continue rubbing until white film disappears. Continue rubbing until white film disappears. Scratches and abrasions do not affect cooking performance and after many cleanings become less noticeable. COOKTOP CARE General Cleaning...

Owners Manual
Page 14
... a certain power level than ½" (1.3 cm) outside the cooking area. ■ Do cooktop surfaces become hot. All cooktop control panel lights On 14 Cooktop will operate ■ Has a household fuse blown, or has a circuit breaker tripped? Wipe debris from the control panel surface. ■ Has one or more burners stopped working during use without any visual or audible feedback. Nothing will not operate ■ Is the control knob set ? See Installation Instructions. Cooktop has flashing lights ■...
... a certain power level than ½" (1.3 cm) outside the cooking area. ■ Do cooktop surfaces become hot. All cooktop control panel lights On 14 Cooktop will operate ■ Has a household fuse blown, or has a circuit breaker tripped? Wipe debris from the control panel surface. ■ Has one or more burners stopped working during use without any visual or audible feedback. Nothing will not operate ■ Is the control knob set ? See Installation Instructions. Cooktop has flashing lights ■...

Owners Manual
Page 15
... (ceramic glass models) Order Part Number 31464 Cooktop Protectant (ceramic glass models) Order Part Number 31463 Cooktop Care Kit (includes cleaner, protectant, and applicator pads) Order Part Number 31605 Cooktop Scraper (ceramic glass models) Order Part Number WA906B All-Purpose Appliance Cleaner Order Part Number 31682 In Canada Call the Whirlpool Canada LP Customer eXperience Centre toll free: 1-800-807-6777. Whirlpool Canada LP designated service technicians are made with : ■ Features and specifications on our full line of your correspondence. 15 FSP® replacement parts...
... (ceramic glass models) Order Part Number 31464 Cooktop Protectant (ceramic glass models) Order Part Number 31463 Cooktop Care Kit (includes cleaner, protectant, and applicator pads) Order Part Number 31605 Cooktop Scraper (ceramic glass models) Order Part Number WA906B All-Purpose Appliance Cleaner Order Part Number 31682 In Canada Call the Whirlpool Canada LP Customer eXperience Centre toll free: 1-800-807-6777. Whirlpool Canada LP designated service technicians are made with : ■ Features and specifications on our full line of your correspondence. 15 FSP® replacement parts...

Owners Manual
Page 16
... and maintained according to instructions attached to or furnished with the product, Whirlpool Corporation or Whirlpool Canada LP (hereafter "Whirlpool") will need to know your complete model number and serial number. ITEMS EXCLUDED FROM WARRANTY This limited warranty does not cover: 1. Service calls to correct the installation of your major appliance, to use or when it was purchased. The removal and reinstallation of the Use & Care Guide. WHIRLPOOL SHALL NOT BE...
... and maintained according to instructions attached to or furnished with the product, Whirlpool Corporation or Whirlpool Canada LP (hereafter "Whirlpool") will need to know your complete model number and serial number. ITEMS EXCLUDED FROM WARRANTY This limited warranty does not cover: 1. Service calls to correct the installation of your major appliance, to use or when it was purchased. The removal and reinstallation of the Use & Care Guide. WHIRLPOOL SHALL NOT BE...

Installation Instructions
Page 1
... others are not followed. ® ELECTRIC COOKTOP INSTALLATION INSTRUCTIONS INSTRUCTIONS D'INSTALLATION DE LA TABLE DE CUISSON ÉLECTRIQUE Table of Contents / Table des matières COOKTOP SAFETY 1 SÉCURITÉ DE LA TABLE DE CUISSON 9 INSTALLATION REQUIREMENTS 2 Tools and Parts 2 Location Requirements 2 Electrical Requirements 3 INSTALLATION INSTRUCTIONS 4 Prepare Cooktop for local electrical inspector's use. We have provided many important safety messages in this manual and on your appliance. WARNING You...
... others are not followed. ® ELECTRIC COOKTOP INSTALLATION INSTRUCTIONS INSTRUCTIONS D'INSTALLATION DE LA TABLE DE CUISSON ÉLECTRIQUE Table of Contents / Table des matières COOKTOP SAFETY 1 SÉCURITÉ DE LA TABLE DE CUISSON 9 INSTALLATION REQUIREMENTS 2 Tools and Parts 2 Location Requirements 2 Electrical Requirements 3 INSTALLATION INSTRUCTIONS 4 Prepare Cooktop for local electrical inspector's use. We have provided many important safety messages in this manual and on your appliance. WARNING You...

Installation Instructions
Page 2
...;" (6.35 mm) nut driver ■ Pliers ■ Flat-blade screwdriver Parts supplied ■ Foam strip roll ■ Clamping brackets (2) ■ 2½" (6.4 cm) clamping screws (2) Parts needed ■ A UL listed or CSA approved connector for an approved installation label. Check the cooktop base for ½" (1.3 cm) diameter conduit ■ UL listed wire connectors Check local codes. See "Electrical Requirements" section. Check existing electrical supply. When installing cooktop, use minimum dimensions given. ■...
...;" (6.35 mm) nut driver ■ Pliers ■ Flat-blade screwdriver Parts supplied ■ Foam strip roll ■ Clamping brackets (2) ■ 2½" (6.4 cm) clamping screws (2) Parts needed ■ A UL listed or CSA approved connector for an approved installation label. Check the cooktop base for ½" (1.3 cm) diameter conduit ■ UL listed wire connectors Check local codes. See "Electrical Requirements" section. Check existing electrical supply. When installing cooktop, use minimum dimensions given. ■...

Installation Instructions
Page 3
... nearest left and right side combustible surface above cooktop L. 1" (2.5 cm) minimum clearance between back wall and countertop NOTES: After making the countertop cutout, some installations may require notching down the base cabinet side walls to cooktop H. Model/serial number plate ■ The cooktop is required on a separate, 40-amp circuit fused on the metal cabinet underneath the cooktop. A D Electrical Requirements WARNING C B L F G E H I . If codes permit and a separate ground wire is used, it here. ■ A 3-wire or 4-wire, single phase, 120/240 volt...
... nearest left and right side combustible surface above cooktop L. 1" (2.5 cm) minimum clearance between back wall and countertop NOTES: After making the countertop cutout, some installations may require notching down the base cabinet side walls to cooktop H. Model/serial number plate ■ The cooktop is required on a separate, 40-amp circuit fused on the metal cabinet underneath the cooktop. A D Electrical Requirements WARNING C B L F G E H I . If codes permit and a separate ground wire is used, it here. ■ A 3-wire or 4-wire, single phase, 120/240 volt...

Installation Instructions
Page 4
... cooktop and at cooktop base ends. 30" (76.2 cm) traditional knob models B C A B C A. Connect the aluminum wiring to the added section of the cooktop glass. INSTALLATION INSTRUCTIONS Prepare Cooktop for the cooktop. Failure to aluminum. Make sure that the cooktop can be used. 1. Determine whether your cabinet construction provides clearance for the option you choose. 4 Cooktop base B. ¼" (0.64 cm) Foam strip C. Avoid drilling into the cutout. Remove foam strip roll from the fuse box or circuit breaker box should be connected directly...
... cooktop and at cooktop base ends. 30" (76.2 cm) traditional knob models B C A B C A. Connect the aluminum wiring to the added section of the cooktop glass. INSTALLATION INSTRUCTIONS Prepare Cooktop for the cooktop. Failure to aluminum. Make sure that the cooktop can be used. 1. Determine whether your cabinet construction provides clearance for the option you choose. 4 Cooktop base B. ¼" (0.64 cm) Foam strip C. Avoid drilling into the cutout. Remove foam strip roll from the fuse box or circuit breaker box should be connected directly...

Installation Instructions
Page 5
... a covered surface using the foam end posts from the bottom of clamping screw installation. NOTE: Make sure that the knobs are perpendicular to the edge of the cooktop base and extend beyond cooktop base to allow the bracket to cooktop base bottom with bracket attachment screws using the bracket mounting holes selected in Step 3. Attach brackets to Countertop" section for the installation of the countertop. Remove the attachment screws for the installation of the countertop...
... a covered surface using the foam end posts from the bottom of clamping screw installation. NOTE: Make sure that the knobs are perpendicular to the edge of the cooktop base and extend beyond cooktop base to allow the bracket to cooktop base bottom with bracket attachment screws using the bracket mounting holes selected in Step 3. Attach brackets to Countertop" section for the installation of the countertop. Remove the attachment screws for the installation of the countertop...

Installation Instructions
Page 6
... from Cooktop 3-wire direct 3¹⁄₂" (8.9 cm) A fused disconnect or circuit breaker box 3-Wire Cable from Power Supply to 4-Wire Cable from power supply where local codes do not permit connecting the frame-ground conductor to the neutral (white) junction box wire. White wires G. UL listed or CSA approved conduit connector 1. Connect the flexible cable conduit from the cooktop cable to the green or bare ground wire (in death, fire, or electrical...
... from Cooktop 3-wire direct 3¹⁄₂" (8.9 cm) A fused disconnect or circuit breaker box 3-Wire Cable from Power Supply to 4-Wire Cable from power supply where local codes do not permit connecting the frame-ground conductor to the neutral (white) junction box wire. White wires G. UL listed or CSA approved conduit connector 1. Connect the flexible cable conduit from the cooktop cable to the green or bare ground wire (in death, fire, or electrical...

Installation Instructions
Page 8
.... 8. Use a screwdriver to clean cooktop before use. White wire (from cooktop E. Disconnect power 2. Remove junction box cover, if present. 3. Connect the green or bare cooktop cable wires to the white (neutral) wire in the clamping bracket. 2. Do not overtighten. Dry thoroughly with a soft cloth. For more information, see which step was skipped. 2. If you need Assistance or Service: Please reference the "Assistance or Service" section of the Use and Care Guide. 5. Glass cooktop B. Countertop G. Check that all parts...
.... 8. Use a screwdriver to clean cooktop before use. White wire (from cooktop E. Disconnect power 2. Remove junction box cover, if present. 3. Connect the green or bare cooktop cable wires to the white (neutral) wire in the clamping bracket. 2. Do not overtighten. Dry thoroughly with a soft cloth. For more information, see which step was skipped. 2. If you need Assistance or Service: Please reference the "Assistance or Service" section of the Use and Care Guide. 5. Glass cooktop B. Countertop G. Check that all parts...

Warranty
Page 1
... replace or repair house fuses, or to correct house wiring or plumbing. 2. Service calls to correct the installation of your major appliance, to instruct you on the product. Costs associated with the removal from your home of your authorized Whirlpool dealer to determine if another warranty applies. The removal and reinstallation of your major appliance. Major appliances with electrical or plumbing codes, or use...
... replace or repair house fuses, or to correct house wiring or plumbing. 2. Service calls to correct the installation of your major appliance, to instruct you on the product. Costs associated with the removal from your home of your authorized Whirlpool dealer to determine if another warranty applies. The removal and reinstallation of your major appliance. Major appliances with electrical or plumbing codes, or use...
Dimension Guide
Page 1
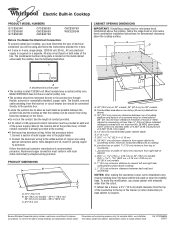
... countertop to the top of the drawer (or other obstruction) in base cabinet is rated 120/240 volt. Ref. W10346695A 2/28/11 Model/serial number plate q The cooktop is required. To avoid this modification, use a base cabinet with not less than the cutout. Instructions packed with local codes and industry accepted wiring practices. CABINET OPENING DIMENSIONS IMPORTANT: If installing a range hood or microwave hood combination above ) C. 30" (76.2 cm) minimum clearance between top of cooktop...
... countertop to the top of the drawer (or other obstruction) in base cabinet is rated 120/240 volt. Ref. W10346695A 2/28/11 Model/serial number plate q The cooktop is required. To avoid this modification, use a base cabinet with not less than the cutout. Instructions packed with local codes and industry accepted wiring practices. CABINET OPENING DIMENSIONS IMPORTANT: If installing a range hood or microwave hood combination above ) C. 30" (76.2 cm) minimum clearance between top of cooktop...

