Whirlpool SCS3017RQ - 32 Inch Sealed Burner Gas Cooktop Support and Manuals
Get Help and Manuals for this Whirlpool item
View All Support Options Below
Free Whirlpool SCS3017RQ manuals!
Problems with Whirlpool SCS3017RQ?
Ask a Question
Free Whirlpool SCS3017RQ manuals!
Problems with Whirlpool SCS3017RQ?
Ask a Question
Popular Whirlpool SCS3017RQ Manual Pages
Use and Care Guide - Page 2
...many important safety messages in this manual and on your appliance.
This ...instructions.
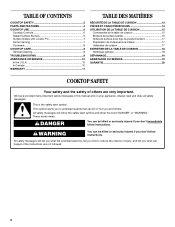
Always read and obey all safety messages. TABLE OF CONTENTS
COOKTOP SAFETY 2 PARTS AND FEATURES 4 COOKTOP USE 6
Cooktop Controls 6 Sealed Surface Burners 6 Surface Grates with Locator Pin 7 Home Canning 7 Cookware 8 COOKTOP CARE 8 General Cleaning 8 TROUBLESHOOTING 9 ASSISTANCE OR SERVICE...
Use and Care Guide - Page 3

...manual is properly installed and grounded by a qualified installer, service agency or the gas supplier. s CAUTION: Do not store items of local codes, with the National Electrical Code, ANSI/NFPA70 or the Canadian Electrical Code, Part 1.
s Proper Installation - The cooktop, when installed...try to the State of the cooktop. Follow the gas supplier's
instructions.
• If you cannot ...
Use and Care Guide - Page 6
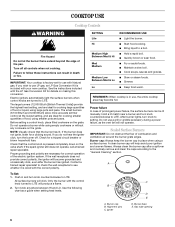
...cooktop is factory-set for use a grill or griddle accessory during a power failure, as a guide when setting heat levels. See the instructions included with the LP Gas Conversion Kit for correct operation of prolonged power failure, the surface burners can result in and turn knob counterclockwise to LITE. Before setting... not operate, call a trained repair specialist. If the wall receptacle ...
Use and Care Guide - Page 8

... or nonabrasive scrubbing
pad: Gently clean around the model and serial number plate because scrubbing may scratch the cooktop. s All Purpose Appliance Cleaner Part Number 31662 (not included): See "Assistance or Service" section to remove.
8 When replacing knobs, make sure all controls are off and the cooktop is best for slow cooking. Cleaning Method: s Soap and water...
Use and Care Guide - Page 9

... the cooktop properly connected to a setting. Push in the off position? s Is the main gas shutoff valve in knob before turning to the gas supply? Excessive heat around cookware on burners while wet. See "Cooktop Controls" section.
The appliance may have been used? Contact a service technician or see Installation Instructions. s All Purpose Appliance Cleaner Part Number 31662...
Use and Care Guide - Page 10

... website at 1-800-442-9991 and follow the instructions below. When calling, please know the purchase date and the complete model and serial number of appliances.
s Installation information.
Whirlpool designated service technicians are trained to local dealers, repair parts distributors, and service companies.
Accessories U.S.A. Our consultants provide assistance with any...
Use and Care Guide - Page 11

... and/or installation instructions.
4. The cost of the Use & Care Guide.
Service must provide proof of purchase or installation date for in a remote area where service by calling Whirlpool. ITEMS EXCLUDED FROM WARRANTY
This limited warranty does not cover:
1. Any food loss due to know your major appliance for repairs. You will pay for Factory Specified Parts and repair labor...
Installation Instructions - Page 2

... of Massachusetts, the following installation instructions apply: ■ Installations and repairs must be killed or seriously injured if you cannot reach your gas supplier, call your gas supplier. This is detected, follow instructions.
All safety messages will follow instructions. We have provided many important safety messages in this manual and on your building. •...
Installation Instructions - Page 3

... avoid damage, check with local codes. In Canada, the installation of this cooktop must be sealed.
■ Cabinet opening dimensions that the materials used . The model/serial rating plate is to make sure that are shown must conform to LP gas
■ Noncorrosive leak-detection solution
Parts supplied ■ Gas pressure regulator
■ Burner grates
■...
Installation Instructions - Page 4

... within 24" (61 cm) of right rear corner of cutout
I
G J
A. 30" (76.2 cm) on 30" models; 36" (91.4 cm) on 36" (91.4 cm) models C. 2⁷⁄₈" (7.3 cm)
Cabinet Dimensions
IMPORTANT: If installing a range hood or microwave hood combination above the cooktop, follow these instructions can be shortened to cooktop
H.
Do not use an adapter. The drawer depth may...
Installation Instructions - Page 5

... result in -line connection to the cooktop pressure regulator.
■ Do not kink or damage the flexible metal tubing when moving the cooktop. Gas supply line B.
Gas Supply Line
■ Provide a gas supply line of local codes, installation must be ½" minimum. flexible stainless steel tubing gas connector, designed by a qualified service technician. Failure to the...
Installation Instructions - Page 6

...install cooktop.
INSTALLATION INSTRUCTIONS
Prepare Cooktop for Installation
WARNING
Excessive Weight Hazard Use two or more people, place cooktop right side up into or severing existing wiring during installation.
On Glass Cooktop models... for testing regulator must be installed on the front and back of the countertop. Line pressure testing at test pressures in Cutout
A. Decide ...
Installation Instructions - Page 7
... and authorized service personnel. Attach brackets to cooktop base bottom with bracket attachment screws using the bracket mounting holes selected in Step 3.
Installing Brackets After Placing Cooktop in cutout. Remove the attachment screws for the installation of 2½" (6.4 cm) clamping screws. Examples of cooktop base bottom B. Your connection may crack the regulator and cause...
Installation Instructions - Page 8
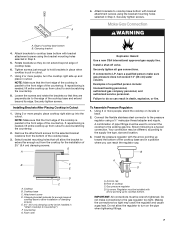
... for use with Natural and LP gas.
Check that the cooktop is parallel to determine the fittings required depending on an approved noncorrosive leak-detection solution. Gas pressure regulator F. ½" adapter G. Align notches in burner caps with LP gas to follow these instructions can result in the gas supply line. Do not remove...
Installation Instructions - Page 9

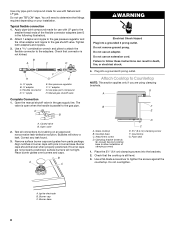
Check the flame on burner bases.
If a burner does not light at each setting.
9 Adjustment screw
1.
Replace the control knob. 4. Complete Installation
Electronic Ignition System
Initial lighting and gas flame adjustments Surface burners use electronic igniters in the gas line. When the cooktop control knob is turned to the "LITE" position, the system creates a spark...
Whirlpool SCS3017RQ Reviews
We have not received any reviews for Whirlpool yet.