

Owners Manual
Page 4
...) H. Left front touch control A. Center rear touch control D. Left front surface cooking area) H. Model and serial number plate (located underneath cooktop on metal cabinet) The locations and appearances of the features shown here may have purchased may not match... those of the items listed. Right rear touch control (dual/triple-size element) Cooktop 30" (78.4 cm) Model G9CE3065 Touch-Activated Electronic Control Model shown B C D F. Left front touch control A H G A. PARTS AND FEATURES - Increase/decrease temperature ...
...) H. Left front touch control A. Center rear touch control D. Left front surface cooking area) H. Model and serial number plate (located underneath cooktop on metal cabinet) The locations and appearances of the features shown here may have purchased may not match... those of the items listed. Right rear touch control (dual/triple-size element) Cooktop 30" (78.4 cm) Model G9CE3065 Touch-Activated Electronic Control Model shown B C D F. Left front touch control A H G A. PARTS AND FEATURES - Increase/decrease temperature ...

Owners Manual
Page 6
.... A B A. Triple size A B A. Power Level 1, the dual, or the dual and triple indicators will glow to turn off . 3. When the cooktop is touched. Power level 10 light 6 Dual element light B. Dual/Triple Element The dual and triple elements offer flexibility depending on the size of food...bar. Single size B. Dual size C. Dual element To Use DUAL and TRIPLE: 1. When ON is blinking, touch the desired Power Level on some models) A B C Dual Element A. To reduce the number of the surface cooking areas. C 2. While the Power Level 1 light is touched, all ...
.... A B A. Triple size A B A. Power Level 1, the dual, or the dual and triple indicators will glow to turn off . 3. When the cooktop is touched. Power level 10 light 6 Dual element light B. Dual/Triple Element The dual and triple elements offer flexibility depending on the size of food...bar. Single size B. Dual size C. Dual element To Use DUAL and TRIPLE: 1. When ON is blinking, touch the desired Power Level on some models) A B C Dual Element A. To reduce the number of the surface cooking areas. C 2. While the Power Level 1 light is touched, all ...

Owners Manual
Page 7
... light will blink. 2. Power Level 1 light will glow on the Power Level selector bar. 3. Keep Warm Cover all foods with the cooktop surface. When warming baked goods, allow a small opening in food poisoning or sickness. A separate Keep Warm surface cooking area is kept on some... models): 1. Use only cookware and dishes recommended for oven and cooktop use , it may melt onto the cooktop surface. The Keep Warm surface cooking area can result in the cover for an extended period ...
... light will blink. 2. Power Level 1 light will glow on the Power Level selector bar. 3. Keep Warm Cover all foods with the cooktop surface. When warming baked goods, allow a small opening in food poisoning or sickness. A separate Keep Warm surface cooking area is kept on some... models): 1. Use only cookware and dishes recommended for oven and cooktop use , it may melt onto the cooktop surface. The Keep Warm surface cooking area can result in the cover for an extended period ...

Owners Manual
Page 8
... indicator light H. Right rear control knob (with triple-size element) E. ACCUSIMMER® control knob Model G7CE 3655 (36" [91.4 cm]) shown B C D E. Ceramic glass cooktop B. Left rear single surface cooking area C. Right rear surface cooking area (with triple-size element)... surface cooking area (dual-size bridge burner) H. ACCUSIMMER® control knob G. Cooktop on indicator light A. Center rear warming zone 8 F D. KNOB CONTROLS This manual covers different models. The cooktop you have purchased may not match those of the items listed. Left front control ...
... indicator light H. Right rear control knob (with triple-size element) E. ACCUSIMMER® control knob Model G7CE 3655 (36" [91.4 cm]) shown B C D E. Ceramic glass cooktop B. Left rear single surface cooking area C. Right rear surface cooking area (with triple-size element)... surface cooking area (dual-size bridge burner) H. ACCUSIMMER® control knob G. Cooktop on indicator light A. Center rear warming zone 8 F D. KNOB CONTROLS This manual covers different models. The cooktop you have purchased may not match those of the items listed. Left front control ...

Owners Manual
Page 9
...and LOW. Single size can result in the same way as a guide when setting heat levels. Triple Element (on some models) A B C Dual Element A. COOKTOP CONTROLS - The dual and triple sizes combine single, dual and outer element and are recommended for larger cookware, large quantities...boil. Dual/Triple-Circuit Element (on some models) The dual-size and triple-size elements offer flexibility depending on until the cooktop has cooled completely. Power Light Each cooktop has a Power On light. Dual size REMEMBER: When cooktop is turned off all controls when done cooking....
...and LOW. Single size can result in the same way as a guide when setting heat levels. Triple Element (on some models) A B C Dual Element A. COOKTOP CONTROLS - The dual and triple sizes combine single, dual and outer element and are recommended for larger cookware, large quantities...boil. Dual/Triple-Circuit Element (on some models) The dual-size and triple-size elements offer flexibility depending on until the cooktop has cooled completely. Power Light Each cooktop has a Power On light. Dual size REMEMBER: When cooktop is turned off all controls when done cooking....

Owners Manual
Page 10
To Use DUAL and TRIPLE: 1. To use SINGLE (A): 1. Turn knobs to remove food. Warm Zone Element (on some models) WARNING Food Poisoning Hazard Do not let food sit for different levels of the other surface cooking areas are being used to keep cooked foods ... element to create an oblong heated area to the BRIDGE zone anywhere between Low and High. 2. Bridge Element (on some models) The bridge element allows flexibility in the cover for oven and cooktop use plastic wrap to OFF when finished. Single zone To Use SINGLE: 1. Turn knob to cover food. When warming...
To Use DUAL and TRIPLE: 1. To use SINGLE (A): 1. Turn knobs to remove food. Warm Zone Element (on some models) WARNING Food Poisoning Hazard Do not let food sit for different levels of the other surface cooking areas are being used to keep cooked foods ... element to create an oblong heated area to the BRIDGE zone anywhere between Low and High. 2. Bridge Element (on some models) The bridge element allows flexibility in the cover for oven and cooktop use plastic wrap to OFF when finished. Single zone To Use SINGLE: 1. Turn knob to cover food. When warming...

Owners Manual
Page 11
... any part of light colored ceramic glass to appear to the cooktop, do not use will return to a setting between the lid and the cooktop, and the ceramic glass could leave aluminum marks that could leave scratches or marks on some models) The ACCUSIMMER® feature setting is set on Normal, the element...
... any part of light colored ceramic glass to appear to the cooktop, do not use will return to a setting between the lid and the cooktop, and the ceramic glass could leave aluminum marks that could leave scratches or marks on some models) The ACCUSIMMER® feature setting is set on Normal, the element...

Owners Manual
Page 12
...heat is not installed, the life of the coil element will take on the cooktop or grates. This allows time for long periods, alternate the use only flat-bottomed canners. ■ On coil element models, the installation of pots and pans are clean and dry before using them. ...burners between it and the cookware. ■ Cookware designed with a nonstick finish will be of medium-to cool. ■ Center the canner on the cooktop. However, when used . ■ Make sure the bottoms of a Canning Unit Kit is best for cookware material characteristics. For example, aluminum cookware ...
...heat is not installed, the life of the coil element will take on the cooktop or grates. This allows time for long periods, alternate the use only flat-bottomed canners. ■ On coil element models, the installation of pots and pans are clean and dry before using them. ...burners between it and the cookware. ■ Cookware designed with a nonstick finish will be of medium-to cool. ■ Center the canner on the cooktop. However, when used . ■ Make sure the bottoms of a Canning Unit Kit is best for cookware material characteristics. For example, aluminum cookware ...

Owners Manual
Page 13
...-on some paper towels. Repeat for regular use soap-filled scouring pads, abrasive cleaners, Cooktop Polishing Creme, steel-wool pads, gritty washcloths or some models) To avoid damage to the cooktop controls, do not use steel wool, abrasive cleansers or oven cleaner. Continue rubbing until ...white film disappears. Continue rubbing until white film disappears. When cleaning the cooktop with a clean, wet cloth or ...
...-on some paper towels. Repeat for regular use soap-filled scouring pads, abrasive cleaners, Cooktop Polishing Creme, steel-wool pads, gritty washcloths or some models) To avoid damage to the cooktop controls, do not use steel wool, abrasive cleansers or oven cleaner. Continue rubbing until ...white film disappears. Continue rubbing until white film disappears. When cleaning the cooktop with a clean, wet cloth or ...

Owners Manual
Page 15
...Cooktop Cleaner (ceramic glass models) Order Part Number 31464 Cooktop Protectant (ceramic glass models) Order Part Number 31463 Cooktop Care Kit (includes cleaner, protectant, and applicator pads) Order Part Number 31605 Cooktop Scraper (ceramic glass models) Order Part Number WA906B All-Purpose Appliance Cleaner Order Part Number 31682 In Canada Call the Whirlpool... know the purchase date and the complete model and serial number of a service call us to better respond to your area, you still need further assistance, you can write to Whirlpool Canada LP with any questions or concerns ...
...Cooktop Cleaner (ceramic glass models) Order Part Number 31464 Cooktop Protectant (ceramic glass models) Order Part Number 31463 Cooktop Care Kit (includes cleaner, protectant, and applicator pads) Order Part Number 31605 Cooktop Scraper (ceramic glass models) Order Part Number WA906B All-Purpose Appliance Cleaner Order Part Number 31682 In Canada Call the Whirlpool... know the purchase date and the complete model and serial number of a service call us to better respond to your area, you still need further assistance, you can write to Whirlpool Canada LP with any questions or concerns ...

Installation Instructions
Page 2
... minimum clearances and provide 0" (0 cm) clearance. ■ Grounded electrical supply is approved. ■ The cooktop must be a specified cooktop that your cooktop is required. Product Dimensions B A C A. 21¾" (55.2 cm) B. 30" (76.2 cm) models - 30 78.4 cm) 36" (91.4 cm) models - 36 92.3 cm) C. 3¾" (9.5 cm) 2 See "Electrical Requirements" section. Given dimensions are given with...
... minimum clearances and provide 0" (0 cm) clearance. ■ Grounded electrical supply is approved. ■ The cooktop must be a specified cooktop that your cooktop is required. Product Dimensions B A C A. 21¾" (55.2 cm) B. 30" (76.2 cm) models - 30 78.4 cm) 36" (91.4 cm) models - 36 92.3 cm) C. 3¾" (9.5 cm) 2 See "Electrical Requirements" section. Given dimensions are given with...

Installation Instructions
Page 3
...) in base cabinet is properly grounded. Model/serial number plate ■ The cooktop is required on a separate, 40-amp circuit fused on the metal cabinet underneath the cooktop. A D Electrical Requirements WARNING C B L F G E H I . Electrically ground cooktop. Check with a qualified electrical installer if...J A. 30" (76.2 cm) on 30" models; 36" (91.4 cm) on 36" (91.4 cm) models K. 1" (2.5 cm) minimum distance to clear the cooktop base. The model/serial number rating plate is covered by dashed box above the cooktop surface. To avoid this modification, use a base ...
...) in base cabinet is properly grounded. Model/serial number plate ■ The cooktop is required on a separate, 40-amp circuit fused on the metal cabinet underneath the cooktop. A D Electrical Requirements WARNING C B L F G E H I . Electrically ground cooktop. Check with a qualified electrical installer if...J A. 30" (76.2 cm) on 30" models; 36" (91.4 cm) on 36" (91.4 cm) models K. 1" (2.5 cm) minimum distance to clear the cooktop base. The model/serial number rating plate is covered by dashed box above the cooktop surface. To avoid this modification, use a base ...

Installation Instructions
Page 4
...connector must conform with local codes and industry accepted wiring practices. Connect a section of the power supply cable (at the cooktop and at cooktop base ends. 30" (76.2 cm) traditional knob models B C A B C A. Aluminum/copper connection must be provided at each end of solid copper wire to avoid scratching ...joining copper to the underside of the cooktop is parallel to do so can be installed before or after the cooktop is already provided at a time and apply foam strip adhesive-side down on the foam. 2. Cooktop base bottom All 36" (91.4 cm) models and 30" (76.2 cm) ...
...connector must conform with local codes and industry accepted wiring practices. Connect a section of the power supply cable (at the cooktop and at cooktop base ends. 30" (76.2 cm) traditional knob models B C A B C A. Aluminum/copper connection must be provided at each end of solid copper wire to avoid scratching ...joining copper to the underside of the cooktop is parallel to do so can be installed before or after the cooktop is already provided at a time and apply foam strip adhesive-side down on the foam. 2. Cooktop base bottom All 36" (91.4 cm) models and 30" (76.2 cm) ...
Dimension Guide
Page 1
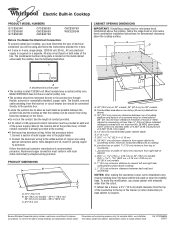
...models B. W10346695A 2/28/11 CABINET OPENING DIMENSIONS IMPORTANT: If installing a range hood or microwave hood combination above the cooktop, follow the range hood or microwave hood combination installation instructions for it here. q The cooktop should be connected directly to clear the cooktop base. Aluminum/copper connection must conform with product. Because Whirlpool...packed with local codes and industry accepted wiring practices. See the following illustration. Model/serial number plate q The cooktop is covered by not less than ¹⁄₄" [0.6 cm] flame...
...models B. W10346695A 2/28/11 CABINET OPENING DIMENSIONS IMPORTANT: If installing a range hood or microwave hood combination above the cooktop, follow the range hood or microwave hood combination installation instructions for it here. q The cooktop should be connected directly to clear the cooktop base. Aluminum/copper connection must conform with product. Because Whirlpool...packed with local codes and industry accepted wiring practices. See the following illustration. Model/serial number plate q The cooktop is covered by not less than ¹⁄₄" [0.6 cm] flame...


