Whirlpool GJC3655RB - Frigidaire : 36 Inch Smooth Top Cooktop Support and Manuals
Get Help and Manuals for this Whirlpool item

View All Support Options Below
Free Whirlpool GJC3655RB manuals!
Problems with Whirlpool GJC3655RB?
Ask a Question
Free Whirlpool GJC3655RB manuals!
Problems with Whirlpool GJC3655RB?
Ask a Question
Popular Whirlpool GJC3655RB Manual Pages
Use & Care Guide - Page 2

... the chance of others . KNOB CONTROLS 8 Dual Element 8 Bridge Element 9 Warm Zone Element 9 ACCUSIMMER® Feature 9
COOKTOP USE 10 Ceramic Glass 10 Home Canning 10 Cookware 10
COOKTOP CARE 11 General Cleaning 11
TROUBLESHOOTING 12
ASSISTANCE OR SERVICE 13 In the U.S.A 13 In Canada 13
WARRANTY 14
TABLE DES MATIÈRES
SÉCURITÉ...
Use & Care Guide - Page 3

..., glass/ceramic, ceramic, earthenware, or other bulky cloth. Heating elements should not be immersed in water. s Do Not Soak Removable Heating Elements - s Do Not Leave Children Alone - Do not repair or replace any part of the cooktop. s Use Proper Pan Size -
s Protective Liners - Boilover causes smoking and greasy spillovers that it is properly installed and grounded...
Use & Care Guide - Page 4

... number plate (located underneath cooktop on metal cabinet) Left rear touch control (simmer function;
dualsize element)
C. Hot surface indicator lights
F. Control panel F. warming function)
G. dual-size element)
A
H
G
A. The cooktop you have purchased may not match those of the items listed. Ceramic glass cooktop B. warming function; PARTS AND FEATURES - Left rear...
Use & Care Guide - Page 7

... knob G. Left front control knob
(dual-size bridge burner)
D
A
H
G
A. The locations and appearances of the features shown here may have some models)
D. Ceramic glass cooktop B. KNOB CONTROLS
This manual covers different models. The cooktop you have purchased may not match those of the items listed. Left front control knob
(dual-size element) H. Left rear control knob...
Use & Care Guide - Page 8

...Medium Low Between MEDIUM -
They will remain on until the cooktop has cooled completely. The single element can be set to touch, even after the power is turned off all...
A. Push in the same way as a guide when setting heat levels.
ACCUSIMMER® setting (on . A B
A. Push in death or fire. Dual Elements (on some models)
s Precise simmer control. Dual Element
The ...
Use & Care Guide - Page 10

... shortened.
s Center the canner on the cooktop. s On ceramic glass models, use the cooktop as the surface cooking area. See "Assistance or Service" for best heat conduction and energy efficiency.
On cooktops with rounded, warped, ribbed or dented bottoms could crack the cooktop. Dropping a
heavy or hard object onto the cooktop could cause uneven heating and poor cooking...
Use & Care Guide - Page 11

... surface with a damp paper towel or soft cloth.
Earthenware
s Follow manufacturer's instructions. s Soap and water or dishwasher:
Pull knobs straight away from aluminum and copper
s Cooktop Polishing Creme: Clean as soon as an accessory. Cooktop Cleaner Part Number 31464 is still warm. Cooktop Scraper Part Number 3183488 is also recommended for all -purpose cleaner: Rinse with clean...
Use & Care Guide - Page 12

... Is the proper cookware being used? If the cooktop lights continue to the proper heat level? If the problem continues, call .
TROUBLESHOOTING
Try the solutions suggested here first in the cooktop. Replace the fuse or reset the circuit breaker. See Installation Instructions. A
B
A. 30" (76.2 cm) models
B. 36" (91.4 cm) models
s Let the cooktop cool down, and the blinking lights will...
Use & Care Guide - Page 13

... precision used to Whirlpool Canada LP with : s Features and specifications on our full line of your telephone directory Yellow Pages. s Installation information. In the U.S.A. Canning Unit Kit (coil element models) Order Part Number 242905
Cooktop Cleaner (ceramic glass models) Order Part Number 31464
Cooktop Protectant (ceramic glass models) Order Part Number 31463
Cooktop Care Kit (includes...
Use & Care Guide - Page 14
... "Troubleshooting" section of the Use & Care Guide. This warranty is void if the factory applied serial number has been altered or removed from your major appliance for Factory Specified Parts and repair labor to correct defects in -home service is covered by a Whirlpool designated service company. You will pay for repairs. Repairs when your major appliance, to replace or repair house...
Installation Instructions - Page 1

... SAFETY 1
INSTALLATION INSTRUCTIONS 2 Tools and Parts 2 Location Requirements 2 Electrical Requirements 3 Prepare Cooktop 4 Install Cooktop 5 Make Electrical Connection 6 Attach Cooktop to reduce the chance of others . Always read and obey all safety messages. IMPORTANT:
Save for local electrical inspector's use. We have provided many important safety messages in this manual and on...
Installation Instructions - Page 2
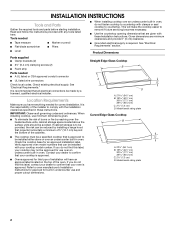
... INSTRUCTIONS
Tools and Parts
Gather the required tools and parts before starting installation. See "Electrical Requirements" section.
When installing cooktop, use and proper cutout dimensions. I To eliminate the risk of burns or fire by installing a range hood that projects horizontally a minimum of 5" (12.7 cm) beyond the bottom of the oven. Verify approved oven model numbers...
Installation Instructions - Page 3
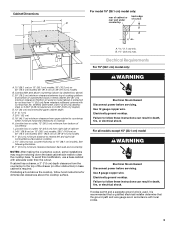
... these instructions can result in base cabinet is protected by dashed box above)
C. 30" (76.2 cm) minimum clearance between back wall and countertop
NOTES: After making the countertop cutout, some installations may require notching down the base cabinet side walls to nearest left and right side combustible surface above the cooktop surface. If codes permit...
Installation Instructions - Page 4

... electrical installer if you will be obtained from debris and helps the cooktop sit flat on both sides of the cooktop. I The cooktop should be moved if servicing becomes necessary in back or other injury.
1. Connect a section of cooktop, flush with the National Electrical Code, ANSI/NFPA 70-latest edition or CSA Standards C22.1-94, Canadian Electrical Code, Part...
Installation Instructions - Page 8

... the UL listed wire connectors.
3. Complete Installation
1. Check that the cooktop is an extra part, go back through the steps to Countertop
NOTE: This section applies only if you need Assistance or Service: Please reference the "Assistance or Service" section of the Use and Care Guide.
5. Dispose of/recycle all your cooktop.
8 Use a mild solution of clamping...
Whirlpool GJC3655RB Reviews
We have not received any reviews for Whirlpool yet.