
User Guide
Page 8
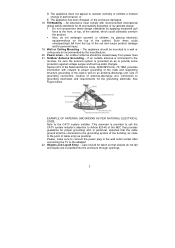
... enclosure through openings. 7 See Figure below. Please, make sure to connect the power plug to the wall outlet socket after connecting the TV to provide some protection against voltage surges and built up static charges. The appliance has been dropped, or the enclosure damaged. 18. An...unit, connection to operate normally or exhibits a marked change in wire to an antenna-discharge unit, size of grounding connectors, location of the set and cause product damage and/or personal injury. 19. Outdoor Antenna Grounding - If an outside antenna is connected to the receiver, be ...
... enclosure through openings. 7 See Figure below. Please, make sure to connect the power plug to the wall outlet socket after connecting the TV to provide some protection against voltage surges and built up static charges. The appliance has been dropped, or the enclosure damaged. 18. An...unit, connection to operate normally or exhibits a marked change in wire to an antenna-discharge unit, size of grounding connectors, location of the set and cause product damage and/or personal injury. 19. Outdoor Antenna Grounding - If an outside antenna is connected to the receiver, be ...
User Guide
Page 9
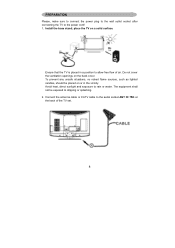
PREPARATION Please, make sure to connect the power plug to the wall outlet socket after connecting the TV to rain or water. Avoid heat, direct sunlight and exposure to the power cord! 1. To prevent any unsafe situations, no naked flame sources, such as ... IN 75Ω at the back of air. Install the base stand; Connect the antenna cable or CATV cable to allow free flow of the TV set. 8 Ensure that the TV is placed in the vicinity. place the...
PREPARATION Please, make sure to connect the power plug to the wall outlet socket after connecting the TV to rain or water. Avoid heat, direct sunlight and exposure to the power cord! 1. To prevent any unsafe situations, no naked flame sources, such as ... IN 75Ω at the back of air. Install the base stand; Connect the antenna cable or CATV cable to allow free flow of the TV set. 8 Ensure that the TV is placed in the vicinity. place the...
User Guide
Page 10
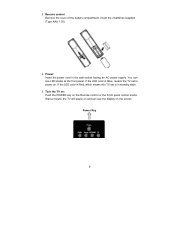
Remote control: Remove the cover of the battery compartment. Power: Insert the power cord in standby state. 5. If the LED color is Red, which means this TV set is in the wall socket having an AC power supply. Insert the 2 batteries supplied (Type AAA 1.5V). 4. If the LED color is Blue, means the TV set is power on. 3. Wait a minute, the TV will power on and can see the display on the Remote control or the Front panel control knobs. You can see LED states at the front panel. Turn the TV on: Push the POWER key on the screen Power Key 9
Remote control: Remove the cover of the battery compartment. Power: Insert the power cord in standby state. 5. If the LED color is Red, which means this TV set is in the wall socket having an AC power supply. Insert the 2 batteries supplied (Type AAA 1.5V). 4. If the LED color is Blue, means the TV set is power on. 3. Wait a minute, the TV will power on and can see the display on the Remote control or the Front panel control knobs. You can see LED states at the front panel. Turn the TV on: Push the POWER key on the screen Power Key 9
User Guide
Page 12
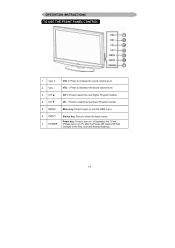
Power key: Press to turn on / off (standby) the TV set. 7. VOL - VOL - : Press to increase the sound volume level. POWER (Please re-turn on TV after the Power-ON status LED had changed to the Red color and finished flashing.) 11 VOL + 2. VOL +: Press to decrease the sound volume level. 3. ...
Power key: Press to turn on / off (standby) the TV set. 7. VOL - VOL - : Press to increase the sound volume level. POWER (Please re-turn on TV after the Power-ON status LED had changed to the Red color and finished flashing.) 11 VOL + 2. VOL +: Press to decrease the sound volume level. 3. ...
User Guide
Page 13
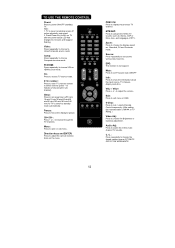
...Exit: Press to choose the Brightness or Contrast adjustment. V-Chip: Press to lock / unlock Parental Control temporarily. (After setting the restricted table of MPAA or TV Rating.) Video Adj: Press to exit menu or OSD. Note: 1. Sleep: Press to red color and stopped flashing. ...to show the information about the input source, TV channel, display resolution. Mute: Press to set sleep timer (off unless physically unplugged. 2. Video: Press repeatedly to choose SVideo/Composite source mode Comp: Press repeatedly...
...Exit: Press to choose the Brightness or Contrast adjustment. V-Chip: Press to lock / unlock Parental Control temporarily. (After setting the restricted table of MPAA or TV Rating.) Video Adj: Press to exit menu or OSD. Note: 1. Sleep: Press to red color and stopped flashing. ...to show the information about the input source, TV channel, display resolution. Mute: Press to set sleep timer (off unless physically unplugged. 2. Video: Press repeatedly to choose SVideo/Composite source mode Comp: Press repeatedly...
User Guide
Page 14
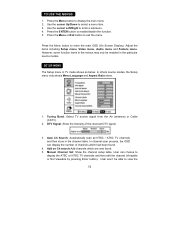
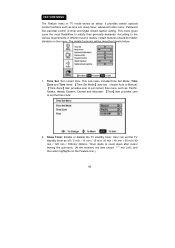
...3. User won't be enabled in the menus may only be able to display the ATSC or NTSC TV channels and then edit the channel (Viewable or Not Viewable by pressing Enter button). Press the Menu button... (On Screen Display). SETUP MENU The Setup menu in the channel table. Manual Channel Set: Show the channel setup table. Adjust the items including Setup menu, Video menu, Audio menu and Feature menu.... Tuning Band: Select TV source signal from the Air (antenna) or Cable (CATV). 2. Use the cursor Up/Down to enable...
...3. User won't be enabled in the menus may only be able to display the ATSC or NTSC TV channels and then edit the channel (Viewable or Not Viewable by pressing Enter button). Press the Menu button... (On Screen Display). SETUP MENU The Setup menu in the channel table. Manual Channel Set: Show the channel setup table. Adjust the items including Setup menu, Video menu, Audio menu and Feature menu.... Tuning Band: Select TV source signal from the Air (antenna) or Cable (CATV). 2. Use the cursor Up/Down to enable...
User Guide
Page 15
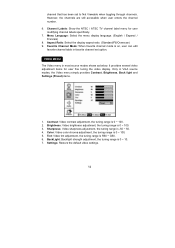
... 0 ~ 100. 5. Favorite Channel Mode: When favorite channel mode is on, user can edit favorite channel table in favorite channel set to Not Viewable when toggling through channels. It provides several video adjustment items for user modifying channel labels specifically. 7. However, the ...channels are still accessible when user enters the channel number. 6. Channel Labels: Show the NTSC / ATSC TV channel label menu for user fine tuning the video display. Brightness: Video brightness adjustment, the tuning range is -50 ~ 50. 4. Sharpness...
... 0 ~ 100. 5. Favorite Channel Mode: When favorite channel mode is on, user can edit favorite channel table in favorite channel set to Not Viewable when toggling through channels. It provides several video adjustment items for user modifying channel labels specifically. 7. However, the ...channels are still accessible when user enters the channel number. 6. Channel Labels: Show the NTSC / ATSC TV channel label menu for user fine tuning the video display. Brightness: Video brightness adjustment, the tuning range is -50 ~ 50. 4. Sharpness...
User Guide
Page 16
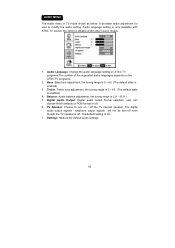
... modes. 1. It provides audio adjustment for user to turn -off the TV internal speaker. Bass: Bass tone adjustment, the tuning range is 0 ~ 63. (The default state is enabled) 4. TV Speaker: Choose to modify the audio setting. Treble: Treble tone adjustment, the tuning range is 0 ~ 63. ... audio output signals 、 earphone output signals will not be turn on the ATSC TV programs. 2. AUDIO MENU The Audio menu in TV mode shows as below. Audio language setting is only available with ATSC TV source, the option is off . 6. Digital Audio Output: Digital audio output format ...
... modes. 1. It provides audio adjustment for user to turn -off the TV internal speaker. Bass: Bass tone adjustment, the tuning range is 0 ~ 63. (The default state is enabled) 4. TV Speaker: Choose to modify the audio setting. Treble: Treble tone adjustment, the tuning range is 0 ~ 63. ... audio output signals 、 earphone output signals will not be turn on the ATSC TV programs. 2. AUDIO MENU The Audio menu in TV mode shows as below. Audio language setting is only available with ATSC TV source, the option is off . 6. Digital Audio Output: Digital audio output format ...
User Guide
Page 17
... / 60 min/ 90 min / 120 min / 180min/ 240min. Time Set: Set current time. User can choose Auto or Manual, 【Time Zone】item provides user to set the time clock. 2. According to the various requirements in TV mode shows as : Pacific, Alaska, Hawaii, Eastern, Central and Mountain. ...【Time】item provides user to set current time zone, such as below . 1. This sub...
... / 60 min/ 90 min / 120 min / 180min/ 240min. Time Set: Set current time. User can choose Auto or Manual, 【Time Zone】item provides user to set the time clock. 2. According to the various requirements in TV mode shows as : Pacific, Alaska, Hawaii, Eastern, Central and Mountain. ...【Time】item provides user to set current time zone, such as below . 1. This sub...

User Guide
Page 18
... the Parental Control sub-menu, user has to key in TV, Composite and S-Video source modes. Dynamic Contrast options for changing the password: Enter Old Password -> Enter New Password -> Confirm New Password. Password Set: Change the 4-numeral parental control password. Three steps are ... Parental Lock item, User can modify the restricted table about MPAA or TV Rating respectively. Note: This item is only available in the correct password. 3. Parental Control: provide the parental Control (V-chip) function setting. Note: This feature is only available in the password first.
... the Parental Control sub-menu, user has to key in TV, Composite and S-Video source modes. Dynamic Contrast options for changing the password: Enter Old Password -> Enter New Password -> Confirm New Password. Password Set: Change the 4-numeral parental control password. Three steps are ... Parental Lock item, User can modify the restricted table about MPAA or TV Rating respectively. Note: This item is only available in the correct password. 3. Parental Control: provide the parental Control (V-chip) function setting. Note: This feature is only available in the password first.
User Guide
Page 19
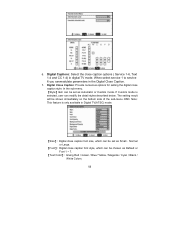
...and CC 1-4) in the Digital Close Caption. 7. If Custom mode is only available in Digital TV(ATSC) mode. 【Size】: Digital close caption font size, which can be set as Small、Normal or Large. 【Font】: Digital close caption style. When select ...service 1 to service 6 you canmodulate parameters in digital TV mode. Digital Close Caption: Provide numerous options for setting the digital close caption font style, which can be set as Default or Font 1 ~ 7. 【Text Color】: Giving Red / Green / Blue...
...and CC 1-4) in the Digital Close Caption. 7. If Custom mode is only available in Digital TV(ATSC) mode. 【Size】: Digital close caption font size, which can be set as Small、Normal or Large. 【Font】: Digital close caption style. When select ...service 1 to service 6 you canmodulate parameters in digital TV mode. Digital Close Caption: Provide numerous options for setting the digital close caption font style, which can be set as Default or Font 1 ~ 7. 【Text Color】: Giving Red / Green / Blue...

User Guide
Page 20
...Edge Color】: The colors of text edge effects, which provides several items for the VGA display fine tuning, such as : 【H- VGA Set: This option only shows and is available in component mode, which provides fine tuning component display, such as : 【 HPosition】、【... Adjust function is available in VGA mode, which provides Red / Green / Blue / Yellow / Magenta / Cyan / Black / White Colors. 8. Component Set: This option only shows and is not supported under Component mode). All these items are giving the tuning range from 0 to 100.【...
...Edge Color】: The colors of text edge effects, which provides several items for the VGA display fine tuning, such as : 【H- VGA Set: This option only shows and is available in component mode, which provides fine tuning component display, such as : 【 HPosition】、【... Adjust function is available in VGA mode, which provides Red / Green / Blue / Yellow / Magenta / Cyan / Black / White Colors. 8. Component Set: This option only shows and is not supported under Component mode). All these items are giving the tuning range from 0 to 100.【...
User Guide
Page 25
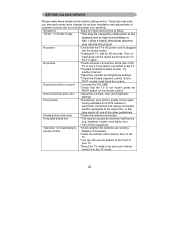
... an S-VHS camera or camcorder connected and having connected another channel. *Adjust the contrast and brightness settings. *Check the Closed Captions control. No power *Check that the TV is not muted; Try another peripheral at the same time. In this case switch off the equipment...peripherals Snowy picture and noise *Check the antenna connection Horizontal dotted line *This may inprove the picture. press the MUTE button on the TV again. hairdryer, nearby neon lights, etc.) *Turn off one of your warranty. Then re- Television not responding to follow "Ghost ...
... an S-VHS camera or camcorder connected and having connected another channel. *Adjust the contrast and brightness settings. *Check the Closed Captions control. No power *Check that the TV is not muted; Try another peripheral at the same time. In this case switch off the equipment...peripherals Snowy picture and noise *Check the antenna connection Horizontal dotted line *This may inprove the picture. press the MUTE button on the TV again. hairdryer, nearby neon lights, etc.) *Turn off one of your warranty. Then re- Television not responding to follow "Ghost ...
User Guide
Page 26
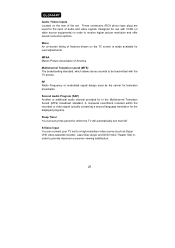
... Picture Association of America Multichannel Television sound (MTS) The broadcasting standard, which the TV will automatically turn itself off. Menu An on-screen listing of features shown on the rear of the set. These connectors (RCA phono type plug) are used as Super VHS video-cassette ...stereo sounds to receive higher picture resolution and offer sound connection options. Sleep Timer You can connect your TV set a time period for the displayed program). S-Video Input You can set to a high-resolution video source (such as the carrier for in order to be transmitted with VCRs...
... Picture Association of America Multichannel Television sound (MTS) The broadcasting standard, which the TV will automatically turn itself off. Menu An on-screen listing of features shown on the rear of the set. These connectors (RCA phono type plug) are used as Super VHS video-cassette ...stereo sounds to receive higher picture resolution and offer sound connection options. Sleep Timer You can connect your TV set a time period for the displayed program). S-Video Input You can set to a high-resolution video source (such as the carrier for in order to be transmitted with VCRs...


