
User Guide
Page 8
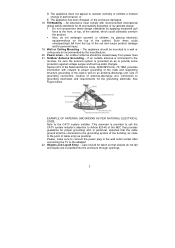
... international global safety standards for proper grounding and, in particular, specifies that the cable ground shall be connected to the grounding system of the set and cause product damage and/or personal injury. 19. Tilt/Stability - The appliance should be sure the antenna system is provided to call ...building, as close to the adapter! 22. Please, make sure to connect the power plug to the wall outlet socket after connecting the TV to the point of cable entry as recommended by placing electronic equipment/toys on the top of the cabinet, which could unsuspectingly fall and ...
... international global safety standards for proper grounding and, in particular, specifies that the cable ground shall be connected to the grounding system of the set and cause product damage and/or personal injury. 19. Tilt/Stability - The appliance should be sure the antenna system is provided to call ...building, as close to the adapter! 22. Please, make sure to connect the power plug to the wall outlet socket after connecting the TV to the point of cable entry as recommended by placing electronic equipment/toys on the top of the cabinet, which could unsuspectingly fall and ...
User Guide
Page 9
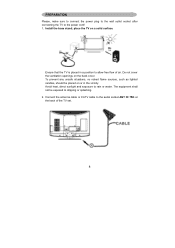
... on the back cover. Connect the antenna cable or CATV cable to allow free flow of the TV set. 8 PREPARATION Please, make sure to connect the power plug to the wall outlet socket after connecting the TV to rain or water. Do not cover the ventilation openings on or in a position to the... aerial socket ANT IN 75Ω at the back of air. Avoid heat, direct sunlight and exposure to the power cord! 1. place the TV on a solid surface. Install the...
... on the back cover. Connect the antenna cable or CATV cable to allow free flow of the TV set. 8 PREPARATION Please, make sure to connect the power plug to the wall outlet socket after connecting the TV to rain or water. Do not cover the ventilation openings on or in a position to the... aerial socket ANT IN 75Ω at the back of air. Avoid heat, direct sunlight and exposure to the power cord! 1. place the TV on a solid surface. Install the...
User Guide
Page 10
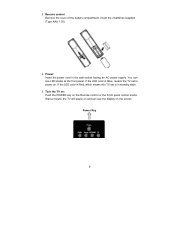
Insert the 2 batteries supplied (Type AAA 1.5V). 4. You can see LED states at the front panel. If the LED color is Blue, means the TV set is power on the screen Power Key 9 Wait a minute, the TV will power on and can see the display on . Remote control: Remove the cover of the battery compartment. 3. Turn the TV on: Push the POWER key on the Remote control or the Front panel control knobs. Power: Insert the power cord in standby state. 5. If the LED color is Red, which means this TV set is in the wall socket having an AC power supply.
Insert the 2 batteries supplied (Type AAA 1.5V). 4. You can see LED states at the front panel. If the LED color is Blue, means the TV set is power on the screen Power Key 9 Wait a minute, the TV will power on and can see the display on . Remote control: Remove the cover of the battery compartment. 3. Turn the TV on: Push the POWER key on the Remote control or the Front panel control knobs. Power: Insert the power cord in standby state. 5. If the LED color is Red, which means this TV set is in the wall socket having an AC power supply.
User Guide
Page 12
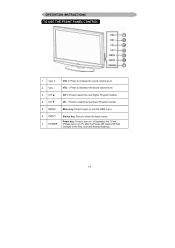
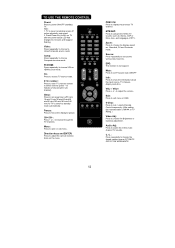
CH ▼ CH - : Press to turn on / off (standby) the TV set. 7. Power key: Press to select the next lower Program number. 5. VOL +: Press to open or exit the OSD menu. 6. MENU Menu key: Press to increase ...the sound volume level. VOL - : Press to the Red color and finished flashing.) 11 VOL - POWER (Please re-turn on TV after the Power-ON status LED had changed to decrease the sound volume level. 3. INPUT Source key: Press to select the next higher Program number...
CH ▼ CH - : Press to turn on / off (standby) the TV set. 7. Power key: Press to select the next lower Program number. 5. VOL +: Press to open or exit the OSD menu. 6. MENU Menu key: Press to increase ...the sound volume level. VOL - : Press to the Red color and finished flashing.) 11 VOL - POWER (Please re-turn on TV after the Power-ON status LED had changed to decrease the sound volume level. 3. INPUT Source key: Press to select the next higher Program number...
User Guide
Page 13
... input sources. Direction keys and ENTER: Press to adjust the various function items on TV after the power status LED had changed to set sleep timer (off unless physically unplugged. 2. Source: Press repeatedly to switch the ATSC multichannel TV sounds. Mute: Press to red color and stopped flashing. C. number: Press to... off /5 min/ 10 min/15 min/30 min/45 min/60 min/90 min/120 min/180 min/240 min) for TV to switch to lock / unlock Parental Control temporarily. (After setting the restricted table of choosing the subchannel). to exit menu or OSD. Exit: Press to adjust the volume.
... input sources. Direction keys and ENTER: Press to adjust the various function items on TV after the power status LED had changed to set sleep timer (off unless physically unplugged. 2. Source: Press repeatedly to switch the ATSC multichannel TV sounds. Mute: Press to red color and stopped flashing. C. number: Press to... off /5 min/ 10 min/15 min/30 min/45 min/60 min/90 min/120 min/180 min/240 min) for TV to switch to lock / unlock Parental Control temporarily. (After setting the restricted table of choosing the subchannel). to exit menu or OSD. Exit: Press to adjust the volume.
User Guide
Page 14
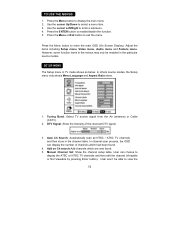
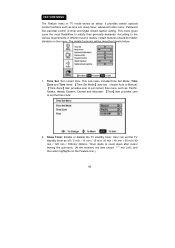
...the main OSD (On Screen Display). Press the Menu or Exit button to display the ATSC or NTSC TV channels and then edit the channel (Viewable or Not Viewable by pressing Enter button). SETUP MENU The ... In channel scan process, the OSD can choose to exit the menu. Manual Channel Set: Show the channel setup table. Adjust the items including Setup menu, Video menu, Audio menu and Feature ...menu. Tuning Band: Select TV source signal from the Air (antenna) or Cable (CATV). 2. Add on Ch search:Add channels which...
...the main OSD (On Screen Display). Press the Menu or Exit button to display the ATSC or NTSC TV channels and then edit the channel (Viewable or Not Viewable by pressing Enter button). SETUP MENU The ... In channel scan process, the OSD can choose to exit the menu. Manual Channel Set: Show the channel setup table. Adjust the items including Setup menu, Video menu, Audio menu and Feature ...menu. Tuning Band: Select TV source signal from the Air (antenna) or Cable (CATV). 2. Add on Ch search:Add channels which...
User Guide
Page 15
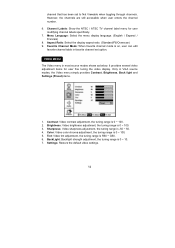
... when user enters the channel number. 6. VIDEO MENU The Video menu in VGA source modes, the Video menu simply provides Contrast, Brightness, Back light and Settings (Preset) items. 1. Sharpness: Video sharpness adjustment, the tuning range is R50 ~ G50. 6. Menu Language: Select the menu display language. (English / ... brightness adjustment, the tuning range is 0 ~ 10. 7. BackLight: Backlight strength adjustment, the tuning range is 0 ~ 100. 3. channel that has been set option. Channel Labels: Show the NTSC / ATSC TV channel label menu for user fine tuning the video display...
... when user enters the channel number. 6. VIDEO MENU The Video menu in VGA source modes, the Video menu simply provides Contrast, Brightness, Back light and Settings (Preset) items. 1. Sharpness: Video sharpness adjustment, the tuning range is R50 ~ G50. 6. Menu Language: Select the menu display language. (English / ... brightness adjustment, the tuning range is 0 ~ 10. 7. BackLight: Backlight strength adjustment, the tuning range is 0 ~ 100. 3. channel that has been set option. Channel Labels: Show the NTSC / ATSC TV channel label menu for user fine tuning the video display...
User Guide
Page 16
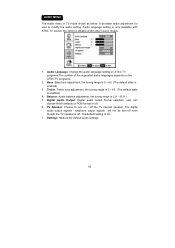
...: Bass tone adjustment, the tuning range is 0 ~ 63. (The default state is On. 7. Audio language setting is only available with ATSC TV source, the option is L31 ~ R31.) 5. Audio Language: Change the audio language setting on ATSC TV programs The number of the supported audio languages depends on / off . 6. Balance: Audio balance adjustment, the...
...: Bass tone adjustment, the tuning range is 0 ~ 63. (The default state is On. 7. Audio language setting is only available with ATSC TV source, the option is L31 ~ R31.) 5. Audio Language: Change the audio language setting on ATSC TV programs The number of the supported audio languages depends on / off . 6. Balance: Audio balance adjustment, the...
User Guide
Page 17
... provides certain optional control functions such as : Pacific, Alaska, Hawaii, Eastern, Central and Mountain. 【Time】item provides user to set current time zone, such as time set the TV standby timer as below . 1. This menu gives users the most flexibilities to count down after cursor leaving the sub-menu. (At the...
... provides certain optional control functions such as : Pacific, Alaska, Hawaii, Eastern, Central and Mountain. 【Time】item provides user to set current time zone, such as time set the TV standby timer as below . 1. This menu gives users the most flexibilities to count down after cursor leaving the sub-menu. (At the...

User Guide
Page 18
... Before entering the Parental Control sub-menu, user has to key in TV, Composite and S-Video source modes. While exiting the submenu, the parental control function is 『0 0 0 0』. 5. Password Set: Change the 4-numeral parental control password. The inhibitive channels or source ... password. Parental Control: provide the parental Control (V-chip) function setting. 3. Note: This feature is On. 【 Dynamic Contrast】user can modify the restricted table about MPAA or TV Rating respectively. Dynamic Contrast options for changing the password: Enter...
... Before entering the Parental Control sub-menu, user has to key in TV, Composite and S-Video source modes. While exiting the submenu, the parental control function is 『0 0 0 0』. 5. Password Set: Change the 4-numeral parental control password. The inhibitive channels or source ... password. Parental Control: provide the parental Control (V-chip) function setting. 3. Note: This feature is On. 【 Dynamic Contrast】user can modify the restricted table about MPAA or TV Rating respectively. Dynamic Contrast options for changing the password: Enter...
User Guide
Page 19
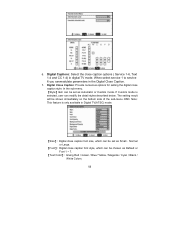
When select service 1 to service 6 you canmodulate parameters in digital TV mode. The setting result will be chosen as Automatic or Custom mode. Note: This feature is selected, user can be set as Default or Font 1 ~ 7. 【Text Color】: Giving Red / Green / Blue/ Yellow / Magenta / Cyan / ...Black / White Colors. 18 If Custom mode is only available in Digital TV(ATSC) mode. 【Size】: Digital close ...
When select service 1 to service 6 you canmodulate parameters in digital TV mode. The setting result will be chosen as Automatic or Custom mode. Note: This feature is selected, user can be set as Default or Font 1 ~ 7. 【Text Color】: Giving Red / Green / Blue/ Yellow / Magenta / Cyan / ...Black / White Colors. 18 If Custom mode is only available in Digital TV(ATSC) mode. 【Size】: Digital close ...

User Guide
Page 20
...】: The colors of text edge effects, which provides several items for the VGA display fine tuning, such as : 【H- Component Set: This option only shows and is not supported under Component mode). All these items are giving the tuning range from 0 to 100.【...;Setting】item provides the default VGA setting values restoring. 19 Position】、【V-Position】, 【Clock】and【Phase】(Auto Adjust function is...
...】: The colors of text edge effects, which provides several items for the VGA display fine tuning, such as : 【H- Component Set: This option only shows and is not supported under Component mode). All these items are giving the tuning range from 0 to 100.【...;Setting】item provides the default VGA setting values restoring. 19 Position】、【V-Position】, 【Clock】and【Phase】(Auto Adjust function is...
User Guide
Page 25
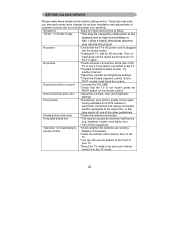
...of the TV to the TV. *Possible broadcast station trouble. In this case switch off the equipment. Poor picture *Sometimes, poor picture quality occurs when having activated an S-VHS camera or camcorder connected and having connected another channel. *Adjust the contrast and brightness settings. *...Then re- Some TEXT modes could block the screen, Good picture but poor color *Adjust the contrast, color and brightness settings. Television not responding to high rise buildings or hills. BEFORE CALLING SERVICE Please make these simple checks before calling service. insert...
...of the TV to the TV. *Possible broadcast station trouble. In this case switch off the equipment. Poor picture *Sometimes, poor picture quality occurs when having activated an S-VHS camera or camcorder connected and having connected another channel. *Adjust the contrast and brightness settings. *...Then re- Some TEXT modes could block the screen, Good picture but poor color *Adjust the contrast, color and brightness settings. Television not responding to high rise buildings or hills. BEFORE CALLING SERVICE Please make these simple checks before calling service. insert...
User Guide
Page 26
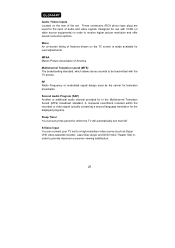
... additional audio channel provided for the input of audio and video signals. S-Video Input You can set a time period for use with the TV picture. Sleep Timer You can connect your TV set . MPAA Motion Picture Association of the set to be transmitted with VCRs (or other source equipments) in the Multichannel Television Sound (MTS...
... additional audio channel provided for the input of audio and video signals. S-Video Input You can set a time period for use with the TV picture. Sleep Timer You can connect your TV set . MPAA Motion Picture Association of the set to be transmitted with VCRs (or other source equipments) in the Multichannel Television Sound (MTS...


