User Manual
Page 4
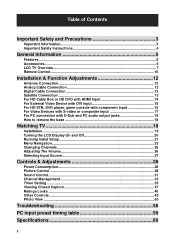
... and Precautions 3 Important Information 3 Important Safety Instructions 4 General Information 5 Features...5 Accessories...6 LCD TV Overview...7 Remote Control...10 Installation & Function Adjustments 12 Antenna Connection 12 Analog Cable Connection 12 Digital Cable...LCD Display On and Off 20 Running Initial Setup 21 Menu Navigation ...23 Changing Channels 26 Adjusting The Volume 26 Selecting Input Source 27 Controls & Adjustments 28 Power Consumption 28 Picture Control...28 Sound Control...31 Channel Management 33 Timer Setting...35 Viewing Closed Caption 37 Ratings Locks ...40...
... and Precautions 3 Important Information 3 Important Safety Instructions 4 General Information 5 Features...5 Accessories...6 LCD TV Overview...7 Remote Control...10 Installation & Function Adjustments 12 Antenna Connection 12 Analog Cable Connection 12 Digital Cable...LCD Display On and Off 20 Running Initial Setup 21 Menu Navigation ...23 Changing Channels 26 Adjusting The Volume 26 Selecting Input Source 27 Controls & Adjustments 28 Power Consumption 28 Picture Control...28 Sound Control...31 Channel Management 33 Timer Setting...35 Viewing Closed Caption 37 Ratings Locks ...40...

User Manual
Page 8
Accessories User Guide Remote Control & Batteries (AAAx2) Warranty Card Screw driver & Screws Power Cord Quick connect Quick Connect Guide NOTE 1 : The number of screws may differ depending on your purchase. 6
Accessories User Guide Remote Control & Batteries (AAAx2) Warranty Card Screw driver & Screws Power Cord Quick connect Quick Connect Guide NOTE 1 : The number of screws may differ depending on your purchase. 6
User Manual
Page 9
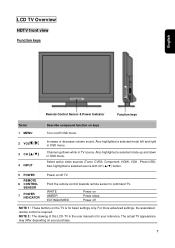
... up and down while in OSD menu. The actual TV appearance may differ depending on the TV is for your purchase. 7 Also highlighted a selected mode up /down in TV source. Point the remote control towards remote sensor to command TV. LCD TV Overview HDTV front view Function keys English Remote Control Sensor & Power Indicator Function keys Terms 1 MENU Describe...
... up and down while in OSD menu. The actual TV appearance may differ depending on the TV is for your purchase. 7 Also highlighted a selected mode up /down in TV source. Point the remote control towards remote sensor to command TV. LCD TV Overview HDTV front view Function keys English Remote Control Sensor & Power Indicator Function keys Terms 1 MENU Describe...
User Manual
Page 12
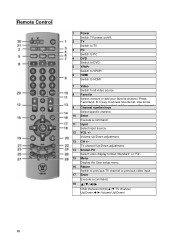
Press Favorite(A, B, C)key to all video source 8 Favorite Select, remove or add your favorite channel. Remote Control 1 Power Switch TV power on/off. 2 TV Switch to TV 3 PC Switch to PC 4 DVD Switch to DVD 5 YPbPr Switch to YPbPr 6 HDMI Switch to HDMI 7 Video Switch to access favorite list. Use...9 Channel number keys Select specific channel. 10 Enter Execute a command. 11 Input Select input source. 12 VOL +/Volume Up/Down adjustment. 13 CH +/TV channel Up/Down adjustment. 14 Screen Fit Select video display format "Standard" or "Fill". 15 Menu Display the User setup menu. 16 Return Switch to...
Press Favorite(A, B, C)key to all video source 8 Favorite Select, remove or add your favorite channel. Remote Control 1 Power Switch TV power on/off. 2 TV Switch to TV 3 PC Switch to PC 4 DVD Switch to DVD 5 YPbPr Switch to YPbPr 6 HDMI Switch to HDMI 7 Video Switch to access favorite list. Use...9 Channel number keys Select specific channel. 10 Enter Execute a command. 11 Input Select input source. 12 VOL +/Volume Up/Down adjustment. 13 CH +/TV channel Up/Down adjustment. 14 Screen Fit Select video display format "Standard" or "Fill". 15 Menu Display the User setup menu. 16 Return Switch to...
User Manual
Page 21
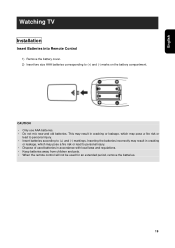
... a fire risk or lead to personal injury. Ǹʳ Insert batteries according to (+) and (-) markings. English ʳ Watching TV Installation Insert Batteries into Remote Control 1) Remove the battery cover. 2) Insert two size AAA batteries corresponding to personal injury. Ǹʳ Dispose of used batteries ...in accordance with local laws and regulations. Ǹʳ Keep batteries away from children and pets. Ǹʳ When the remote control will not be used for an extended period, remove the batteries. 19 Inserting the batteries incorrectly may result in cracking or ...
... a fire risk or lead to personal injury. Ǹʳ Insert batteries according to (+) and (-) markings. English ʳ Watching TV Installation Insert Batteries into Remote Control 1) Remove the battery cover. 2) Insert two size AAA batteries corresponding to personal injury. Ǹʳ Dispose of used batteries ...in accordance with local laws and regulations. Ǹʳ Keep batteries away from children and pets. Ǹʳ When the remote control will not be used for an extended period, remove the batteries. 19 Inserting the batteries incorrectly may result in cracking or ...
User Manual
Page 22
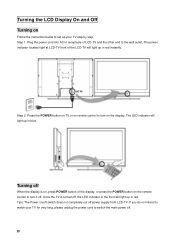
..., or press the POWER button on the remote control to turn on the display. The power indicator located right at LCD-TV front of the LCD-TV will light up in red. Once the TV is on, press POWER button of LCD-TV and the other end to set up your TV for very long, please unplug the power... blue. Step 2: Press the POWER button on TV or on /off switch does not completely cut off . 20 If you do not intend to watch your TV step by step. Tips: The Power on remote control to switch the main power off power supply from LCD-TV. Turning off When the display is turned off...
..., or press the POWER button on the remote control to turn on the display. The power indicator located right at LCD-TV front of the LCD-TV will light up in red. Once the TV is on, press POWER button of LCD-TV and the other end to set up your TV for very long, please unplug the power... blue. Step 2: Press the POWER button on TV or on /off switch does not completely cut off . 20 If you do not intend to watch your TV step by step. Tips: The Power on remote control to switch the main power off power supply from LCD-TV. Turning off When the display is turned off...
User Manual
Page 23
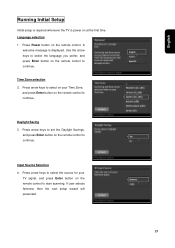
... English Running Initial Setup Initial setup is required whenever the TV is displayed. A welcome message is power on the remote control. Use the arrow keys to select the language you prefer, and press Enter button on the remote control to continue. If user selects Antenna, then the... arrow keys to set the Daylight Savings, and press Enter button on the remote control to continue. Daylight Saving 3. Press arrow keys to select on your TV signal, and press Enter button on the remote control to start scanning. Language selection 1. Input Source Selection 4. Press arrow ...
... English Running Initial Setup Initial setup is required whenever the TV is displayed. A welcome message is power on the remote control. Use the arrow keys to select the language you prefer, and press Enter button on the remote control to continue. If user selects Antenna, then the... arrow keys to set the Daylight Savings, and press Enter button on the remote control to continue. Daylight Saving 3. Press arrow keys to select on your TV signal, and press Enter button on the remote control to start scanning. Language selection 1. Input Source Selection 4. Press arrow ...
User Manual
Page 24
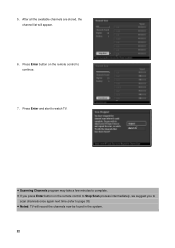
After all the available channels are stored, the channel list will record the channels now be found in the system. 22 Press Enter button on the remote control to Stop Scan process intermediately, we suggest you to scan channels once again next time.(refer to continue. 7. Press Enter and start to watch TV. Scanning Channels program may take a few minutes to complete. If you press Enter button on the remote control to page 33) Noted: TV will appear. 6. 5.
After all the available channels are stored, the channel list will record the channels now be found in the system. 22 Press Enter button on the remote control to Stop Scan process intermediately, we suggest you to scan channels once again next time.(refer to continue. 7. Press Enter and start to watch TV. Scanning Channels program may take a few minutes to complete. If you press Enter button on the remote control to page 33) Noted: TV will appear. 6. 5.
User Manual
Page 25
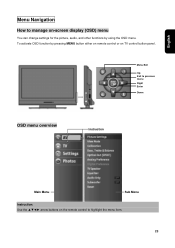
English Menu Navigation How to highlight the menu item. 23 To activate OSD function by pressing MENU button either on remote control or on -screen display (OSD) menu You can change settings for the picture, audio, and other functions by using the OSD menu. Menu/Exit Up Exit to previous menu Right Enter Down OSD menu overview Instruction Main Menu Sub Menu Instruction: Use the ŸźŻŹ arrow buttons on the remote control to manage on TV control button panel.
English Menu Navigation How to highlight the menu item. 23 To activate OSD function by pressing MENU button either on remote control or on -screen display (OSD) menu You can change settings for the picture, audio, and other functions by using the OSD menu. Menu/Exit Up Exit to previous menu Right Enter Down OSD menu overview Instruction Main Menu Sub Menu Instruction: Use the ŸźŻŹ arrow buttons on the remote control to manage on TV control button panel.

User Manual
Page 26
Press MENU button to adjust the setting parameter later. 3. Use arrow keys to choose the desired item in order to display the main menu. 2. Ϫ Use menu buttons on OSD main menu and adjust the settings. 1. Press Enter button to turn on remote control to enter your selection. 24
Press MENU button to adjust the setting parameter later. 3. Use arrow keys to choose the desired item in order to display the main menu. 2. Ϫ Use menu buttons on OSD main menu and adjust the settings. 1. Press Enter button to turn on remote control to enter your selection. 24
User Manual
Page 30
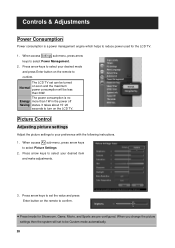
Press arrow keys to select your desired mode and press Enter button on the LCD TV. It takes about 15~20 seconds to turn on the remote to your desired item and make adjustments. 3. Picture Control Adjusting picture settings Adjust the picture settings to confirm. Press arrow ...is a power management engine which helps to confirm. Preset mode for the LCD TV. 1. When access AV sub-menu, press arrow keys to select Power Management. 2. The LCD TV set to be turned Normal on the remote to reduce power used for Showroom, Game, Movie, and Sports are pre-configured. ...
Press arrow keys to select your desired mode and press Enter button on the LCD TV. It takes about 15~20 seconds to turn on the remote to your desired item and make adjustments. 3. Picture Control Adjusting picture settings Adjust the picture settings to confirm. Press arrow ...is a power management engine which helps to confirm. Preset mode for the LCD TV. 1. When access AV sub-menu, press arrow keys to select Power Management. 2. The LCD TV set to be turned Normal on the remote to reduce power used for Showroom, Game, Movie, and Sports are pre-configured. ...

User Manual
Page 31
... to select your desired mode and press Enter button on the remote control directly to enter into View Mode for further adjustment.(refer to select View mode. 2. Press arrow keys and Enter button to select your TV screen to handle different picture formats. Adjusting the color temperature Adjust...Flesh Tone Correction, Blue Stretch, HD-MFD, Custom Color Temperature, Level Set. 1. Tip: You can press Screen Fit button on the remote control to make adjustments. 29 When access AV sub-menu, press arrow keys to become reddish or greenish Sharpness Soften or sharpen image Backlight ...
... to select your desired mode and press Enter button on the remote control directly to enter into View Mode for further adjustment.(refer to select View mode. 2. Press arrow keys and Enter button to select your TV screen to handle different picture formats. Adjusting the color temperature Adjust...Flesh Tone Correction, Blue Stretch, HD-MFD, Custom Color Temperature, Level Set. 1. Tip: You can press Screen Fit button on the remote control to make adjustments. 29 When access AV sub-menu, press arrow keys to become reddish or greenish Sharpness Soften or sharpen image Backlight ...

User Manual
Page 32
...best Auto Sync fit parameter at horizontal, vertical, and phase items in an opposite side. Adjusting PC settings Make sure the PC and display TV has been well connected; Set the time before DMPS goes into effect. When access Settings sub-menu, press arrow keys to enable or ...Timer Set the DPMS timer you want. DPMS : Display Power Management Signaling 30 DPMS When VGA is choose input source, press Enter button on the remote control to PC (VGA) mode. Move the image in horizontal way H-Position and it V-Position may goes beyond display active area to produce a...
...best Auto Sync fit parameter at horizontal, vertical, and phase items in an opposite side. Adjusting PC settings Make sure the PC and display TV has been well connected; Set the time before DMPS goes into effect. When access Settings sub-menu, press arrow keys to enable or ...Timer Set the DPMS timer you want. DPMS : Display Power Management Signaling 30 DPMS When VGA is choose input source, press Enter button on the remote control to PC (VGA) mode. Move the image in horizontal way H-Position and it V-Position may goes beyond display active area to produce a...

User Manual
Page 33
...sound balance between left Balance or right speakers. Press arrow keys and Enter button on the remote to Stereo, Mono or a Secondary Audio Program (SAP). (The language program in Digital TV The digital TV with SAP function will allow broadcasting the 2nd language other than English for those supportive programs or...AV sub-menu, press arrow keys to confirm. Tip: You can press INFO button on the remote control to show if there is no SAP support program, TV will be varied depends on the remote to select Analog Preference. 2. Press arrow keys to select your preferred mode. When access AV ...
...sound balance between left Balance or right speakers. Press arrow keys and Enter button on the remote to Stereo, Mono or a Secondary Audio Program (SAP). (The language program in Digital TV The digital TV with SAP function will allow broadcasting the 2nd language other than English for those supportive programs or...AV sub-menu, press arrow keys to confirm. Tip: You can press INFO button on the remote control to show if there is no SAP support program, TV will be varied depends on the remote to select Analog Preference. 2. Press arrow keys to select your preferred mode. When access AV ...

User Manual
Page 34
... is OFF. Press arrow keys and Enter button on the remote to select your TV to select AC3 or PCM. Ϫ TV Speaker 1. Press arrow keys and Enter button on the remote to select ON or OFF. Press TV speaker Speaker ON to select Optical Out (SPDIF). 2. When access AV sub-menu, press arrow ...keys to resume the sound or volume. 32 When access AV sub-menu, press arrow keys to select TV Speaker. 2. When access AV sub...
... is OFF. Press arrow keys and Enter button on the remote to select your TV to select AC3 or PCM. Ϫ TV Speaker 1. Press arrow keys and Enter button on the remote to select ON or OFF. Press TV speaker Speaker ON to select Optical Out (SPDIF). 2. When access AV sub-menu, press arrow ...keys to resume the sound or volume. 32 When access AV sub-menu, press arrow keys to select TV Speaker. 2. When access AV sub...
User Manual
Page 35
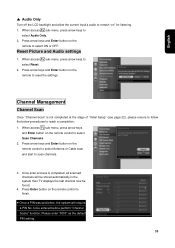
...Enter button on " for listening. 1. English Ϫ Audio Only Turn off the LCD backlight and allow the current input's audio to select Reset. 2. When access AV sub-menu, press arrow keys to remain "on the remote control to select Audio Only. 2. Channel Management Channel Scan Once "Channel Scan" ...is completed, all scanned channels will require a PIN No. When access TV sub-menu, press arrow keys and Enter button on the remote control to select Antenna or Cable scan and start to reset the settings. Press arrow keys and Enter button on...
...Enter button on " for listening. 1. English Ϫ Audio Only Turn off the LCD backlight and allow the current input's audio to select Reset. 2. When access AV sub-menu, press arrow keys to remain "on the remote control to select Audio Only. 2. Channel Management Channel Scan Once "Channel Scan" ...is completed, all scanned channels will require a PIN No. When access TV sub-menu, press arrow keys and Enter button on the remote control to select Antenna or Cable scan and start to reset the settings. Press arrow keys and Enter button on...
User Manual
Page 36
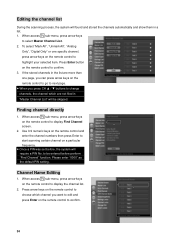
... channel which are more than one specific channel, press arrow keys on the remote control to confirm. 3. Please enter "0000" as the default PIN setting. When access TV sub-menu, press arrow keys on the remote control to confirm. 34 If the stored channels in the list are not ...filed in a list. 1. Finding channel directly 1. When access TV sub-menu, press arrow keys on the remote control to highlight your selected item. When access TV sub-menu, press arrow keys to display the channel list. 2. Channel Name Editing 1. Editing the channel...
... channel which are more than one specific channel, press arrow keys on the remote control to confirm. 3. Please enter "0000" as the default PIN setting. When access TV sub-menu, press arrow keys on the remote control to confirm. 34 If the stored channels in the list are not ...filed in a list. 1. Finding channel directly 1. When access TV sub-menu, press arrow keys on the remote control to highlight your selected item. When access TV sub-menu, press arrow keys to display the channel list. 2. Channel Name Editing 1. Editing the channel...
User Manual
Page 37
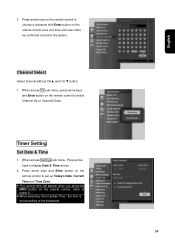
... to the broadcast. 35 Channel Select Select channel without CHŸ and CH ź button. 1. When access TV sub-menu, press arrow keys and Enter button on the remote control. (refer to page10) When selecting "Auto-Update Time," the time is set according to select Channel Up or Channel Down. When... access Settings sub-menu, Press arrow keys to choose a character with Enter button on the remote control once at a time until new name be confirmed at most 6 characters. Press arrow keys on the...
... to the broadcast. 35 Channel Select Select channel without CHŸ and CH ź button. 1. When access TV sub-menu, press arrow keys and Enter button on the remote control. (refer to page10) When selecting "Auto-Update Time," the time is set according to select Channel Up or Channel Down. When... access Settings sub-menu, Press arrow keys to choose a character with Enter button on the remote control once at a time until new name be confirmed at most 6 characters. Press arrow keys on the...

User Manual
Page 38
...set up Days, Start Time, Duration, and Source/Channel to turn on the remote control to turn on or off . concurrently, the Sleep timer setting has been switch off TV automatically in a giving time period. 1. TV will automatically turn off . 36 Setting the sleep timer Activating sleeper timer to...1. When access Settings sub-menu, press arrow keys and Enter button on the remote control to display Timers screen. 2. When access Settings sub-menu, Press arrow keys to set up the time. Once the TV has been turned off; Please note Timer 1 takes precedence over Timer 2.
...set up Days, Start Time, Duration, and Source/Channel to turn on the remote control to turn on or off . concurrently, the Sleep timer setting has been switch off TV automatically in a giving time period. 1. TV will automatically turn off . 36 Setting the sleep timer Activating sleeper timer to...1. When access Settings sub-menu, press arrow keys and Enter button on the remote control to display Timers screen. 2. When access Settings sub-menu, Press arrow keys to set up the time. Once the TV has been turned off; Please note Timer 1 takes precedence over Timer 2.
User Manual
Page 39
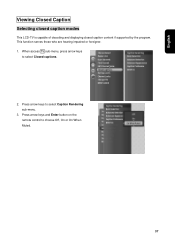
This function serves those who are hearing impaired or foreigner. 1. When access TV sub-menu, press arrow keys to choose Off, On or On When Muted. 37 Press arrow keys and Enter button on the remote control to select Closed captions. 2. Press arrow keys to select Caption Rendering sub-menu. 3. English Viewing Closed Caption Selecting closed caption modes This LCD-TV is capable of decoding and displaying closed caption content if supported by the program.
This function serves those who are hearing impaired or foreigner. 1. When access TV sub-menu, press arrow keys to choose Off, On or On When Muted. 37 Press arrow keys and Enter button on the remote control to select Closed captions. 2. Press arrow keys to select Caption Rendering sub-menu. 3. English Viewing Closed Caption Selecting closed caption modes This LCD-TV is capable of decoding and displaying closed caption content if supported by the program.


