User Manual
Page 4
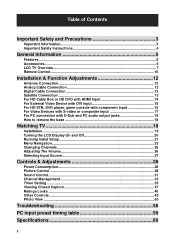
... composite Input 17 For PC connection with D-Sub and PC audio output jacks 18 How to remove the base 18 Watching TV 19 Installation ...19 Turning the LCD Display On and Off 20 Running Initial Setup 21 Menu Navigation ...23 Changing Channels 26 Adjusting The Volume 26 Selecting Input Source 27 Controls & Adjustments 28 Power Consumption 28 Picture Control...28 Sound Control...31 Channel Management 33 Timer Setting...35 Viewing Closed Caption 37 Ratings Locks ...40 Other Controls ...43 Photo View ...50 Troubleshooting 56 PC input preset timing table 59 Specifications...
... composite Input 17 For PC connection with D-Sub and PC audio output jacks 18 How to remove the base 18 Watching TV 19 Installation ...19 Turning the LCD Display On and Off 20 Running Initial Setup 21 Menu Navigation ...23 Changing Channels 26 Adjusting The Volume 26 Selecting Input Source 27 Controls & Adjustments 28 Power Consumption 28 Picture Control...28 Sound Control...31 Channel Management 33 Timer Setting...35 Viewing Closed Caption 37 Ratings Locks ...40 Other Controls ...43 Photo View ...50 Troubleshooting 56 PC input preset timing table 59 Specifications...
User Manual
Page 5
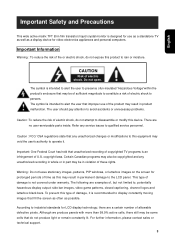
... any unauthorized changes or modifications to this type of damage, it . Caution : FCC/ CSA regulations state that improper use as a standalone TV as well as possible. This type of damage is an infringement of U.S. According to , potentially hazardous display output: side bar images, video game patterns, closed captioning, channel logos and letterbox black bars. For further information, please contact sales or technical support. 3 There are...
... any unauthorized changes or modifications to this type of damage, it . Caution : FCC/ CSA regulations state that improper use as a standalone TV as well as possible. This type of damage is an infringement of U.S. According to , potentially hazardous display output: side bar images, video game patterns, closed captioning, channel logos and letterbox black bars. For further information, please contact sales or technical support. 3 There are...

User Manual
Page 6
... all instructions. 5. Do not use attachments/accessories specified by the manufacturer, or sold with the cart, stand, tripod, bracket, or table specified by the manufacturer. 12. Clean only with the manufacturer's instructions. 8. The wide blade or the third prong are provided for your outlet, consult an electrician for long periods of the polarized or grounding-type plug. Use only...
... all instructions. 5. Do not use attachments/accessories specified by the manufacturer, or sold with the cart, stand, tripod, bracket, or table specified by the manufacturer. 12. Clean only with the manufacturer's instructions. 8. The wide blade or the third prong are provided for your outlet, consult an electrician for long periods of the polarized or grounding-type plug. Use only...
User Manual
Page 7
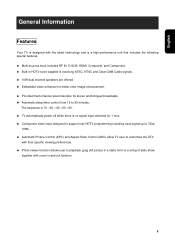
... is no signal input detected for 1 hour. ‹ Component video input designed to support only HDTV programming including input signal up to 720p, 1080i. ‹ Automatic Picture Control (APC) and Aspect Ratio Control (ARC) allow TV user to customize the DTV with zoom in a static form or a string of receiving ATSC, NTSC and Clear QAM Cable signals. ‹ 10W dual channel speakers are offered. ‹ Embedded video enhancer for better color image enhancement...
... is no signal input detected for 1 hour. ‹ Component video input designed to support only HDTV programming including input signal up to 720p, 1080i. ‹ Automatic Picture Control (APC) and Aspect Ratio Control (ARC) allow TV user to customize the DTV with zoom in a static form or a string of receiving ATSC, NTSC and Clear QAM Cable signals. ‹ 10W dual channel speakers are offered. ‹ Embedded video enhancer for better color image enhancement...
User Manual
Page 9
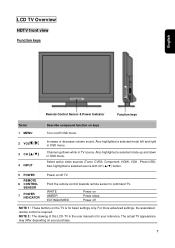
..., Component, HDMI, VGA , Photo-USB). NOTE 2 : The drawing of this LCD-TV in TV source. Also highlighted a selected source with CH (Ÿ/ź) button. 5 POWER REMOTE 6 CONTROL SENSOR 7 POWER INDICATOR Power on/off NOTE 1 : These buttons on Power sleep Power off TV. For more advanced settings, the associated remote control is for your purchase. 7 Channel up and down while in the user manual is for basic settings only. WHITE AMBER EXTINGUISHED Power on the TV is required. Also highlighted a selected mode...
..., Component, HDMI, VGA , Photo-USB). NOTE 2 : The drawing of this LCD-TV in TV source. Also highlighted a selected source with CH (Ÿ/ź) button. 5 POWER REMOTE 6 CONTROL SENSOR 7 POWER INDICATOR Power on/off NOTE 1 : These buttons on Power sleep Power off TV. For more advanced settings, the associated remote control is for your purchase. 7 Channel up and down while in the user manual is for basic settings only. WHITE AMBER EXTINGUISHED Power on the TV is required. Also highlighted a selected mode...
User Manual
Page 11
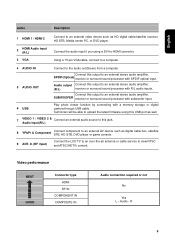
... the audio out(Green) from a computer. 5 AUDIO OUT Connect this output to an external stereo audio amplifier, SUBWOOFER receiver or surround sound processor with subwoofer input. 6 USB Play photo viewer function by connecting with R/L audio inputs. Audio - In (RF input) Connect the LCD TV to an over-the-air antenna or cable service to an external video device such as HD digital cable/satellite receiver, HD STB, Media center PC, or DVD player. Video performance BEST GOOD Connector type HDMI RF IN COMPONENT IN COMPOSITE IN Audio connection...
... the audio out(Green) from a computer. 5 AUDIO OUT Connect this output to an external stereo audio amplifier, SUBWOOFER receiver or surround sound processor with subwoofer input. 6 USB Play photo viewer function by connecting with R/L audio inputs. Audio - In (RF input) Connect the LCD TV to an over-the-air antenna or cable service to an external video device such as HD digital cable/satellite receiver, HD STB, Media center PC, or DVD player. Video performance BEST GOOD Connector type HDMI RF IN COMPONENT IN COMPOSITE IN Audio connection...
User Manual
Page 12
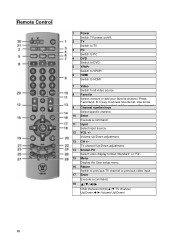
... adjustment. 14 Screen Fit Select video display format "Standard" or "Fill". 15 Menu Display the User setup menu. 16 Return Switch to access favorite list. Press Favorite(A, B, C)key to previous TV channel or previous video input 17 Enter Execute a command. 18 Ÿ/ź/Ż/Ź OSD menual control(Ÿ/ź:TV channel Up/Down;Ż/Ź:Volume Up/Down) 10 Remote Control 1 Power Switch TV power on/off. 2 TV Switch to TV 3 PC Switch to PC 4 DVD Switch to DVD 5 YPbPr Switch to YPbPr 6 HDMI Switch to HDMI 7 Video Switch...
... adjustment. 14 Screen Fit Select video display format "Standard" or "Fill". 15 Menu Display the User setup menu. 16 Return Switch to access favorite list. Press Favorite(A, B, C)key to previous TV channel or previous video input 17 Enter Execute a command. 18 Ÿ/ź/Ż/Ź OSD menual control(Ÿ/ź:TV channel Up/Down;Ż/Ź:Volume Up/Down) 10 Remote Control 1 Power Switch TV power on/off. 2 TV Switch to TV 3 PC Switch to PC 4 DVD Switch to DVD 5 YPbPr Switch to YPbPr 6 HDMI Switch to HDMI 7 Video Switch...
User Manual
Page 15
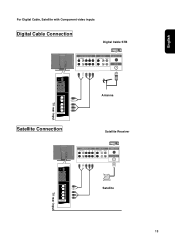
English For Digital Cable, Satellite with Component video inputs Digital Cable Connection Digital Cable STB Satellite Connection TV rear input Antenna Satellite Receiver TV rear input Satellite 13
English For Digital Cable, Satellite with Component video inputs Digital Cable Connection Digital Cable STB Satellite Connection TV rear input Antenna Satellite Receiver TV rear input Satellite 13
User Manual
Page 22
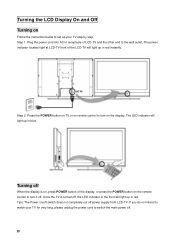
The power indicator located right at LCD-TV front of the LCD-TV will light up in red instantly. If you do not intend to switch the main power off power supply from LCD-TV. The LED indicator will light up your TV for very long, please unplug the power cord to watch your TV step by step. Turning the LCD Display On and Off Turning on the display. Step 1: Plug the power cord into AC In receptacle of...
The power indicator located right at LCD-TV front of the LCD-TV will light up in red instantly. If you do not intend to switch the main power off power supply from LCD-TV. The LED indicator will light up your TV for very long, please unplug the power cord to watch your TV step by step. Turning the LCD Display On and Off Turning on the display. Step 1: Plug the power cord into AC In receptacle of...
User Manual
Page 28
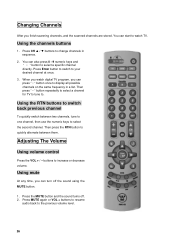
... a specific channel directly. Using the RTN buttons to switch back previous channel To quickly switch between them. Press the MUTE button and the sound turns off the sound using the MUTE button. 1. Press MUTE again or VOL + buttons to resume audio back to select the second channel. You can start to watch digital TV program, you can press "Θ" button once to change channels in a list. Using the channels buttons 1. Adjusting The Volume Using volume control Press the VOL + / - Press Enter button to switch...
... a specific channel directly. Using the RTN buttons to switch back previous channel To quickly switch between them. Press the MUTE button and the sound turns off the sound using the MUTE button. 1. Press MUTE again or VOL + buttons to resume audio back to select the second channel. You can start to watch digital TV program, you can press "Θ" button once to change channels in a list. Using the channels buttons 1. Adjusting The Volume Using volume control Press the VOL + / - Press Enter button to switch...
User Manual
Page 29
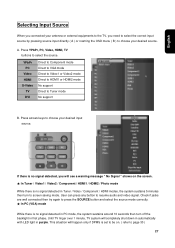
... video signal. User can press any button to select the source. Until TV linger over 1 minute, TV system will completely shut down in automatically with LED light in Tuner / Video / Component / HDMI modes, the system sustains 5 minutes then turn off the backlight in first phase. This situation will see a warning message " No Signal " shows on . ( refer to page 30 ) 27 If there is no signal detected, you need...
... video signal. User can press any button to select the source. Until TV linger over 1 minute, TV system will completely shut down in automatically with LED light in Tuner / Video / Component / HDMI modes, the system sustains 5 minutes then turn off the backlight in first phase. This situation will see a warning message " No Signal " shows on . ( refer to page 30 ) 27 If there is no signal detected, you need...
User Manual
Page 30
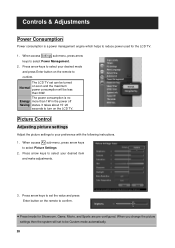
... Enter button on the remote to your desired item and make adjustments. 3. Picture Control Adjusting picture settings Adjust the picture settings to confirm. When you change the picture settings then the system will be turned Normal on the LCD TV. When access AV sub-menu, press arrow keys to be Custom mode automatically. 28 Press arrow keys to select Power Management. 2. The power consumption is a power management engine which helps to reduce power used for Showroom, Game...
... Enter button on the remote to your desired item and make adjustments. 3. Picture Control Adjusting picture settings Adjust the picture settings to confirm. When you change the picture settings then the system will be turned Normal on the LCD TV. When access AV sub-menu, press arrow keys to be Custom mode automatically. 28 Press arrow keys to select Power Management. 2. The power consumption is a power management engine which helps to reduce power used for Showroom, Game...

User Manual
Page 32
... remote control to enable or disable the display power management mode. When access Settings sub-menu, press arrow keys to and Enter button on the remote to set the DPMS Timer. When access Settings sub-menu, press arrow keys to PC (VGA) mode. Move the image in horizontal way H-Position and it V-Position may goes beyond display active area to produce a black bar in view of the current VGA input signal. also source input...
... remote control to enable or disable the display power management mode. When access Settings sub-menu, press arrow keys to and Enter button on the remote to set the DPMS Timer. When access Settings sub-menu, press arrow keys to PC (VGA) mode. Move the image in horizontal way H-Position and it V-Position may goes beyond display active area to produce a black bar in view of the current VGA input signal. also source input...
User Manual
Page 37
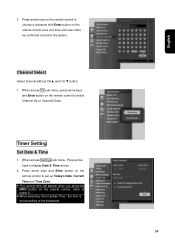
... access TV sub-menu, press arrow keys and Enter button on the remote control to display Date & Time screen. 2. When access Settings sub-menu, Press arrow keys to select Channel Up or Channel Down. English 3. Channel Select Select channel without CHŸ and CH ź button. 1. Press arrow keys on the remote control once at a time until new name be confirmed at most 6 characters. Timer Setting Set Date & Time 1. Press arrow keys and Enter button...
... access TV sub-menu, press arrow keys and Enter button on the remote control to display Date & Time screen. 2. When access Settings sub-menu, Press arrow keys to select Channel Up or Channel Down. English 3. Channel Select Select channel without CHŸ and CH ź button. 1. Press arrow keys on the remote control once at a time until new name be confirmed at most 6 characters. Timer Setting Set Date & Time 1. Press arrow keys and Enter button...

User Manual
Page 41
Reset Closed Captions User decide to restore all Closed Caption conditions back to select RESET CC sub-menu. 2. When access Closed Captions sub-menu, press arrow keys on the remote control to factory default settings. 1. Press arrow keys and Enter button on the remote control to reset the settings. 39 Press arrow keys and Enter button on the remote control to select your desired mode. English Caption Preference It is the service aiming at delivering more closed caption options on the...
Reset Closed Captions User decide to restore all Closed Caption conditions back to select RESET CC sub-menu. 2. When access Closed Captions sub-menu, press arrow keys on the remote control to factory default settings. 1. Press arrow keys and Enter button on the remote control to reset the settings. 39 Press arrow keys and Enter button on the remote control to select your desired mode. English Caption Preference It is the service aiming at delivering more closed caption options on the...

User Manual
Page 45
... Setup Wizard after resetting all settings. (refer page 20) Showing system info When access Settings sub-menu, press arrow keys on the remote control to select your preferred language. Resetting all settings The user can reset all settings back to show the System Info. 43 English Other Controls Menu Language When access Settings sub-menu, press arrow keys and Enter button on the remote control to factory settings, including the channel list, all Program Info, Favorite channel lists...
... Setup Wizard after resetting all settings. (refer page 20) Showing system info When access Settings sub-menu, press arrow keys on the remote control to select your preferred language. Resetting all settings The user can reset all settings back to show the System Info. 43 English Other Controls Menu Language When access Settings sub-menu, press arrow keys and Enter button on the remote control to factory settings, including the channel list, all Program Info, Favorite channel lists...
User Manual
Page 52
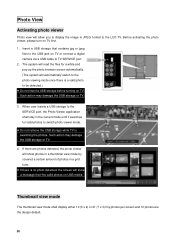
... screen automatically. (The system will automatically switch to the photo viewing mode once there is a valid photo to be detected.) Do not insert a USB storage before turning on TV first. 1. Insert a USB storage that "No valid photos on TV or connect a digital camera via a USB cable to TV SERVICE port. 2. If there are the design default. 50 format to the LCD TV. Such action may damage the USB storage or TV...
... screen automatically. (The system will automatically switch to the photo viewing mode once there is a valid photo to be detected.) Do not insert a USB storage before turning on TV first. 1. Insert a USB storage that "No valid photos on TV or connect a digital camera via a USB cable to TV SERVICE port. 2. If there are the design default. 50 format to the LCD TV. Such action may damage the USB storage or TV...

User Manual
Page 54
... component >Monochrome or color Y:Cb:Cr=4:2:2 or Y:Cb:Cr=4:2:0 >DCT-based, non-differential, Huffman-coded ‹ Pictures modified using a PC may not be displayed on TV. ‹ Image size limited to watch TV icon and start to 8912 pixels in either direction. ‹ A maximum of 3000 photos on the remote control to switch to photo USB mode.(refer to page 28) IMPORTANT ‹ The system support connection...
... component >Monochrome or color Y:Cb:Cr=4:2:2 or Y:Cb:Cr=4:2:0 >DCT-based, non-differential, Huffman-coded ‹ Pictures modified using a PC may not be displayed on TV. ‹ Image size limited to watch TV icon and start to 8912 pixels in either direction. ‹ A maximum of 3000 photos on the remote control to switch to photo USB mode.(refer to page 28) IMPORTANT ‹ The system support connection...
User Manual
Page 59
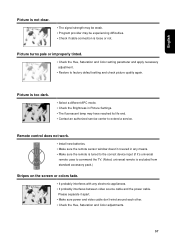
...; Make sure the remote is tuned to the correct device input (if it apart. ƒ Make sure power and video cable don't wind around each other. ƒ Check the Hue, Saturation and Color adjustments. 57 Please separate it 's universal remote uses to factory default setting and check picture quality again. English Picture is not clear. ƒ The signal strength may be weak. ƒ Program provider may have...
...; Make sure the remote is tuned to the correct device input (if it apart. ƒ Make sure power and video cable don't wind around each other. ƒ Check the Hue, Saturation and Color adjustments. 57 Please separate it 's universal remote uses to factory default setting and check picture quality again. English Picture is not clear. ƒ The signal strength may be weak. ƒ Program provider may have...
User Manual
Page 62
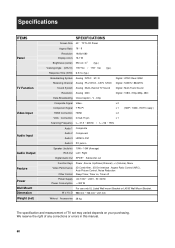
... Control (ARC) , Auto Picture Control, Noise Reduction Sleep Timer, Timer on your purchasing. We reserve the right of TV set may varied depends on , Timer off Power Supply AC 100V ~ 240V , 50 / 60Hz Power Consumption < 300 W For use only UL Listed Wall mount Bracket or L4030 Wall Mount Bracket. Specifications ITEMS Panel TV Function Video Input Audio Input Audio Output Feature Power Wall Mount Dimension Weight (net) SPECIFICATIONS Screen Size 40" TFT-LCD Panel Aspect Ratio 16Κ9 Resolution 1920x1080 Display colors 16.7 M Brightness (center) 550 cd / m2 (typ.) Viewing...
... Control (ARC) , Auto Picture Control, Noise Reduction Sleep Timer, Timer on your purchasing. We reserve the right of TV set may varied depends on , Timer off Power Supply AC 100V ~ 240V , 50 / 60Hz Power Consumption < 300 W For use only UL Listed Wall mount Bracket or L4030 Wall Mount Bracket. Specifications ITEMS Panel TV Function Video Input Audio Input Audio Output Feature Power Wall Mount Dimension Weight (net) SPECIFICATIONS Screen Size 40" TFT-LCD Panel Aspect Ratio 16Κ9 Resolution 1920x1080 Display colors 16.7 M Brightness (center) 550 cd / m2 (typ.) Viewing...


