User Manual
Page 3
4= HDTV OPERATION About the On Screen Display (OSD) OSD Menus & Features --Settings Video Menu --Audio Menu _olor Menu --Setup Menu _uick Setup Menu --Advanced Setup Menu --Lock Menu --reset of Setup Menu _uide Menu --About Parental Controls --Input Menu 5= APPENDIX 19-inch High Definition LCD TV Specifications Troubleshooting Cleaning the High Definition LCD TV
4= HDTV OPERATION About the On Screen Display (OSD) OSD Menus & Features --Settings Video Menu --Audio Menu _olor Menu --Setup Menu _uick Setup Menu --Advanced Setup Menu --Lock Menu --reset of Setup Menu _uide Menu --About Parental Controls --Input Menu 5= APPENDIX 19-inch High Definition LCD TV Specifications Troubleshooting Cleaning the High Definition LCD TV
User Manual
Page 8
... with care when moving the cart/apparatus combination to rain or moisture and does not operate normally, or it off and contact the Westinghouse Service Center. Unplug this User's Manual for a long period of the obsolete outlet. 6. A grounding type plug has two blades ... tipping over. 9. liquid has been spilled into your LCD display with one wider than the other equipment (including amplifiers) that produce heat. 5. PRODUCT SAFETY Follow and obey all servicing to remove. Your High Definition LCD TV contains high-voltage parts. Skin oils are provided for ...
... with care when moving the cart/apparatus combination to rain or moisture and does not operate normally, or it off and contact the Westinghouse Service Center. Unplug this User's Manual for a long period of the obsolete outlet. 6. A grounding type plug has two blades ... tipping over. 9. liquid has been spilled into your LCD display with one wider than the other equipment (including amplifiers) that produce heat. 5. PRODUCT SAFETY Follow and obey all servicing to remove. Your High Definition LCD TV contains high-voltage parts. Skin oils are provided for ...
User Manual
Page 11
...1/60 th of a second. Progressive "p" scanning means that make up onscreen images are refreshed simultaneously, with a true high definition display--and a 720p or 1080i signal coming into your provider to determine which packages include stations broadcasting in high definition, and if you...understand some fundamentals of your antenna, cable or satellite service. INTRODUCTION: THE BASICS About the Digital Television Picture Your new Westinghouse High Definition LCD TV has a built-in HDTV/NTSC tuner, meaning it 's important to view all of your programming choices in disappointing ...
...1/60 th of a second. Progressive "p" scanning means that make up onscreen images are refreshed simultaneously, with a true high definition display--and a 720p or 1080i signal coming into your provider to determine which packages include stations broadcasting in high definition, and if you...understand some fundamentals of your antenna, cable or satellite service. INTRODUCTION: THE BASICS About the Digital Television Picture Your new Westinghouse High Definition LCD TV has a built-in HDTV/NTSC tuner, meaning it 's important to view all of your programming choices in disappointing ...
User Manual
Page 13
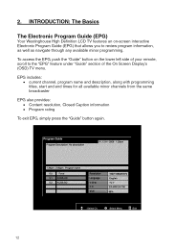
INTRODUCTION: The Basics The Electronic Program Guide (EPG) Your Westinghouse High Definition LCD TV features an on the lower left side of the On Screen Display's (OSD) TV menu. To access the EPG, push the "Guide" button on -screen interactive Electronic Program Guide (EPG) that allows you to the "EPG" feature under "Guide" ...
INTRODUCTION: The Basics The Electronic Program Guide (EPG) Your Westinghouse High Definition LCD TV features an on the lower left side of the On Screen Display's (OSD) TV menu. To access the EPG, push the "Guide" button on -screen interactive Electronic Program Guide (EPG) that allows you to the "EPG" feature under "Guide" ...
User Manual
Page 14
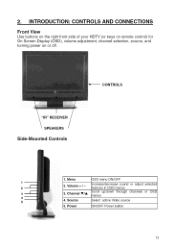
Channel VIA 4. Source 5. Volume + / - 3. Power DSD menu ON/OFF Increase/decrease sound or adjust features in OSD menus Scroll up/down through channels "_enus Select active Video source selected or OSD DN/OFF Power button 13 Menu 2. 2. INTRODUCTION: CONTROLS AND CONNECTIONS Front View Use buttons on the right front side of your HDTV (or keys on remote control) for On Screen Display (OSD), volume adjustment, channel selection, source, and turning power on or off. ,_-iCONTROLS "IR"RECEIVER SPEAKERS Side-Mounted Controls 1.
Channel VIA 4. Source 5. Volume + / - 3. Power DSD menu ON/OFF Increase/decrease sound or adjust features in OSD menus Scroll up/down through channels "_enus Select active Video source selected or OSD DN/OFF Power button 13 Menu 2. 2. INTRODUCTION: CONTROLS AND CONNECTIONS Front View Use buttons on the right front side of your HDTV (or keys on remote control) for On Screen Display (OSD), volume adjustment, channel selection, source, and turning power on or off. ,_-iCONTROLS "IR"RECEIVER SPEAKERS Side-Mounted Controls 1.

User Manual
Page 18
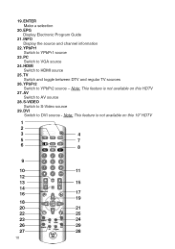
... Display sub picture On/Off Note: This feature is not available on this 19" HDTV. 5. LAST CHANNEL Switch to adjust backlight adjustment 6. BACKLIGHT Shortcut to previous channel 18. FAVORITE CHANNEL A / B / C Jump to favorite channels (Hold button for 3 seconds to "STANDARD", "FILL" 15.0H VIA TV ...timer 8. DOT To input dot when selecting digital channels 11.ENT Complete channel selection 12.INPUT Display MP input menu 13.VOL -/+ Volume Up/Down adjustment 14.SCALING Set video display format to program favorite channel). 9. 2. SWAP Switch between PIP and Main Picture Note: This...
... Display sub picture On/Off Note: This feature is not available on this 19" HDTV. 5. LAST CHANNEL Switch to adjust backlight adjustment 6. BACKLIGHT Shortcut to previous channel 18. FAVORITE CHANNEL A / B / C Jump to favorite channels (Hold button for 3 seconds to "STANDARD", "FILL" 15.0H VIA TV ...timer 8. DOT To input dot when selecting digital channels 11.ENT Complete channel selection 12.INPUT Display MP input menu 13.VOL -/+ Volume Up/Down adjustment 14.SCALING Set video display format to program favorite channel). 9. 2. SWAP Switch between PIP and Main Picture Note: This...
User Manual
Page 19
Note: This feature is not available on this HDTV 27. Note: This feature is not available on this 19" HDTV 15 7 9 18 19.ENTER Make a selection 20.EPG Display Electronic Program Guide 21.1NFO Display the source and channel information 22. S-VIDEO Switch to DVI source - DVI Switch to S-Video source 29. TV Switch and toggle between DTV and regular TV sources 26.YPbPr2 Switch to AV source 28. AV Switch to YPbPr2 source - YPbPrl Switch to HDMI source 25. PC Switch to VGA source 24.HDMI Switch to YPbPrl source 23.
Note: This feature is not available on this HDTV 27. Note: This feature is not available on this 19" HDTV 15 7 9 18 19.ENTER Make a selection 20.EPG Display Electronic Program Guide 21.1NFO Display the source and channel information 22. S-VIDEO Switch to DVI source - DVI Switch to S-Video source 29. TV Switch and toggle between DTV and regular TV sources 26.YPbPr2 Switch to AV source 28. AV Switch to YPbPr2 source - YPbPrl Switch to HDMI source 25. PC Switch to VGA source 24.HDMI Switch to YPbPrl source 23.
User Manual
Page 20
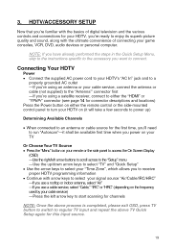
...shall be available first time when you power on your TV Or ChooseYourTV Source • Pressthe"lVbr_' bL_on on your remoteor the side panelto access the On Screen Display (CSD) the right/leftarrow bLltons to scroll across to ...the "Setup" menu --Use the up/down arrow keys to select "TV" and "Quick Setup" • Use the arrow... Once the abov_, process is comple_od, pMaee _x]_ OSD, press_ TV bu_ton _o e_/iMh _o _guM_ TV h_}uf and _l_eat the above TV Ou_ek S_tup agMn [ythis #}put source...
...shall be available first time when you power on your TV Or ChooseYourTV Source • Pressthe"lVbr_' bL_on on your remoteor the side panelto access the On Screen Display (CSD) the right/leftarrow bLltons to scroll across to ...the "Setup" menu --Use the up/down arrow keys to select "TV" and "Quick Setup" • Use the arrow... Once the abov_, process is comple_od, pMaee _x]_ OSD, press_ TV bu_ton _o e_/iMh _o _guM_ TV h_}uf and _l_eat the above TV Ou_ek S_tup agMn [ythis #}put source...
User Manual
Page 21
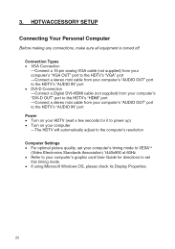
... • Refer to your computer's graphic card User Guide for directions to set this timing mode. • If using Microsoft Windows OS, please check its Display Properties. 2O 3.
... • Refer to your computer's graphic card User Guide for directions to set this timing mode. • If using Microsoft Windows OS, please check its Display Properties. 2O 3.

User Manual
Page 23
... Menus and Features Settings Video Menu The "Settings Video" menu allows you to make proper adjustment. HDTV OPERATION About the On Screen Display (OSD) Your HDTV's On Screen Display (OSD) conveniently integrates all functions required for setup and operation. There are two ways you see on the HDTVs ri_t-side control panel...
... Menus and Features Settings Video Menu The "Settings Video" menu allows you to make proper adjustment. HDTV OPERATION About the On Screen Display (OSD) Your HDTV's On Screen Display (OSD) conveniently integrates all functions required for setup and operation. There are two ways you see on the HDTVs ri_t-side control panel...
User Manual
Page 32
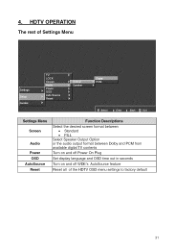
4. HDTV OPERATION The rest of Settings Menu Screen Audio Power OSD AutoSource Reset Select the desired screen format between • Standard • FILL Select Speaker Output Option or the audio output format between Dolby and PCM from available digital TV contents Turn on and off Power On Plug Set display language and OSD time out in seconds Turn on and off WDE's AutoSource feature Reset all of the HDTV OSD menu settings to factory default 31
4. HDTV OPERATION The rest of Settings Menu Screen Audio Power OSD AutoSource Reset Select the desired screen format between • Standard • FILL Select Speaker Output Option or the audio output format between Dolby and PCM from available digital TV contents Turn on and off Power On Plug Set display language and OSD time out in seconds Turn on and off WDE's AutoSource feature Reset all of the HDTV OSD menu settings to factory default 31

User Manual
Page 33
Under DTV input Display EPG information as shown above Under other inputs Display Install Matrix Help Guide 32 HDTV OPERATION Guide Menu i!i!i!i!i!i!i!i!i_!_i_!i_i_i_i!i_i_i!__ii_!i_i_i!ii_i!_ii!ii_!ii!!ii!!_i!i_!i!ii!i_!ii!i_!ii!i_!ii!,i:!_i!i_!i__i_!I_Ii_I_!iI_iI_!I_iI_'Ii!_I_iI_!I_iI_!I_Ii__I!i_Ii__I!_II_i_I_I!I__iII¸!I__Ii_I_!_IIiI_!_IIi_I!Ii_!Ii_I! 4.
Under DTV input Display EPG information as shown above Under other inputs Display Install Matrix Help Guide 32 HDTV OPERATION Guide Menu i!i!i!i!i!i!i!i!i_!_i_!i_i_i_i!i_i_i!__ii_!i_i_i!ii_i!_ii!ii_!ii!!ii!!_i!i_!i!ii!i_!ii!i_!ii!i_!ii!,i:!_i!i_!i__i_!I_Ii_I_!iI_iI_!I_iI_'Ii!_I_iI_!I_iI_!I_Ii__I!i_Ii__I!_II_i_I_I!I__iII¸!I__Ii_I_!_IIiI_!_IIi_I!Ii_!Ii_I! 4.

User Manual
Page 37
When the input menu is on the remote to the highlighted one. 38 HDTV OPERATION Input Menu To change the Main Picture source, press the Input button on , use the up/down arrows to scroll through all inputs and the press enter to switch to display the Main Picture (MP) input menu. 4.
When the input menu is on the remote to the highlighted one. 38 HDTV OPERATION Input Menu To change the Main Picture source, press the Input button on , use the up/down arrows to scroll through all inputs and the press enter to switch to display the Main Picture (MP) input menu. 4.
User Manual
Page 39
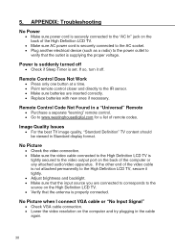
... power cord is securely connected to the "AC In" jack on the back of the video cable is not attached permanently to the High Definition LCD TV, secure it off • Check if Sleep Timer is properly connected. No Picture • Check the video connection. • Make sure the ...video cable connected to the video output port on the computer and try plugging in Standard display format. Power is suddenly turned off . Remote Control Does Not Work • Press only one button at a time. • Point remote control closer...
... power cord is securely connected to the "AC In" jack on the back of the video cable is not attached permanently to the High Definition LCD TV, secure it off • Check if Sleep Timer is properly connected. No Picture • Check the video connection. • Make sure the ...video cable connected to the video output port on the computer and try plugging in Standard display format. Power is suddenly turned off . Remote Control Does Not Work • Press only one button at a time. • Point remote control closer...

