User Guide
Page 1
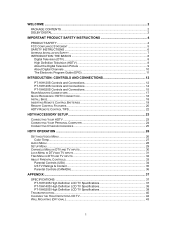
... Connections 12 PT-19H140S Controls and Connections 14 PT-19H520S Controls and Connections 15 REAR MOUNTED CONNECTORS 17 QUICK REFERENCE: HDTV CONNECTION 18 INSTALL BASE...18 INSERTING REMOTE CONTROL BATTERIES 19 REMOTE CONTROL FEATURES...20 HDTV REMOTE CONTROL TIPS 22 HDTV/ACCESSORY SETUP 23 CONNECTING YOUR HDTV ...23 CONNECTING YOUR PERSONAL COMPUTER 24 CONNECTING OTHER ACCESSORIES 25 HDTV OPERATION ...26 SETTINGS VIDEO MENU ...26 Color Temp...27 AUDIO MENU...28 SETUP MENU ...29 CHANNELS MENU IN DTV AND TV INPUTS 30 LOCK MENU IN DTV AND TV INPUTS 31 TIME MENU IN DTV AND TV INPUTS...
... Connections 12 PT-19H140S Controls and Connections 14 PT-19H520S Controls and Connections 15 REAR MOUNTED CONNECTORS 17 QUICK REFERENCE: HDTV CONNECTION 18 INSTALL BASE...18 INSERTING REMOTE CONTROL BATTERIES 19 REMOTE CONTROL FEATURES...20 HDTV REMOTE CONTROL TIPS 22 HDTV/ACCESSORY SETUP 23 CONNECTING YOUR HDTV ...23 CONNECTING YOUR PERSONAL COMPUTER 24 CONNECTING OTHER ACCESSORIES 25 HDTV OPERATION ...26 SETTINGS VIDEO MENU ...26 Color Temp...27 AUDIO MENU...28 SETUP MENU ...29 CHANNELS MENU IN DTV AND TV INPUTS 30 LOCK MENU IN DTV AND TV INPUTS 31 TIME MENU IN DTV AND TV INPUTS...
User Guide
Page 2
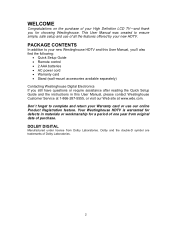
... original date of purchase. Don't forget to ensure simple, safe setup and use our online Product Registration feature. WELCOME Congratulations on the purchase of your new Westinghouse HDTV and this User Manual, you'll also find the following: • Quick Setup Guide • Remote control • 2 AAA batteries • AC power cord • Warranty card • Stand (wall-mount accessories available separately) Contacting Westinghouse Digital Electronics If you for choosing...
... original date of purchase. Don't forget to ensure simple, safe setup and use our online Product Registration feature. WELCOME Congratulations on the purchase of your new Westinghouse HDTV and this User Manual, you'll also find the following: • Quick Setup Guide • Remote control • 2 AAA batteries • AC power cord • Warranty card • Stand (wall-mount accessories available separately) Contacting Westinghouse Digital Electronics If you for choosing...
User Guide
Page 4
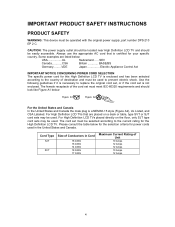
... cord set must be used . CAUTION: The power supply outlet should be located near High Definition LCD TV and should look like Figure A1 below for the selection criteria for power cords used . Please consult the table below : Figure A1 Figure A2 For the United States and Canada In the United States and Canada the male plug is certified for your specific country. Always use...
... cord set must be used . CAUTION: The power supply outlet should be located near High Definition LCD TV and should look like Figure A1 below for the selection criteria for power cords used . Please consult the table below : Figure A1 Figure A2 For the United States and Canada In the United States and Canada the male plug is certified for your specific country. Always use...
User Guide
Page 5
... generates, uses, and can be determined by turning the equipment off and on, the user is encouraged to try to which the receiver is connected. • Consult the Westinghouse Service Center or an experienced radio/TV technician for a Class B digital device, pursuant to the screen of the FCC Rules. If a BNC cable is no guarantee that your CATV system installer has connected the...
... generates, uses, and can be determined by turning the equipment off and on, the user is encouraged to try to which the receiver is connected. • Consult the Westinghouse Service Center or an experienced radio/TV technician for a Class B digital device, pursuant to the screen of the FCC Rules. If a BNC cable is no guarantee that your CATV system installer has connected the...
User Guide
Page 6
... Definition LCD TV contains high-voltage parts. install in any way, such as radiators, heat registers, stoves or any way to remove. • Never remove the rear cover. Take care to moisture or high humidity. • Do not attempt repairs yourself. Ensure the power cord is required when the apparatus has been damaged in accordance with dry cloth. 3. Only use caution...
... Definition LCD TV contains high-voltage parts. install in any way, such as radiators, heat registers, stoves or any way to remove. • Never remove the rear cover. Take care to moisture or high humidity. • Do not attempt repairs yourself. Ensure the power cord is required when the apparatus has been damaged in accordance with dry cloth. 3. Only use caution...
User Guide
Page 7
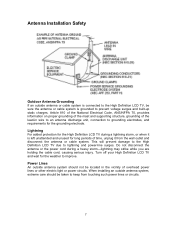
... of time, unplug it is grounded to lightning and power-line surges. Do not disconnect the antenna or the power cord during a lightning storm, or when it from touching such power lines or circuits. 7 Turn off your High Definition LCD TV and wait for the grounding electrode. Power Lines An outside antenna system should be located in wire to an antenna discharge unit, connection...
... of time, unplug it is grounded to lightning and power-line surges. Do not disconnect the antenna or the power cord during a lightning storm, or when it from touching such power lines or circuits. 7 Turn off your High Definition LCD TV and wait for the grounding electrode. Power Lines An outside antenna system should be located in wire to an antenna discharge unit, connection...

User Guide
Page 8
... use. HDTV's aspect ratio is changing. As a result of this in compliance with digital cable or digital satellite systems. While these systems receive digital signals, the signals are Standard Definition Television (SDTV) and High Definition Television (HDTV). HDTV also uses a "widescreen format," which refers to the magnetic waves used for analog transmission (also known as data, using fewer channels, freeing parts of the broadcast spectrum for other uses, such as public safety and wireless services...
... use. HDTV's aspect ratio is changing. As a result of this in compliance with digital cable or digital satellite systems. While these systems receive digital signals, the signals are Standard Definition Television (SDTV) and High Definition Television (HDTV). HDTV also uses a "widescreen format," which refers to the magnetic waves used for analog transmission (also known as data, using fewer channels, freeing parts of the broadcast spectrum for other uses, such as public safety and wireless services...
User Guide
Page 14
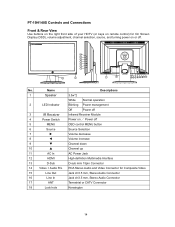
... 15pin Connector 14 Video + Audio R/L RCA Stereo Audio and Video Connector for On Screen Display (OSD), volume adjustment, channel selection, source, and turning power on remote control) for Composite Video 15 Line Out Jack d=3.5 mm, Stereo Audio Connector 16 Line In Jack d=3.5 mm, Stereo Audio Connector 17 ANT Terrestrial or CATV Connector 18 Lock hole Kensington 14 PT-19H140S Controls and Connections Front & Rear View Use buttons on the right front side of your HDTV (or keys...
... 15pin Connector 14 Video + Audio R/L RCA Stereo Audio and Video Connector for On Screen Display (OSD), volume adjustment, channel selection, source, and turning power on remote control) for Composite Video 15 Line Out Jack d=3.5 mm, Stereo Audio Connector 16 Line In Jack d=3.5 mm, Stereo Audio Connector 17 ANT Terrestrial or CATV Connector 18 Lock hole Kensington 14 PT-19H140S Controls and Connections Front & Rear View Use buttons on the right front side of your HDTV (or keys...
User Guide
Page 17
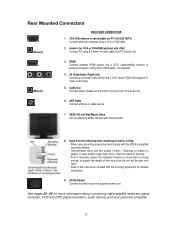
... AV input) 5. AV Video/Audio (Right/Left) Connect an external video device like a DVD, cable/satellite receiver or personal computer (using a DVI-HDMI cable, not supplied) 4. ANT/Cable Connect antenna or cable service 7. VESA 100 mm Wall Mount Holes Use for VGA or DVI-HDMI (optional with a 3.5mm mini-jack from PC's Audio Out (Black) 3. lease note the following when mounting on PT-16H120S HDTV) Connect personal computer using mounting accessories must comply with the mounting equipment for more information about connecting cable/satellite receivers, game...
... AV input) 5. AV Video/Audio (Right/Left) Connect an external video device like a DVD, cable/satellite receiver or personal computer (using a DVI-HDMI cable, not supplied) 4. ANT/Cable Connect antenna or cable service 7. VESA 100 mm Wall Mount Holes Use for VGA or DVI-HDMI (optional with a 3.5mm mini-jack from PC's Audio Out (Black) 3. lease note the following when mounting on PT-16H120S HDTV) Connect personal computer using mounting accessories must comply with the mounting equipment for more information about connecting cable/satellite receivers, game...
User Guide
Page 20
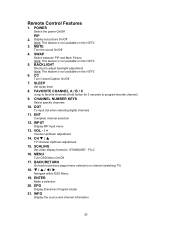
... channel selection 12. SLEEP Set sleep timer 8. CHANNEL NUMBER KEYS Select specific channels 10. DOT To input dot when selecting digital channels 11. VOL - / + Volume Up/Down adjustment 14. EPG Display Electronic Program Guide 21. SCALING Set video display format to previous page (menu selection) or channel (watching TV) 18. MUTE Turn the sound On/Off 4. BACK/RETURN Go back to "STANDARD", "FILL" 16. INFO Display the source and channel information 20 POWER Switch the power On/Off PIP 2. SWAP Switch between PIP and Main Picture...
... channel selection 12. SLEEP Set sleep timer 8. CHANNEL NUMBER KEYS Select specific channels 10. DOT To input dot when selecting digital channels 11. VOL - / + Volume Up/Down adjustment 14. EPG Display Electronic Program Guide 21. SCALING Set video display format to previous page (menu selection) or channel (watching TV) 18. MUTE Turn the sound On/Off 4. BACK/RETURN Go back to "STANDARD", "FILL" 16. INFO Display the source and channel information 20 POWER Switch the power On/Off PIP 2. SWAP Switch between PIP and Main Picture...
User Guide
Page 23
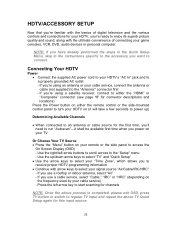
... picture quality and sound, along with arrow keys to access the On Screen Display (OSD) - If you want to the "Setup" menu - Press the left arrow buttons to scroll across to connect. NOTE: If you have already performed the steps in the Quick Setup Menu, skip to the instructions specific to the accessory you use a cable service, select "Cable," "IRC" or "HRC" (depending on your remote or the side panel...
... picture quality and sound, along with arrow keys to access the On Screen Display (OSD) - If you want to the "Setup" menu - Press the left arrow buttons to scroll across to connect. NOTE: If you have already performed the steps in the Quick Setup Menu, skip to the instructions specific to the accessory you use a cable service, select "Cable," "IRC" or "HRC" (depending on your remote or the side panel...

User Guide
Page 24
...'s resolution Computer Settings • For optimal picture quality, set timing mode of your computer's to recommended VESA™ (Video Electronics Standards Association) mode (see specifications of your purchased model from your computer's "AUDIO OUT" port to the HDTV's "AUDIO IN" port Power • Turn on your computer - Connect a 15-pin analog VGA cable (not supplied) from your computer's "VGA OUT" port to set this timing mode. • If using Microsoft Windows OS, please check its Display Properties. 24 Connecting...
...'s resolution Computer Settings • For optimal picture quality, set timing mode of your computer's to recommended VESA™ (Video Electronics Standards Association) mode (see specifications of your purchased model from your computer's "AUDIO OUT" port to the HDTV's "AUDIO IN" port Power • Turn on your computer - Connect a 15-pin analog VGA cable (not supplied) from your computer's "VGA OUT" port to set this timing mode. • If using Microsoft Windows OS, please check its Display Properties. 24 Connecting...

User Guide
Page 25
...; Connect your DVD player or gaming system using the Composite and Audio (Right/Left) connectors on the HDTV to (cable not supplied) • You can also connect your DVD player using the HDTV's HDMI port (HDMI cable not supplied) Video Cassette Recorder (VCR) • Use the S-Video connector on your HDTV to connect your VCR (S-Video four-pin cable with round connector not supplied) • You can also connect composite video to the HDTV's AV Jack Cable or Satellite Receiver • Connect your cable...
...; Connect your DVD player or gaming system using the Composite and Audio (Right/Left) connectors on the HDTV to (cable not supplied) • You can also connect your DVD player using the HDTV's HDMI port (HDMI cable not supplied) Video Cassette Recorder (VCR) • Use the S-Video connector on your HDTV to connect your VCR (S-Video four-pin cable with round connector not supplied) • You can also connect composite video to the HDTV's AV Jack Cable or Satellite Receiver • Connect your cable...

User Guide
Page 31
Default is 0000 Turn On and off rating lock Turn On and off parental control channels Enter USA parental control Enter Canada parental control Enter and edit RRT setting table Reset RRT settings Enable or disable TV function key Reset all adjustments back to set proper lock or unlock certain programs based on Parental Control functions, please see "About Parental Controls," pages 33~36. 31 Lock Menu Change PIN System Lock Unrated Lock USA Canada RRT Setting Reset RRT Front Panel Lock Reset Feature Descriptions Type in DTV and TV inputs The...
Default is 0000 Turn On and off rating lock Turn On and off parental control channels Enter USA parental control Enter Canada parental control Enter and edit RRT setting table Reset RRT settings Enable or disable TV function key Reset all adjustments back to set proper lock or unlock certain programs based on Parental Control functions, please see "About Parental Controls," pages 33~36. 31 Lock Menu Change PIN System Lock Unrated Lock USA Canada RRT Setting Reset RRT Front Panel Lock Reset Feature Descriptions Type in DTV and TV inputs The...
User Guide
Page 37
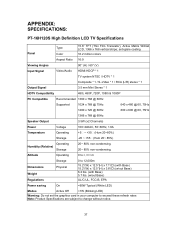
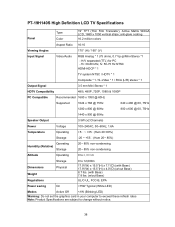
... 16.2 million colors Aspect Ratio 16:9 Viewing Angles 90° (H) / 60° (V) Input Signal Video/Audio HDMI-HDCP * 1 TV system NTSC / HDTV * 1 Composite * 1 / S-Video * 1 / RCA (L/R) stereo * 1 Output Signal 3.5 mm Mini Stereo * 1 HDTV Compatibility 480i, 480P, 720P, 1080i & 1080P PC Compatible Recommended 1360 x 768 @ 60Hz Supported 1024 x 768 @ 75Hz 640 x 480 @ 60, 75Hz 1280 x 720 @ 60Hz 800 x 600 @ 60, 75Hz 1366 x 768 @ 60Hz Speaker Output 3.5W (x2 Channels) Power Voltage 100...
... 16.2 million colors Aspect Ratio 16:9 Viewing Angles 90° (H) / 60° (V) Input Signal Video/Audio HDMI-HDCP * 1 TV system NTSC / HDTV * 1 Composite * 1 / S-Video * 1 / RCA (L/R) stereo * 1 Output Signal 3.5 mm Mini Stereo * 1 HDTV Compatibility 480i, 480P, 720P, 1080i & 1080P PC Compatible Recommended 1360 x 768 @ 60Hz Supported 1024 x 768 @ 75Hz 640 x 480 @ 60, 75Hz 1280 x 720 @ 60Hz 800 x 600 @ 60, 75Hz 1366 x 768 @ 60Hz Speaker Output 3.5W (x2 Channels) Power Voltage 100...
User Guide
Page 38
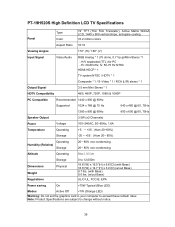
anti-glare coating 16.2 million colors Aspect Ratio 16:10 Viewing Angles 170° (H) / 160° (V) Input Signal Video/Audio RGB Analog * 1 (75 ohms, 0.7 Vp-p)/Mini-Stereo *1 - Altitude Operating 0 to 2,000 m Dimensions Weight Regulations Storage Physical 0 to 12,000m 17.9"(W) x 15.5"(H) x 7.1"(D) (with Base) 17.9"(W) x 15.5"(H) x 4.0"(D) (w/out Base) 8.7 lbs. (with Base) 7.8 lbs. (w/out Base) UL/C-UL, FCC-B, EPA Power saving On PT-19H140S High Definition LCD TV Specifications Panel Type Color 19" TFT (Thin Film Transistor...
anti-glare coating 16.2 million colors Aspect Ratio 16:10 Viewing Angles 170° (H) / 160° (V) Input Signal Video/Audio RGB Analog * 1 (75 ohms, 0.7 Vp-p)/Mini-Stereo *1 - Altitude Operating 0 to 2,000 m Dimensions Weight Regulations Storage Physical 0 to 12,000m 17.9"(W) x 15.5"(H) x 7.1"(D) (with Base) 17.9"(W) x 15.5"(H) x 4.0"(D) (w/out Base) 8.7 lbs. (with Base) 7.8 lbs. (w/out Base) UL/C-UL, FCC-B, EPA Power saving On PT-19H140S High Definition LCD TV Specifications Panel Type Color 19" TFT (Thin Film Transistor...
User Guide
Page 39
...:10 Viewing Angles 170° (H) / 160° (V) Input Signal Video/Audio RGB Analog * 1 (75 ohms, 0.7 Vp-p)/Mini-Stereo *1 - PT-19H520S High Definition LCD TV Specifications Panel Type Color 19" TFT (Thin Film Transistor), Active Matrix WXGA LCD, 1440 x 900 vertical stripe; Altitude Operating 0 to 2,000 m Dimensions Weight Regulations Storage Physical 0 to 12,000m 18.6"(W) x 16.5"(H) x 6.6"(D) (with Base) 18.6"(W) x 14.7"(H) x 3.4"(D) (w/out Base) 9.7 lbs. (with Base) 9.0 lbs. (w/out Base) UL/C-UL, FCC-B, EPA Power saving...
...:10 Viewing Angles 170° (H) / 160° (V) Input Signal Video/Audio RGB Analog * 1 (75 ohms, 0.7 Vp-p)/Mini-Stereo *1 - PT-19H520S High Definition LCD TV Specifications Panel Type Color 19" TFT (Thin Film Transistor), Active Matrix WXGA LCD, 1440 x 900 vertical stripe; Altitude Operating 0 to 2,000 m Dimensions Weight Regulations Storage Physical 0 to 12,000m 18.6"(W) x 16.5"(H) x 6.6"(D) (with Base) 18.6"(W) x 14.7"(H) x 3.4"(D) (w/out Base) 9.7 lbs. (with Base) 9.0 lbs. (w/out Base) UL/C-UL, FCC-B, EPA Power saving...
User Guide
Page 40
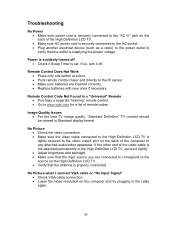
... sure that the input source you are inserted correctly. • Replace batteries with new ones if necessary. If the other end of the video cable is not attached permanently to the High Definition LCD TV, secure it off • Check if Sleep Timer is set. Power is suddenly turned off . Remote Control Code Not Found in Standard display format. Troubleshooting No Power • Make sure power cord is securely connected to the...
... sure that the input source you are inserted correctly. • Replace batteries with new ones if necessary. If the other end of the video cable is not attached permanently to the High Definition LCD TV, secure it off • Check if Sleep Timer is set. Power is suddenly turned off . Remote Control Code Not Found in Standard display format. Troubleshooting No Power • Make sure power cord is securely connected to the...

User Guide
Page 41
Wrong or Abnormal Colors • If any colors (red, green or blue) are missing, check the video cable to SAP or minimum. • Press the Volume + (Up) key on the remote control to turn the function off /with sidebar screen. • Use "Auto Adjust" in the cable connector could cause an improper connection. • Connect the High Definition LCD TV to : www.wde.com • Contact Westinghouse Customer Service at (866) 287...
Wrong or Abnormal Colors • If any colors (red, green or blue) are missing, check the video cable to SAP or minimum. • Press the Volume + (Up) key on the remote control to turn the function off /with sidebar screen. • Use "Auto Adjust" in the cable connector could cause an improper connection. • Connect the High Definition LCD TV to : www.wde.com • Contact Westinghouse Customer Service at (866) 287...
User Guide
Page 43
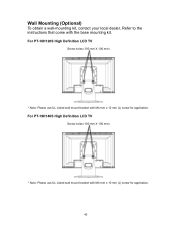
Wall Mounting (Optional) To obtain a wall-mounting kit, contact your local dealer, Refer to the instructions that come with M4 mm x 10 mm (L) screw for application. For PT-16H120S High Definition LCD TV Screw holes (100 mm X 100 mm) * Note: Please use UL Listed wall mount bracket with the base mounting kit. For PT-19H140S High Definition LCD TV Screw holes (100 mm X 100 mm) * Note: Please use UL Listed wall mount bracket with M4 mm x 12 mm (L) screw for application. 43
Wall Mounting (Optional) To obtain a wall-mounting kit, contact your local dealer, Refer to the instructions that come with M4 mm x 10 mm (L) screw for application. For PT-16H120S High Definition LCD TV Screw holes (100 mm X 100 mm) * Note: Please use UL Listed wall mount bracket with the base mounting kit. For PT-19H140S High Definition LCD TV Screw holes (100 mm X 100 mm) * Note: Please use UL Listed wall mount bracket with M4 mm x 12 mm (L) screw for application. 43


