
User Manual
Page 3
... MENU IN DTV AND TV INPUTS 32 ABOUT PARENTAL CONTROLS...33 Parental Controls (USA) ...34 US TV Ratings & Content 35 Parental Controls (CANADA 36 APPENDIX:...37 SPECIFICATIONS: ...37 PT-16H120S High Definition LCD TV Specifications 37 PT-19H140S High Definition LCD TV Specifications 38 PT-19H520S High Definition LCD TV Specifications 39 TROUBLESHOOTING...40 CLEANING THE HIGH DEFINITION LCD TV 42 WALL MOUNTING (OPTIONAL...
... MENU IN DTV AND TV INPUTS 32 ABOUT PARENTAL CONTROLS...33 Parental Controls (USA) ...34 US TV Ratings & Content 35 Parental Controls (CANADA 36 APPENDIX:...37 SPECIFICATIONS: ...37 PT-16H120S High Definition LCD TV Specifications 37 PT-19H140S High Definition LCD TV Specifications 38 PT-19H520S High Definition LCD TV Specifications 39 TROUBLESHOOTING...40 CLEANING THE HIGH DEFINITION LCD TV 42 WALL MOUNTING (OPTIONAL...

User Manual
Page 4
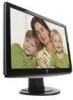
... Remote control • 2 AAA batteries • AC power cord • Warranty card • Stand (wall-mount accessories available separately) Contacting Westinghouse Digital Electronics If you for a period of one year from Dolby Laboratories. WELCOME Congratulations on the purchase of your High Definition LCD TV-and... thank you still have questions or require assistance after reading the Quick Setup Guide and the instructions in materials or workmanship for choosing Westinghouse. This User Manual was created to ensure ...
... Remote control • 2 AAA batteries • AC power cord • Warranty card • Stand (wall-mount accessories available separately) Contacting Westinghouse Digital Electronics If you for a period of one year from Dolby Laboratories. WELCOME Congratulations on the purchase of your High Definition LCD TV-and... thank you still have questions or require assistance after reading the Quick Setup Guide and the instructions in materials or workmanship for choosing Westinghouse. This User Manual was created to ensure ...

User Manual
Page 8
...marked on or pinched, particularly at plugs, convenience receptacles and the point where they exit from the remote control. • Only use caution when moving it. • If the High Definition LCD TV emits smoke, abnormal noise, or a strange odor, immediately turn it has been dropped. install in...and remove the batteries from the apparatus. 7. Take care to rain or moisture and does not operate normally, or it off and contact the Westinghouse Service Center. 6 A polarized plug has two blades with one wider than the other equipment (including amplifiers) that produce heat. 5. the ...
...marked on or pinched, particularly at plugs, convenience receptacles and the point where they exit from the remote control. • Only use caution when moving it. • If the High Definition LCD TV emits smoke, abnormal noise, or a strange odor, immediately turn it has been dropped. install in...and remove the batteries from the apparatus. 7. Take care to rain or moisture and does not operate normally, or it off and contact the Westinghouse Service Center. 6 A polarized plug has two blades with one wider than the other equipment (including amplifiers) that produce heat. 5. the ...

User Manual
Page 13
... Guide (EPG) that allows you to the "EPG" feature under "Guide" section of the On Screen Display's (OSD) TV menu. The Electronic Program Guide (EPG) Your Westinghouse High Definition LCD TV features an on the lower left side of your remote, scroll to review program information, as well as navigate through any available minor programming.
... Guide (EPG) that allows you to the "EPG" feature under "Guide" section of the On Screen Display's (OSD) TV menu. The Electronic Program Guide (EPG) Your Westinghouse High Definition LCD TV features an on the lower left side of your remote, scroll to review program information, as well as navigate through any available minor programming.
User Manual
Page 14
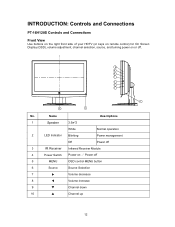
... Source Selection 7 X Volume decrease 8 W Volume increase 9 T Channel down 10 S Channel up 12 INTRODUCTION: Controls and Connections PT-16H120S Controls and Connections Front View Use buttons on the right front side of your HDTV (or keys on remote control) for On Screen Display (OSD), volume adjustment, channel selection, source, and turning power on /...
... Source Selection 7 X Volume decrease 8 W Volume increase 9 T Channel down 10 S Channel up 12 INTRODUCTION: Controls and Connections PT-16H120S Controls and Connections Front View Use buttons on the right front side of your HDTV (or keys on remote control) for On Screen Display (OSD), volume adjustment, channel selection, source, and turning power on /...

User Manual
Page 16
...Video Connector for Composite Video 15 Line Out Jack d=3.5 mm, Stereo Audio Connector 16 Line In Jack d=3.5 mm, Stereo Audio Connector 17 ANT Terrestrial or CATV Connector 18 Lock hole Kensington 14 PT-19H140S Controls and Connections Front & Rear View Use buttons on the right front ...side of your HDTV (or keys on remote control) for On Screen Display (OSD), volume adjustment, channel selection, source, ...
...Video Connector for Composite Video 15 Line Out Jack d=3.5 mm, Stereo Audio Connector 16 Line In Jack d=3.5 mm, Stereo Audio Connector 17 ANT Terrestrial or CATV Connector 18 Lock hole Kensington 14 PT-19H140S Controls and Connections Front & Rear View Use buttons on the right front ...side of your HDTV (or keys on remote control) for On Screen Display (OSD), volume adjustment, channel selection, source, ...

User Manual
Page 17
... MENU button 6 Source Source Selection 7 X Volume decrease 8 W Volume increase 9 T Channel down 10 S Channel up 15 PT-19H520S Controls and Connections Front View Use buttons on the right front side of your HDTV (or keys on remote control) for On Screen Display (OSD), volume adjustment, channel selection, source, and turning power on /...
... MENU button 6 Source Source Selection 7 X Volume decrease 8 W Volume increase 9 T Channel down 10 S Channel up 15 PT-19H520S Controls and Connections Front View Use buttons on the right front side of your HDTV (or keys on remote control) for On Screen Display (OSD), volume adjustment, channel selection, source, and turning power on /...

User Manual
Page 21
... battery installation can result in accordance with local laws and regulations • Keep all batteries away from children and pets • Remove batteries when the remote control will not be used for an extended period of used batteries in cracking or leakage and may pose a risk for fire or personal injury...
... battery installation can result in accordance with local laws and regulations • Keep all batteries away from children and pets • Remove batteries when the remote control will not be used for an extended period of used batteries in cracking or leakage and may pose a risk for fire or personal injury...

User Manual
Page 22
.... MENU Turn OSD Menu On/Off 17. BACK/RETURN Go back to "STANDARD", "FILL" 16. T / S / W / X Navigate within OSD Menu 19. INFO Display the source and channel information 20 Remote Control Features 1. CH T / S TV Channel Up/Down adjustment 15. DOT To input dot when selecting digital channels 11. VOL - / + Volume Up/Down adjustment 14...
.... MENU Turn OSD Menu On/Off 17. BACK/RETURN Go back to "STANDARD", "FILL" 16. T / S / W / X Navigate within OSD Menu 19. INFO Display the source and channel information 20 Remote Control Features 1. CH T / S TV Channel Up/Down adjustment 15. DOT To input dot when selecting digital channels 11. VOL - / + Volume Up/Down adjustment 14...

User Manual
Page 24
HDTV Remote Control TIPS Keep remote control 3~18 feet away, in front of IR receiver from HDTV, within 50∘circle range to have the best signal reception. PT-16H120S & PT-19H140S PT-19H520S 50∘ 50∘ 3~18 feet 50∘ 50∘ 3~18 feet 22
HDTV Remote Control TIPS Keep remote control 3~18 feet away, in front of IR receiver from HDTV, within 50∘circle range to have the best signal reception. PT-16H120S & PT-19H140S PT-19H520S 50∘ 50∘ 3~18 feet 50∘ 50∘ 3~18 feet 22

User Manual
Page 25
...the instructions specific to the accessory you power on your TV Or Choose Your TV Source • Press the "Menu" button on the frequency used by your remote or the side panel to access the On Screen Display ..."Composite" connector (see page 17 for connector descriptions and locations) Press the Power button on either the remote control or the side-mounted control panel to turn your HDTV on (it will take a few seconds to... power up /down arrow keys to select "TV" and "Quick Setup" • Use the arrow keys to select your "Time Zone", which allows you...
...the instructions specific to the accessory you power on your TV Or Choose Your TV Source • Press the "Menu" button on the frequency used by your remote or the side panel to access the On Screen Display ..."Composite" connector (see page 17 for connector descriptions and locations) Press the Power button on either the remote control or the side-mounted control panel to turn your HDTV on (it will take a few seconds to... power up /down arrow keys to select "TV" and "Quick Setup" • Use the arrow keys to select your "Time Zone", which allows you...

User Manual
Page 28
...the "Menu" button on the HDTV's right-side control panel. You can select amongst any of the three menus by selecting one of the remote), or by using your remote's T/S buttons. Similarly, each of the menus includes sub-menus, which can access the OSD-either by pressing the... remote control's "Menu" button (located just below the volume controls on the screen by using the remote's T/S and X buttons. HDTV OPERATION About the On Screen Display (OSD) Your HDTV's On Screen Display (OSD) ...
...the "Menu" button on the HDTV's right-side control panel. You can select amongst any of the three menus by selecting one of the remote), or by using your remote's T/S buttons. Similarly, each of the menus includes sub-menus, which can access the OSD-either by pressing the... remote control's "Menu" button (located just below the volume controls on the screen by using the remote's T/S and X buttons. HDTV OPERATION About the On Screen Display (OSD) Your HDTV's On Screen Display (OSD) ...
User Manual
Page 42
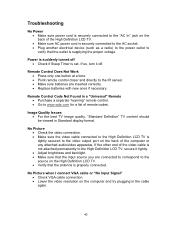
...Work • Press only one button at a time. • Point remote control closer and directly to the IR sensor. • Make sure batteries are connected to correspond to the source on the High Definition LCD TV. • Verify that the outlet is supplying the proper voltage. No ...the best TV image quality, "Standard Definition" TV content should be viewed in a "Universal" Remote • Purchase a separate "learning" remote control. • Go to www.wde.com for a list of remote codes. If the other end of the video cable is not attached permanently to the High Definition LCD TV, secure it...
...Work • Press only one button at a time. • Point remote control closer and directly to the IR sensor. • Make sure batteries are connected to correspond to the source on the High Definition LCD TV. • Verify that the outlet is supplying the proper voltage. No ...the best TV image quality, "Standard Definition" TV content should be viewed in a "Universal" Remote • Purchase a separate "learning" remote control. • Go to www.wde.com for a list of remote codes. If the other end of the video cable is not attached permanently to the High Definition LCD TV, secure it...
User Manual
Page 43
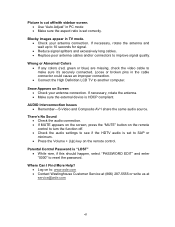
...signal splitters and excessively long cables. • Replace poor antenna cables and/or connectors to make sure it's securely connected. Snow Appears on the remote control to turn the function off /with sidebar screen. • Use "Auto Adjust" in PC mode • Make sure the aspect ratio...computer. Where Can I Find More Help? • Log on the remote control. Blocky images appear in the cable connector could cause an improper connection. • Connect the High Definition LCD TV to : www.wde.com • Contact Westinghouse Customer Service at (866) 287-5555 or write us at service@...
...signal splitters and excessively long cables. • Replace poor antenna cables and/or connectors to make sure it's securely connected. Snow Appears on the remote control to turn the function off /with sidebar screen. • Use "Auto Adjust" in PC mode • Make sure the aspect ratio...computer. Where Can I Find More Help? • Log on the remote control. Blocky images appear in the cable connector could cause an improper connection. • Connect the High Definition LCD TV to : www.wde.com • Contact Westinghouse Customer Service at (866) 287-5555 or write us at service@...


