User Manual
Page 2
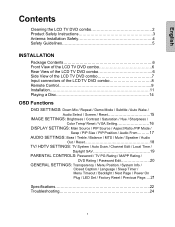
.../ Reset / VGA Setting 16 DISPLAY SETTINGS: Main Source / PIP Source / Aspect Ratio /PIP Mode / Swap / PIP Size / PIP Position / Audio From.........17 AUDIO SETTINGS: Bass / Treble / Balance / MTS / Mute / Speaker / Audio Out / Reset 18 TV/ HDTV SETTINGS: TV System / Auto Scan / Channel Edit / Local Time / Daylight SAV 19 PARENTAL CONTROLS: Password / TV PG Rating / MAPP Rating / DVD Rating / Password Edit 20 GENERAL SETTINGS: Transparency / Menu Position / System Info / Closed Caption / Language / Sleep Timer / Menu Timeout / Backlight / Next Page / Power On Plug / LED Set / Factory Reset...
.../ Reset / VGA Setting 16 DISPLAY SETTINGS: Main Source / PIP Source / Aspect Ratio /PIP Mode / Swap / PIP Size / PIP Position / Audio From.........17 AUDIO SETTINGS: Bass / Treble / Balance / MTS / Mute / Speaker / Audio Out / Reset 18 TV/ HDTV SETTINGS: TV System / Auto Scan / Channel Edit / Local Time / Daylight SAV 19 PARENTAL CONTROLS: Password / TV PG Rating / MAPP Rating / DVD Rating / Password Edit 20 GENERAL SETTINGS: Transparency / Menu Position / System Info / Closed Caption / Language / Sleep Timer / Menu Timeout / Backlight / Next Page / Power On Plug / LED Set / Factory Reset...
User Manual
Page 3
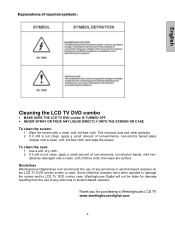
... wipe the surface. Disclaimer Westinghouse Digital does not recommend the use of any ammonia or alcohol-based cleaners. Wipe the screen with a clean, soft, lint-free cloth. If it still is not clean, apply a small amount of non-ammonia, non-alcohol based, mild non- English Cleaning the LCD TV DVD combo • MAKE SURE THE LCD TV DVD combo IS TURNED OFF • NEVER...
... wipe the surface. Disclaimer Westinghouse Digital does not recommend the use of any ammonia or alcohol-based cleaners. Wipe the screen with a clean, soft, lint-free cloth. If it still is not clean, apply a small amount of non-ammonia, non-alcohol based, mild non- English Cleaning the LCD TV DVD combo • MAKE SURE THE LCD TV DVD combo IS TURNED OFF • NEVER...
User Manual
Page 4
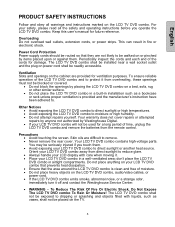
... heat source. Orient your LCD TV DVD combo away from the remote control. For your LCD TV DVD combo to protect it off and contact the Westinghouse Service Center. • WARNING - The LCD TV DVD combo shall be installed near a wall socket outlet and the plug on the TV. 3 Your warranty does not cover repairs or attempted repairs by anyone not authorized by Westinghouse Digital. • If your LCD TV DVD combo will not be readily accessible...
... heat source. Orient your LCD TV DVD combo away from the remote control. For your LCD TV DVD combo to protect it off and contact the Westinghouse Service Center. • WARNING - The LCD TV DVD combo shall be installed near a wall socket outlet and the plug on the TV. 3 Your warranty does not cover repairs or attempted repairs by anyone not authorized by Westinghouse Digital. • If your LCD TV DVD combo will not be readily accessible...
User Manual
Page 5
... the cart, stand, tripod, bracket, or table specified by the manufacturer, or sold with a dry cloth. 7) Do not block any ventilation openings. type plug. This will prevent damage to the LCD TV DVD combo due to improve. Turn off your wall outlet, consult an electrician for replacement of time, unplug it does not operate normally, or the TV has been dropped. Servicing is grounded to...
... the cart, stand, tripod, bracket, or table specified by the manufacturer, or sold with a dry cloth. 7) Do not block any ventilation openings. type plug. This will prevent damage to the LCD TV DVD combo due to improve. Turn off your wall outlet, consult an electrician for replacement of time, unplug it does not operate normally, or the TV has been dropped. Servicing is grounded to...
User Manual
Page 6
... used to radio communications if not installed and used , use a grounded power supply cord and the provided shielded video interface cable with the instructions. For LCD TV DVD combos that are designed to part 15 of the following guidelines if it is necessary to operate this equipment does cause harmful interference to radio or television reception, which the receiver is not enclosed. The cord set is connected. • Consult the Westinghouse Service...
... used to radio communications if not installed and used , use a grounded power supply cord and the provided shielded video interface cable with the instructions. For LCD TV DVD combos that are designed to part 15 of the following guidelines if it is necessary to operate this equipment does cause harmful interference to radio or television reception, which the receiver is not enclosed. The cord set is connected. • Consult the Westinghouse Service...
User Manual
Page 7
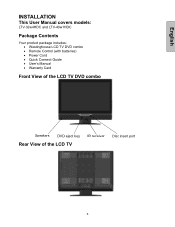
English INSTALLATION This User Manual covers models: LTV-32w4HDC and LTV-40w1HDC Package Contents Your product package includes: • Westinghouse LCD TV DVD combo • Remote Control (with batteries) • Power Cord • Quick Connect Guide • User's Manual • Warranty Card Front View of the LCD TV DVD combo Speakers DVD eject key Rear View of the LCD TV IR receiver Disc insert port 6
English INSTALLATION This User Manual covers models: LTV-32w4HDC and LTV-40w1HDC Package Contents Your product package includes: • Westinghouse LCD TV DVD combo • Remote Control (with batteries) • Power Cord • Quick Connect Guide • User's Manual • Warranty Card Front View of the LCD TV DVD combo Speakers DVD eject key Rear View of the LCD TV IR receiver Disc insert port 6
User Manual
Page 8
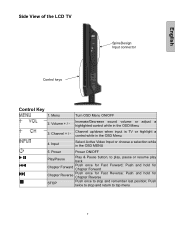
...; Power Power ON/OFF Play/Pause Play & Pause button, to top menu 7 Channel up/down when input is TV or highlight a control while in the OSD MENU 5. Input Select Active Video Input or choose a selection while in the OSD Menu 4. Increase/Decrease sound volume or adjust a highlighted control while in the OSD Menu 3. Push and hold for Chapter Reverse Push once for Fast Chapter Forward Forward; English Side View of the LCD TV...
...; Power Power ON/OFF Play/Pause Play & Pause button, to top menu 7 Channel up/down when input is TV or highlight a control while in the OSD MENU 5. Input Select Active Video Input or choose a selection while in the OSD Menu 4. Increase/Decrease sound volume or adjust a highlighted control while in the OSD Menu 3. Push and hold for Chapter Reverse Push once for Fast Chapter Forward Forward; English Side View of the LCD TV...
User Manual
Page 9
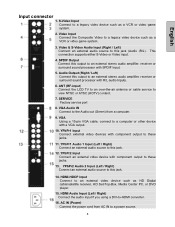
... using a DVI-to an external video device such as a VCR or video game system. 3. SERVICE Factory service port 8. HDMI-HDCP input Connect to -HDMI converter. 16. YPbPr2 Audio 2 Input (Left / Right) Connect an external audio source to a legacy video device such as HD Digital cable/satellite receiver, HD Set-Top-Box, Media Center PC, or DVD player. 15. Video Input Connect the Composite Video to this jack. 12. YPbPr1 Audio 1 Input (Left / Right) Connect an external audio source to an external stereo audio amplifier, receiver or surround sound processor with component output...
... using a DVI-to an external video device such as a VCR or video game system. 3. SERVICE Factory service port 8. HDMI-HDCP input Connect to -HDMI converter. 16. YPbPr2 Audio 2 Input (Left / Right) Connect an external audio source to a legacy video device such as HD Digital cable/satellite receiver, HD Set-Top-Box, Media Center PC, or DVD player. 15. Video Input Connect the Composite Video to this jack. 12. YPbPr1 Audio 1 Input (Left / Right) Connect an external audio source to an external stereo audio amplifier, receiver or surround sound processor with component output...
User Manual
Page 10
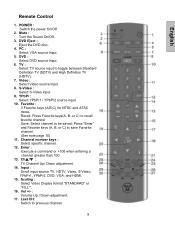
... recall favorite channel Save: Select channel to save Favorite channel. (See note page 10) 11. PC : Select VGA source input. 5. YPbPr : Select YPbPr1 / YPbPr2 source input. 10. English Remote Control 1. POWER : Switch the power On/Off 2. Video : Select Video source input. 8. Last CH: Switch to toggle between Standard Definition TV (SDTV) and High Definition TV (HDTV). 7. TV : Select TV source input to previous channel. 9 Channel number keys : Select specific channel. 12. Scaling : Select Video Display format "STANDARD" or "FILL"". 16. DVD Eject : Eject the DVD...
... recall favorite channel Save: Select channel to save Favorite channel. (See note page 10) 11. PC : Select VGA source input. 5. YPbPr : Select YPbPr1 / YPbPr2 source input. 10. English Remote Control 1. POWER : Switch the power On/Off 2. Video : Select Video source input. 8. Last CH: Switch to toggle between Standard Definition TV (SDTV) and High Definition TV (HDTV). 7. TV : Select TV source input to previous channel. 9 Channel number keys : Select specific channel. 12. Scaling : Select Video Display format "STANDARD" or "FILL"". 16. DVD Eject : Eject the DVD...
User Manual
Page 11
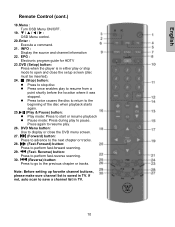
... program guide for HDTV 23. z Press twice causes the disc to return to the beginning of the disc when playback starts again. 25. (Play & Pause) button: z Play mode: Press to start or resume playback z Pause mode: Press during play to resume play to save a channel list in TV. Press again to pause. DVD (Setup) button: Press when the player is saved in TV. 10 T / S / W / X : OSD Menu control. 20. INFO : Display the source...
... program guide for HDTV 23. z Press twice causes the disc to return to the beginning of the disc when playback starts again. 25. (Play & Pause) button: z Play mode: Press to start or resume playback z Pause mode: Press during play to resume play to save a channel list in TV. Press again to pause. DVD (Setup) button: Press when the player is saved in TV. 10 T / S / W / X : OSD Menu control. 20. INFO : Display the source...
User Manual
Page 13
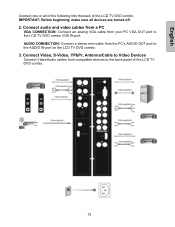
Connect Video, S-Video, YPbPr, Antenna/Cable to Video Devices Connect Video/Audio cables from the PC's AUDIO OUT port to the AUDIO IN port on the LCD TV DVD combo. 3. English Connect one or all devices are turned off. 2. IMPORTANT: Before beginning, make sure all of the following into the back of the LCD TV DVD combo. 12 AUDIO CONNECTION: Connect a stereo mini cable from compatible devices to the LCD TV DVD combo VGA IN port. Connect audio and video cables from a PC VGA CONNECTION: Connect an analog VGA...
Connect Video, S-Video, YPbPr, Antenna/Cable to Video Devices Connect Video/Audio cables from the PC's AUDIO OUT port to the AUDIO IN port on the LCD TV DVD combo. 3. English Connect one or all devices are turned off. 2. IMPORTANT: Before beginning, make sure all of the following into the back of the LCD TV DVD combo. 12 AUDIO CONNECTION: Connect a stereo mini cable from compatible devices to the LCD TV DVD combo VGA IN port. Connect audio and video cables from a PC VGA CONNECTION: Connect an analog VGA...
User Manual
Page 14
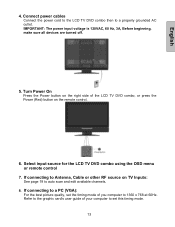
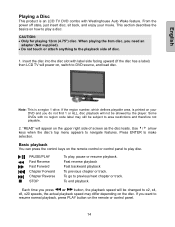
English 4. Connect power cables Connect the power cord to the LCD TV DVD combo then to a PC (VGA): For the best picture quality, set this timing mode. 13 Select input source for the LCD TV DVD combo using the OSD menu or remote control 7. Refer to the graphic card's user guide of the LCD TV DVD combo, or press the Power (Red) button on the remote control. 6. IMPORTANT: The power input voltage is 120VAC, 60 Hz, 3A, Before beginning, make sure all devices are turned off. 5. Turn Power On...
English 4. Connect power cables Connect the power cord to the LCD TV DVD combo then to a PC (VGA): For the best picture quality, set this timing mode. 13 Select input source for the LCD TV DVD combo using the OSD menu or remote control 7. Refer to the graphic card's user guide of the LCD TV DVD combo, or press the Power (Red) button on the remote control. 6. IMPORTANT: The power input voltage is 120VAC, 60 Hz, 3A, Before beginning, make sure all devices are turned off. 5. Turn Power On...
User Manual
Page 15
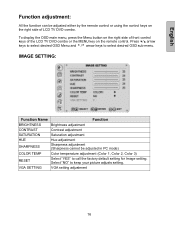
... Playing a Disc This product is an LCD TV DVD combo with no region code label may differ depending on the remote or control panel. 14 From the power off state, just insert disc, sit back, and enjoy your DVD and you need an adapter (Not supplied). • Do not touch or attach anything to navigate features. Use 3/4 arrow keys when the disc's top menu appears...
... Playing a Disc This product is an LCD TV DVD combo with no region code label may differ depending on the remote or control panel. 14 From the power off state, just insert disc, sit back, and enjoy your DVD and you need an adapter (Not supplied). • Do not touch or attach anything to navigate features. Use 3/4 arrow keys when the disc's top menu appears...

User Manual
Page 16
To display DVD setting menu, press Setup button on auto wake function OFF: Turn off auto play disc and repeat playback. OFF: Turn off auto wake function. Function Name DOWN MIX REPEAT DEMO MODE SUBTITLE AUTO WAKE AUDIO SELECT RESET Function Select DVD audio STEREO → LT/RT Press ENTER to your preference via remote control keys or control panel on the right side of DVD, "NO" to skip the setting. 15 To display disc subtitle, only...
To display DVD setting menu, press Setup button on auto wake function OFF: Turn off auto play disc and repeat playback. OFF: Turn off auto wake function. Function Name DOWN MIX REPEAT DEMO MODE SUBTITLE AUTO WAKE AUDIO SELECT RESET Function Select DVD audio STEREO → LT/RT Press ENTER to your preference via remote control keys or control panel on the right side of DVD, "NO" to skip the setting. 15 To display disc subtitle, only...
User Manual
Page 17
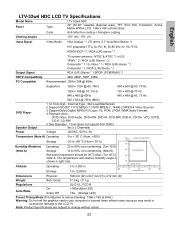
... of the LCD TV DVD combo or the MENU key on the right side of front control keys of LCD TV DVD combo. Select "NO" to call the factory default setting for Image setting. English Function adjustment: All the function can be adjusted in PC mode) COLOR TEMP Color temperature adjustment (Color 1, Color 2, Color 3) RESET Select "YES" to keep your picture adjusts setting. VGA SETTING VGA setting adjustment 16 To display the OSD main menu, press the Menu button on the remote control. Press...
... of the LCD TV DVD combo or the MENU key on the right side of front control keys of LCD TV DVD combo. Select "NO" to call the factory default setting for Image setting. English Function adjustment: All the function can be adjusted in PC mode) COLOR TEMP Color temperature adjustment (Color 1, Color 2, Color 3) RESET Select "YES" to keep your picture adjusts setting. VGA SETTING VGA setting adjustment 16 To display the OSD main menu, press the Menu button on the remote control. Press...

User Manual
Page 22
... Function Name TRANSPARENCY MENU POSITION SYSTEM INFO CLOSED CAPTION LANGUAGE SLEEP TIMER MENU TIMEOUT BACKLIGHT NEXT PAGE POWER ON PLUG LED SET FACTORY RESET PREVIOUS PAGE Function Set OSD transparency level OSD horizontal/vertical position adjustment Display input source, type and signal Turn the closed caption OFF or CC1, CC2, CC3, CC4, TEXT1, TEXT2, TEXT3, TEXT4 OSD language selection Set sleep timer to turn off the power automatically Set the time to turn off POWER ON PLUG function. OFF: Turn off the OSD...
... Function Name TRANSPARENCY MENU POSITION SYSTEM INFO CLOSED CAPTION LANGUAGE SLEEP TIMER MENU TIMEOUT BACKLIGHT NEXT PAGE POWER ON PLUG LED SET FACTORY RESET PREVIOUS PAGE Function Set OSD transparency level OSD horizontal/vertical position adjustment Display input source, type and signal Turn the closed caption OFF or CC1, CC2, CC3, CC4, TEXT1, TEXT2, TEXT3, TEXT4 OSD language selection Set sleep timer to turn off the power automatically Set the time to turn off POWER ON PLUG function. OFF: Turn off the OSD...
User Manual
Page 23
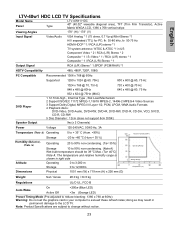
...;C) Dimensions Physical 798 mm (W) x 641 mm (H) x 212 mm (D) Weight Net / Gross 17.0 kg / 21 kg Regulations UL/C-UL, FCC-B Auto Wake On Active Off English LTV-32w4 HDC LCD TV Specifications Model Name LTV-32w4 HDC Panel Type 32" (32.02" viewable diagonal area), TFT (Thin Film Transistor), Active Matrix WXGA LCD, 1366 x 768 vertical stripe Color Anti-reflective coating + Anti-glare coating Viewing Angles 170° (H) / 170° (V) Input Signal Video/Audio VGA Analog...
...;C) Dimensions Physical 798 mm (W) x 641 mm (H) x 212 mm (D) Weight Net / Gross 17.0 kg / 21 kg Regulations UL/C-UL, FCC-B Auto Wake On Active Off English LTV-32w4 HDC LCD TV Specifications Model Name LTV-32w4 HDC Panel Type 32" (32.02" viewable diagonal area), TFT (Thin Film Transistor), Active Matrix WXGA LCD, 1366 x 768 vertical stripe Color Anti-reflective coating + Anti-glare coating Viewing Angles 170° (H) / 170° (V) Input Signal Video/Audio VGA Analog...
User Manual
Page 24
...-80 kHz, fv: 50-75 Hz HDMI-HDCP *1 / RCA (L/R) stereo *1 TV system antenna / NTSC & ATSC *1 in US Component Video * 2 / RCA (L/R) Stereo * 2 Composite * 1 / S-Video * 1 / RCA (L/R) stereo * 1 Composite * 1 / RCA (L/R) Stereo * 1 Output Signal RCA (L/R) Stereo * 1;SPDIF (PCM/RAW) *1 HDTV Compatibility 480i, 480P, 720P, 1080i PC Compatible Recommended 1366 x 768 @ 60Hz Supported 1280 x 1024 @ 60, 75Hz 800 x 600 @ 60, 75 Hz DVD Player Speaker Output 1024 x 768 @ 70, 75 Hz...
...-80 kHz, fv: 50-75 Hz HDMI-HDCP *1 / RCA (L/R) stereo *1 TV system antenna / NTSC & ATSC *1 in US Component Video * 2 / RCA (L/R) Stereo * 2 Composite * 1 / S-Video * 1 / RCA (L/R) stereo * 1 Composite * 1 / RCA (L/R) Stereo * 1 Output Signal RCA (L/R) Stereo * 1;SPDIF (PCM/RAW) *1 HDTV Compatibility 480i, 480P, 720P, 1080i PC Compatible Recommended 1366 x 768 @ 60Hz Supported 1280 x 1024 @ 60, 75Hz 800 x 600 @ 60, 75 Hz DVD Player Speaker Output 1024 x 768 @ 70, 75 Hz...
User Manual
Page 25
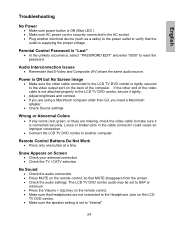
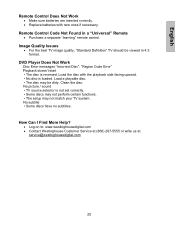
Remote Control Buttons Do Not Work • Press only one button at a time. Power is ON but No Screen Image • Make sure the video cable connected to the LCD TV DVD combo is tightly secured to the video output port on Screen • Check your antenna connection. • Check the TV / CATV selection. Wrong or Abnormal Colors • If any colors (red, green, or blue) are missing, check the video cable to make sure it tightly. •...
Remote Control Buttons Do Not Work • Press only one button at a time. Power is ON but No Screen Image • Make sure the video cable connected to the LCD TV DVD combo is tightly secured to the video output port on Screen • Check your antenna connection. • Check the TV / CATV selection. Wrong or Abnormal Colors • If any colors (red, green, or blue) are missing, check the video cable to make sure it tightly. •...
User Manual
Page 26
... with new ones if necessary. Remote Control Code Not Found in 4:3 format. DVD Player Does Not Work Disc Error messages "Incorrect Disc", "Region Code Error" Playback doesn't start • The disc is loaded. No picture / sound • TV source selector is not set correctly. • Some discs may not perform certain functions. • The setup may be viewed in a "Universal" Remote • Purchase a separate "learning" remote control. Load a playable disc. •...
... with new ones if necessary. Remote Control Code Not Found in 4:3 format. DVD Player Does Not Work Disc Error messages "Incorrect Disc", "Region Code Error" Playback doesn't start • The disc is loaded. No picture / sound • TV source selector is not set correctly. • Some discs may not perform certain functions. • The setup may be viewed in a "Universal" Remote • Purchase a separate "learning" remote control. Load a playable disc. •...


