User Manual
Page 4
English TABLE OF CONTENTS CABLE TV (CTV/DTV) CONNECTION 17 EXTERNAL DEVICE CONNECTIONS 18 POWER CONNECTION 20 CONNECTING AC POWER 20 INITIAL SETUP 20 BASIC OPERATIONS 21 TURNING THE POWER ON AND OFF 21 ADJUSTING THE VOLUME 21 CHANGING CHANNELS 22 SELECTING THE INPUT SOURCE 22 ADJUSTING THE DISPLAY FORMAT 23 ADJUSTING THE LED BACKLIGHT 23 SETUP MENUS 24 SETUP MENU OPERATION 24 PICTURE 25 AUDIO 29 VIEW MODE 33 VIEW MODE (VGA 33 TV PROGRAM 35 SETTINGS 39 WALL MOUNT OPTION 50 WALL MOUNT INSTALLATION REMINDERS 50 TROUBLESHOOTING 51 SPECIFICATIONS 54 ii
English TABLE OF CONTENTS CABLE TV (CTV/DTV) CONNECTION 17 EXTERNAL DEVICE CONNECTIONS 18 POWER CONNECTION 20 CONNECTING AC POWER 20 INITIAL SETUP 20 BASIC OPERATIONS 21 TURNING THE POWER ON AND OFF 21 ADJUSTING THE VOLUME 21 CHANGING CHANNELS 22 SELECTING THE INPUT SOURCE 22 ADJUSTING THE DISPLAY FORMAT 23 ADJUSTING THE LED BACKLIGHT 23 SETUP MENUS 24 SETUP MENU OPERATION 24 PICTURE 25 AUDIO 29 VIEW MODE 33 VIEW MODE (VGA 33 TV PROGRAM 35 SETTINGS 39 WALL MOUNT OPTION 50 WALL MOUNT INSTALLATION REMINDERS 50 TROUBLESHOOTING 51 SPECIFICATIONS 54 ii
User Manual
Page 6
... listed below: • USA - WARNING! Some examples are no user-serviceable parts inside an equilateral triangle symbol is certified for your specific country. CSA • Japan - The lightning flash with the original power supply. UL • Canada - Always use the appropriate AC cord that may be easily accessible. Electric Appliance Control Act 2 The exclamation inside . CAUTION: The power supply outlet should be located near the LED...
... listed below: • USA - WARNING! Some examples are no user-serviceable parts inside an equilateral triangle symbol is certified for your specific country. CSA • Japan - The lightning flash with the original power supply. UL • Canada - Always use the appropriate AC cord that may be easily accessible. Electric Appliance Control Act 2 The exclamation inside . CAUTION: The power supply outlet should be located near the LED...

User Manual
Page 8
... the receiving antenna. • Increase the distance between the LED TV and the receiver. • Connect the LED TV to an outlet on , the user is encouraged to try to correct the interference by the manufacturer will not occur in a residential installation. These limits are designed to radio communications if not installed and used , use a grounded power supply cord and the provided shielded video interface cable...
... the receiving antenna. • Increase the distance between the LED TV and the receiver. • Connect the LED TV to an outlet on , the user is encouraged to try to correct the interference by the manufacturer will not occur in a residential installation. These limits are designed to radio communications if not installed and used , use a grounded power supply cord and the provided shielded video interface cable...

User Manual
Page 12
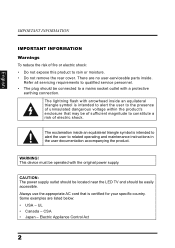
... service equipment NEC: National Electrical Code Grounding Conductors (NEC Section 810-21) Grounding clamps Power service grounding electrode system (NEC Art 250 part H) Lightning Z Z Z For added protection for the LED TV during a heavy storm-lightning may strike while you are holding the cable cord, causing serious injury. Power lines An outside antenna system should be taken to keep from the wall...
... service equipment NEC: National Electrical Code Grounding Conductors (NEC Section 810-21) Grounding clamps Power service grounding electrode system (NEC Art 250 part H) Lightning Z Z Z For added protection for the LED TV during a heavy storm-lightning may strike while you are holding the cable cord, causing serious injury. Power lines An outside antenna system should be taken to keep from the wall...

User Manual
Page 16
DC in 5. TV tuner 3. Composite AV input 4. USB Service port Function Connects the AC adapter from this outlet to an antenna or cable service. L - Audio out 7. Connects the LED TV to a power source. Connects to the audio out port of a computer. Audio in 2. SPDIF audio out 8. For service only. 12 Connects to a computer or other device with a VGA output using a 15-pin VGA cable. Connects to an external AV device such as a VCR, DVD player, set -top box, or game system. English TERMINALS...
DC in 5. TV tuner 3. Composite AV input 4. USB Service port Function Connects the AC adapter from this outlet to an antenna or cable service. L - Audio out 7. Connects the LED TV to a power source. Connects to the audio out port of a computer. Audio in 2. SPDIF audio out 8. For service only. 12 Connects to a computer or other device with a VGA output using a 15-pin VGA cable. Connects to an external AV device such as a VCR, DVD player, set -top box, or game system. English TERMINALS...

User Manual
Page 17
... power on how to the favorite channels (for the channel you're watching. Use to other TV channels. Displays the Electronic Program Guide (EPG). Selects VGA-Component as the input source. Not supported. Sleep zZz 7 B 8 7. Input 17. YPbPr2 25. HDMI2 27. Displays the input source or channel information as well as the input source. Ch / 19. PC 26. Switches to key in the channel number. Mute 2. Toggles the Multichannel Television Sound options. Selects TV or HDTV...
... power on how to the favorite channels (for the channel you're watching. Use to other TV channels. Displays the Electronic Program Guide (EPG). Selects VGA-Component as the input source. Not supported. Sleep zZz 7 B 8 7. Input 17. YPbPr2 25. HDMI2 27. Displays the input source or channel information as well as the input source. Ch / 19. PC 26. Switches to key in the channel number. Mute 2. Toggles the Multichannel Television Sound options. Selects TV or HDTV...
User Manual
Page 21
... these channels is unknown, consult your cable TV company.) For more specific instructions on the rear I/O panel for normal viewing of internal circuit). When connecting the 75 ohm coaxial cable to the unit, screw the 75 ohm cable to the LED TV, do not tighten F-type connector with any tool. CABLE TV (CTV/DTV) CONNECTION The unit has a TV tuner (75 ohm coaxial cable connector) located on installing cable TV...
... these channels is unknown, consult your cable TV company.) For more specific instructions on the rear I/O panel for normal viewing of internal circuit). When connecting the 75 ohm coaxial cable to the unit, screw the 75 ohm cable to the LED TV, do not tighten F-type connector with any tool. CABLE TV (CTV/DTV) CONNECTION The unit has a TV tuner (75 ohm coaxial cable connector) located on installing cable TV...
User Manual
Page 22
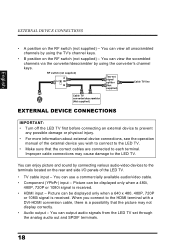
... the HDMI terminal with a DVI-HDMI conversion cable, there is received. • HDMI input - You can use a commercially available audio/video cable. • Component (YPbPr) input - Picture can enjoy picture and sound by using the TV's channel keys. • B position on the rear and side I/O panels of the external device you connect to the LED TV. English EXTERNAL DEVICE CONNECTIONS • A position on the RF switch (not supplied) - RF switch (not supplied) A OUT IN B Two-set through the analog audio out...
... the HDMI terminal with a DVI-HDMI conversion cable, there is received. • HDMI input - You can use a commercially available audio/video cable. • Component (YPbPr) input - Picture can enjoy picture and sound by using the TV's channel keys. • B position on the rear and side I/O panels of the external device you connect to the LED TV. English EXTERNAL DEVICE CONNECTIONS • A position on the RF switch (not supplied) - RF switch (not supplied) A OUT IN B Two-set through the analog audio out...

User Manual
Page 23
Antenna / Cable system PC Audio amplifier AUDIO OUT AUDIO OUT Antenna cable / Cable TV line 3.5 mm stereo mini jack cable RGB cable Audio cable SPDIF cable DC IN TUNER Y - R SPDIF HDMI 1 HDMI 2 USB AC adapter Composite AV cable Home video game system DVD player with an HDMI terminal HDMI-HDMI cable VCR Power outlet Camcorder DVD player Digital TV tuner DVI-HDMI cable DVD player with a DVI terminal 19 L - R AUDIO IN VGA L - English EXTERNAL DEVICE CONNECTIONS The following diagram shows the external device connections.
Antenna / Cable system PC Audio amplifier AUDIO OUT AUDIO OUT Antenna cable / Cable TV line 3.5 mm stereo mini jack cable RGB cable Audio cable SPDIF cable DC IN TUNER Y - R SPDIF HDMI 1 HDMI 2 USB AC adapter Composite AV cable Home video game system DVD player with an HDMI terminal HDMI-HDMI cable VCR Power outlet Camcorder DVD player Digital TV tuner DVI-HDMI cable DVD player with a DVI terminal 19 L - R AUDIO IN VGA L - English EXTERNAL DEVICE CONNECTIONS The following diagram shows the external device connections.
User Manual
Page 24
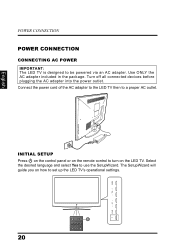
... the control panel or on the remote control to use the SetupWizard. Select the desired language and select Yes to turn on how to a proper AC outlet. The SetupWizard will guide you on the LED TV. MENU VOL CH INPUT 20 C.C. ZZZ MTS Favorite A B Connect the power cord of the AC adapter to the LED TV then to set up the LED TV's operational settings. Turn off all connected devices before plugging...
... the control panel or on the remote control to use the SetupWizard. Select the desired language and select Yes to turn on how to a proper AC outlet. The SetupWizard will guide you on the LED TV. MENU VOL CH INPUT 20 C.C. ZZZ MTS Favorite A B Connect the power cord of the AC adapter to the LED TV then to set up the LED TV's operational settings. Turn off all connected devices before plugging...

User Manual
Page 25
MENU VOL LED indicator Operation Turns from none to turn off the LED TV. CH INPUT C.C. Press again to red. Turn the power on the screen. Turn the power off. ZZZ MTS Favorite Input Vol Ch YPbPr1 HDMI1 Video1 TV Mute Press to turn on the sound. 21 Turning off the power Press on the control panel or on the remote control to turn on the enabled Power settings. The mute icon appears on . press Volto...
MENU VOL LED indicator Operation Turns from none to turn off the LED TV. CH INPUT C.C. Press again to red. Turn the power on the screen. Turn the power off. ZZZ MTS Favorite Input Vol Ch YPbPr1 HDMI1 Video1 TV Mute Press to turn on the sound. 21 Turning off the power Press on the control panel or on the remote control to turn on the enabled Power settings. The mute icon appears on . press Volto...

User Manual
Page 26
... channel number using the channel keys and the • key, then press ENT. Using the Favorite Keys C.C. BASIC OPERATIONS English CHANGING CHANNELS Follow the instructions below to change the input source: TV, PC, Video1, Video 2, YPbPr1, YPbPr2, HDMI1, or HDMI2. 22 Using the Individual Input Keys YPbPr1 HDMI1 Video1 TV YPbPr2 HDMI2 Video2 PC TV, PC, Video, YPbPr, HDMI Keys Press any of the following remote control keys to change channels. Using...
... channel number using the channel keys and the • key, then press ENT. Using the Favorite Keys C.C. BASIC OPERATIONS English CHANGING CHANNELS Follow the instructions below to change the input source: TV, PC, Video1, Video 2, YPbPr1, YPbPr2, HDMI1, or HDMI2. 22 Using the Individual Input Keys YPbPr1 HDMI1 Video1 TV YPbPr2 HDMI2 Video2 PC TV, PC, Video, YPbPr, HDMI Keys Press any of the following remote control keys to change channels. Using...

User Manual
Page 28
... operational settings of the LED TV. MENU VOL Enter CH SPDIF HDMI 1 HDMI 2 USB DC IN TUNER Y - R INPUT Action Remote Control Displays or closes the menu bar. • Select and display a primary menu. • Adjust sub-menu options. • Select and display a sub-menu. / then • Select a sub-menu or a submenu option. • Returns to the primary menu tab from a sub-menu screen. / then • Returns to display the setup menu screen. then INPUT MENU INPUT 24 Applies the selected menu setting. then INPUT Channel...
... operational settings of the LED TV. MENU VOL Enter CH SPDIF HDMI 1 HDMI 2 USB DC IN TUNER Y - R INPUT Action Remote Control Displays or closes the menu bar. • Select and display a primary menu. • Adjust sub-menu options. • Select and display a sub-menu. / then • Select a sub-menu or a submenu option. • Returns to the primary menu tab from a sub-menu screen. / then • Returns to display the setup menu screen. then INPUT MENU INPUT 24 Applies the selected menu setting. then INPUT Channel...
User Manual
Page 32
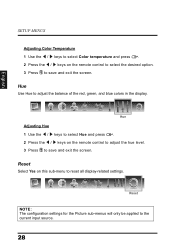
Hue Use Hue to reset all display-related settings. Reset Select Yes on this sub-menu to adjust the balance of the red, green, and blue colors in the display. English SETUP MENUS Adjusting Color Temperature 1 Use the / keys to select Color temperature and press . 2 Press the / keys on the remote control to select the desired option. 3 Press to save and exit the screen. Reset NOTE: The configuration settings for the Picture sub...
Hue Use Hue to reset all display-related settings. Reset Select Yes on this sub-menu to adjust the balance of the red, green, and blue colors in the display. English SETUP MENUS Adjusting Color Temperature 1 Use the / keys to select Color temperature and press . 2 Press the / keys on the remote control to select the desired option. 3 Press to save and exit the screen. Reset NOTE: The configuration settings for the Picture sub...

User Manual
Page 41
... stereo sound for the selected source. 37 Auto Search automatically creates a list of receivable channels for superior TV viewing experience. • SAP: Allows second audio program from the speakers while watching a scene in the original program. MTS Use MTS to save and exit the screen. Two options are available: • Cable: Choose this setting if you are receiving TV channels with an antenna (over the air). Adjusting MTS 1 Use the...
... stereo sound for the selected source. 37 Auto Search automatically creates a list of receivable channels for superior TV viewing experience. • SAP: Allows second audio program from the speakers while watching a scene in the original program. MTS Use MTS to save and exit the screen. Two options are available: • Cable: Choose this setting if you are receiving TV channels with an antenna (over the air). Adjusting MTS 1 Use the...

User Manual
Page 44
... the screen. Adjusting Daylight Saving 1 Use the / keys to select Date and Time and press . 2 Press repeatedly to check (enable) or uncheck (disable) Adjust for closed captioning in TV programs. The following options are available: • Closed Captions: Can be set to ON or OFF. • Analog Type: Can be set to CC1,CC2, CC3, CC4, T1, T2, T3, or T4. • Digital Type: Can be set to...
... the screen. Adjusting Daylight Saving 1 Use the / keys to select Date and Time and press . 2 Press repeatedly to check (enable) or uncheck (disable) Adjust for closed captioning in TV programs. The following options are available: • Closed Captions: Can be set to ON or OFF. • Analog Type: Can be set to CC1,CC2, CC3, CC4, T1, T2, T3, or T4. • Digital Type: Can be set to...

User Manual
Page 45
... set to As Broadcaster, Black, White, Green, Blue, Red, Cyan, Yellow, or Magenta. • Foreground Opacity: Can be set to As Broadcaster, Solid, Translucent, Transparent, or Flashing. • Background Opacity: Can be set Rating to As Broadcaster, Solid, Translucent, Transparent, or Flashing. To display the hidden submenu, set to ON. 41 Parental Control Use Parental Control to save and exit the screen. Enter Password 0~9: Key in password Enter: Confirm Menu...
... set to As Broadcaster, Black, White, Green, Blue, Red, Cyan, Yellow, or Magenta. • Foreground Opacity: Can be set to As Broadcaster, Solid, Translucent, Transparent, or Flashing. • Background Opacity: Can be set Rating to As Broadcaster, Solid, Translucent, Transparent, or Flashing. To display the hidden submenu, set to ON. 41 Parental Control Use Parental Control to save and exit the screen. Enter Password 0~9: Key in password Enter: Confirm Menu...

User Manual
Page 55
... sure the sleep timer is turned off . Press and select Channels/Channel List. • Adjust the display settings. 51 You may already be detected by a universal remote. To illustrate, when a VGA cable is connected to reset your password. • Press only one button at a time. • Make sure the batteries are properly inserted. • The batteries may want to plug in Settings menu to display a computer screen, the PC input mode must be enabled...
... sure the sleep timer is turned off . Press and select Channels/Channel List. • Adjust the display settings. 51 You may already be detected by a universal remote. To illustrate, when a VGA cable is connected to reset your password. • Press only one button at a time. • Make sure the batteries are properly inserted. • The batteries may want to plug in Settings menu to display a computer screen, the PC input mode must be enabled...

User Manual
Page 56
... port. in a sidebar Press screen. Adjust the display settings. Picture is cut off or appear in TV mode (cutoff • Replace poor antenna cables and/or picture, snowy connectors to another computer and check if the problem is with the LED TV. • Wrong, abnormal or missing colors • If any colors (red, green or blue) are missing, check the video cable to ten seconds for a signal. • Reduce signal splitters...
... port. in a sidebar Press screen. Adjust the display settings. Picture is cut off or appear in TV mode (cutoff • Replace poor antenna cables and/or picture, snowy connectors to another computer and check if the problem is with the LED TV. • Wrong, abnormal or missing colors • If any colors (red, green or blue) are missing, check the video cable to ten seconds for a signal. • Reduce signal splitters...
User Manual
Page 57
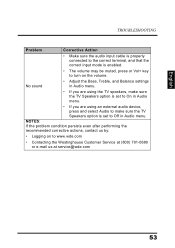
... using the TV speakers, make sure the TV Speakers option is enabled. • The volume may be muted, press or Vol+ key to turn on to On in Audio menu. English TROUBLESHOOTING Problem Corrective Action • Make sure the audio input cable is properly connected to the correct terminal, and that the correct input mode is set to www.wde.com • Contacting the Westinghouse Customer Service at service...
... using the TV speakers, make sure the TV Speakers option is enabled. • The volume may be muted, press or Vol+ key to turn on to On in Audio menu. English TROUBLESHOOTING Problem Corrective Action • Make sure the audio input cable is properly connected to the correct terminal, and that the correct input mode is set to www.wde.com • Contacting the Westinghouse Customer Service at service...


