User Manual
Page 2
Table of Contents IMPORTANT PRODUCT SAFETY INSTRUCTIONS 2 CLEANING THE LCD MONITOR...4 SAFETY GUIDELINES ...5 FCC COMPLIANCE STATEMENT ...5 INSTALLATION...6 SETTING UP THE LCD MONITOR ...6 Angle Adjustment ...6 Front Control Panel and Rear Side Connectors 7 CONNECT THE VIDEO AND AUDIO CABLES 8 CONNECT THE POWER CABLE ...8 TURN THE POWER ON ...8 Automatic Screen ... ...13 Distorted Image...13 Image is Not Centered (size is not scaled correctly 13 Colors are Not Correct ...13 No Sound ...13 Mounting the LCD Monitor on a wall 14 Additional Questions ...14 1
Table of Contents IMPORTANT PRODUCT SAFETY INSTRUCTIONS 2 CLEANING THE LCD MONITOR...4 SAFETY GUIDELINES ...5 FCC COMPLIANCE STATEMENT ...5 INSTALLATION...6 SETTING UP THE LCD MONITOR ...6 Angle Adjustment ...6 Front Control Panel and Rear Side Connectors 7 CONNECT THE VIDEO AND AUDIO CABLES 8 CONNECT THE POWER CABLE ...8 TURN THE POWER ON ...8 Automatic Screen ... ...13 Distorted Image...13 Image is Not Centered (size is not scaled correctly 13 Colors are Not Correct ...13 No Sound ...13 Mounting the LCD Monitor on a wall 14 Additional Questions ...14 1
User Manual
Page 3
... to protect it may cause fire or device failure. 2 Proper Handling of the cord for wear or damage. Always position the LCD monitor on the LCD monitor, video cable, or power cord. Overloading wall outlets, circuits, or extension cords can result in overheating, fire, or electric shock. ... come in possible damage or injury. Unstable surfaces can damage or shorten its useful life. Do not place it is damaged. Orient the monitor away from any wall to remove. Important: Save the original box and all warnings and instructions in a convenient location for future reference....
... to protect it may cause fire or device failure. 2 Proper Handling of the cord for wear or damage. Always position the LCD monitor on the LCD monitor, video cable, or power cord. Overloading wall outlets, circuits, or extension cords can result in overheating, fire, or electric shock. ... come in possible damage or injury. Unstable surfaces can damage or shorten its useful life. Do not place it is damaged. Orient the monitor away from any wall to remove. Important: Save the original box and all warnings and instructions in a convenient location for future reference....
User Manual
Page 4
If the monitor begins to qualified service personnel. Contact the Westinghouse Service Center. To assure proper ventilation, do not block the openings by Westinghouse Digital. There are no user serviceable parts inside. Do not place it off and unplug the power cord. The warranty does not ...cover repairs or attempted repairs by anyone not authorized by placing the monitor on a bed, sofa, rug or other...
If the monitor begins to qualified service personnel. Contact the Westinghouse Service Center. To assure proper ventilation, do not block the openings by Westinghouse Digital. There are no user serviceable parts inside. Do not place it off and unplug the power cord. The warranty does not ...cover repairs or attempted repairs by anyone not authorized by placing the monitor on a bed, sofa, rug or other...

User Manual
Page 5
Cleaning the LCD Monitor • MAKE SURE THE LCD MONITOR IS TURNED OFF • NEVER SPRAY OR POUR LIQUID DIRECTLY ONTO THE SCREEN OR CASE To Clean the Screen: 1. This removes dust and other particles. 2. ...-ammonia, non-alcohol based glass cleaner on a clean, soft, lint-free cloth to clean the surface. Disclaimer Westinghouse Digital does not recommend the use a small amount of any ammonia or alcohol-based cleaners. 4 Westinghouse Digital will not be liable for damage resulting from the use a small amount of any ammonia or alcohol...
Cleaning the LCD Monitor • MAKE SURE THE LCD MONITOR IS TURNED OFF • NEVER SPRAY OR POUR LIQUID DIRECTLY ONTO THE SCREEN OR CASE To Clean the Screen: 1. This removes dust and other particles. 2. ...-ammonia, non-alcohol based glass cleaner on a clean, soft, lint-free cloth to clean the surface. Disclaimer Westinghouse Digital does not recommend the use a small amount of any ammonia or alcohol-based cleaners. 4 Westinghouse Digital will not be liable for damage resulting from the use a small amount of any ammonia or alcohol...
User Manual
Page 6
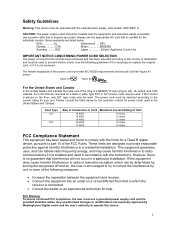
...and receiver. • Connect the equipment into an outlet on a circuit different from that is encouraged to try to correct the interference by Westinghouse Digital could void the user's authority to the current rating for a Class B digital device, pursuant to radio communications if not installed and ... SVT Size of Conductors in the United States and Canada. Always use a grounded power supply cord and the provided shielded cables. If the monitor is a NEMA5-15 style (Figure A2), UL Listed, and CSA Labeled. Some examples are designed to which can radiate radio frequency energy,...
...and receiver. • Connect the equipment into an outlet on a circuit different from that is encouraged to try to correct the interference by Westinghouse Digital could void the user's authority to the current rating for a Class B digital device, pursuant to radio communications if not installed and ... SVT Size of Conductors in the United States and Canada. Always use a grounded power supply cord and the provided shielded cables. If the monitor is a NEMA5-15 style (Figure A2), UL Listed, and CSA Labeled. Some examples are designed to which can radiate radio frequency energy,...
User Manual
Page 7
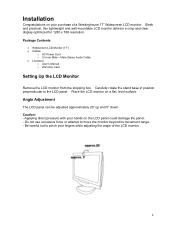
... pinch your fingers while adjusting the angle of a Westinghouse 17" Widescreen LCD monitor. Carefully rotate the stand base in position perpendicular to move the monitor beyond its movement range. - Caution: - Place the LCD monitor on the LCD panel could damage the panel. -...Audio Cable • Literature o User's Manual o Warranty Card Setting Up the LCD Monitor Remove the LCD monitor from the shipping box. Sleek and practical, this lightweight and wall-mountable LCD monitor delivers a crisp and clear display optimized for 1280 x 768 resolution. Installation Congratulations ...
... pinch your fingers while adjusting the angle of a Westinghouse 17" Widescreen LCD monitor. Carefully rotate the stand base in position perpendicular to move the monitor beyond its movement range. - Caution: - Place the LCD monitor on the LCD panel could damage the panel. -...Audio Cable • Literature o User's Manual o Warranty Card Setting Up the LCD Monitor Remove the LCD monitor from the shipping box. Sleek and practical, this lightweight and wall-mountable LCD monitor delivers a crisp and clear display optimized for 1280 x 768 resolution. Installation Congratulations ...

User Manual
Page 8
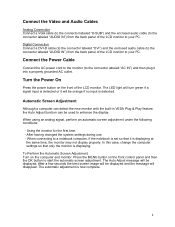
...: Adjust the backlight brightness When the OSD Menu is displayed: Select a menu option When the OSD Menu is in use and orange when in the monitor is not displayed: Switch the signal input between analog and digital Power On/Off Use the AC power cord to connect the... monitor to your PC VGA Output. Use an analog VGA cable (not included) to connect to your PC Audio Output. LED Display 4. Security Lock Anchor When ...
...: Adjust the backlight brightness When the OSD Menu is displayed: Select a menu option When the OSD Menu is in use and orange when in the monitor is not displayed: Switch the signal input between analog and digital Power On/Off Use the AC power cord to connect the... monitor to your PC VGA Output. Use an analog VGA cable (not included) to connect to your PC Audio Output. LED Display 4. Security Lock Anchor When ...
User Manual
Page 9
...will turn green if a signal input is detected. When using an analog signal, perform an automatic screen adjustment under the following conditions: - Using the monitor for the first time. - Digital Connection Connect a DVI-D cable (to the connector labeled "DVI") and the enclosed audio cable (to the connector ...the connector labeled "AC IN") and then plug it will be used to a notebook computer, if the notebook is set so that only the monitor is now complete. 8 Connect the Video and Audio Cables Analog Connection Connect a VGA cable (to the connector labeled "D-SUB") and the enclosed ...
...will turn green if a signal input is detected. When using an analog signal, perform an automatic screen adjustment under the following conditions: - Using the monitor for the first time. - Digital Connection Connect a DVI-D cable (to the connector labeled "DVI") and the enclosed audio cable (to the connector ...the connector labeled "AC IN") and then plug it will be used to a notebook computer, if the notebook is set so that only the monitor is now complete. 8 Connect the Video and Audio Cables Analog Connection Connect a VGA cable (to the connector labeled "D-SUB") and the enclosed ...
User Manual
Page 10
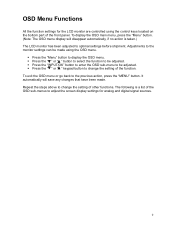
To exit the OSD menu or go back to display the OSD menu. Adjustments to the monitor settings can be made . It automatically will disappear automatically, if no action is a list of other functions. Press the "Menu" button to the previous action, ...press the "MENU" button. Repeat the steps above to optimal settings before shipment. The following is taken.) The LCD monitor has been adjusted to change the setting of the front panel. Press the " " or " " button to select the function to change the setting of the...
To exit the OSD menu or go back to display the OSD menu. Adjustments to the monitor settings can be made . It automatically will disappear automatically, if no action is a list of other functions. Press the "Menu" button to the previous action, ...press the "MENU" button. Repeat the steps above to optimal settings before shipment. The following is taken.) The LCD monitor has been adjusted to change the setting of the front panel. Press the " " or " " button to select the function to change the setting of the...
User Manual
Page 14
... Dark • Adjust the brightness and contrast levels using the OSD. • Check the image size setting. Distorted Image • Reset the LCD monitor by performing the "Recall" function using the OSD. No Image • Make sure the power button is not scaled correctly) • Perform Auto ...Adjust. • Adjust the horizontal and/or vertical position of the LCD monitor. • Make sure the AC power cord is securely connected to the AC socket. • Plug another electrical device (like a radio) ...
... Dark • Adjust the brightness and contrast levels using the OSD. • Check the image size setting. Distorted Image • Reset the LCD monitor by performing the "Recall" function using the OSD. No Image • Make sure the power button is not scaled correctly) • Perform Auto ...Adjust. • Adjust the horizontal and/or vertical position of the LCD monitor. • Make sure the AC power cord is securely connected to the AC socket. • Plug another electrical device (like a radio) ...
User Manual
Page 15
Mounting the LCD Monitor on a wall • Check the Westinghouse Digital website for wall mounting solutions. • Use the 100mm VESA hole pattern to secure a mounting plate to the LCD monitor. • Use professional installation to reduce the risk of injury and damage. Additional Questions • See our website at www.westinghousedigital.com • Contact Westinghouse Digital Customer Service at (866) 287-5555 or write us at [email protected] 14
Mounting the LCD Monitor on a wall • Check the Westinghouse Digital website for wall mounting solutions. • Use the 100mm VESA hole pattern to secure a mounting plate to the LCD monitor. • Use professional installation to reduce the risk of injury and damage. Additional Questions • See our website at www.westinghousedigital.com • Contact Westinghouse Digital Customer Service at (866) 287-5555 or write us at [email protected] 14


