User Manual
Page 2
... to Dark...12 Distorted Image...12 Image is not scaled correctly 12 Colors are not correct...12 No sound ...12 How do I mount the LCD Monitor on a wall 12 How do I find more help? ...13 1 Table of Contents IMPORTANT PRODUCT SAFETY INSTRUCTIONS 2 CLEANING THE LCD DISPLAY...4 SAFETY GUIDELINES ...5 FCC COMPLIANCE STATEMENT...
... to Dark...12 Distorted Image...12 Image is not scaled correctly 12 Colors are not correct...12 No sound ...12 How do I mount the LCD Monitor on a wall 12 How do I find more help? ...13 1 Table of Contents IMPORTANT PRODUCT SAFETY INSTRUCTIONS 2 CLEANING THE LCD DISPLAY...4 SAFETY GUIDELINES ...5 FCC COMPLIANCE STATEMENT...
User Manual
Page 3
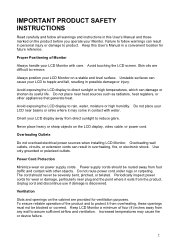
...heavy or sharp objects on power supply cords. Power supply cords should never be blocked or covered. Keep LCD Monitor a minimum of Monitor Always handle your LCD Monitor on the product before you operate your LCD display away from overheating, these openings must not be severely bent... LCD screen. IMPORTANT PRODUCT SAFETY INSTRUCTIONS Read carefully and follow warnings can damage or shorten its useful life. Always position your LCD Monitor with water. Overloading wall outlets, circuits, or extension cords can cause your LCD near heat sources such as radiators, heat registers,...
...heavy or sharp objects on power supply cords. Power supply cords should never be blocked or covered. Keep LCD Monitor a minimum of Monitor Always handle your LCD Monitor on the product before you operate your LCD display away from overheating, these openings must not be severely bent... LCD screen. IMPORTANT PRODUCT SAFETY INSTRUCTIONS Read carefully and follow warnings can damage or shorten its useful life. Always position your LCD Monitor with water. Overloading wall outlets, circuits, or extension cords can cause your LCD near heat sources such as radiators, heat registers,...
User Manual
Page 4
There are no user serviceable parts inside. If smoke, abnormal noise, or strange odor is provided. Contact a qualified service technician If your LCD Monitor will not be seriously injured if you touch them. To assure proper ventilation, do not block the openings by manufacturer. Refer all servicing and repairs ...
There are no user serviceable parts inside. If smoke, abnormal noise, or strange odor is provided. Contact a qualified service technician If your LCD Monitor will not be seriously injured if you touch them. To assure proper ventilation, do not block the openings by manufacturer. Refer all servicing and repairs ...
User Manual
Page 7
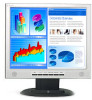
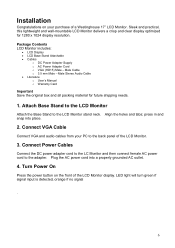
...signal input is detected, orange if no signal . 6 Male Cable o 3.5 mm Male - Plug the AC power cord into place. 2. Package Contents LCD Monitor includes: • LCD Display • LCD Base Stand Attachable • Cables o DC Power Adapter Supply o AC Power Adapter Cord o VGA (HD15)...Monitor delivers a crisp and clear display optimized for future shipping needs. 1. press in and snap into a properly grounded AC outlet. 4. Turn Power On Press the power button on your PC to the LCD Monitor stand neck. Installation Congratulations on the front of a Westinghouse 17" LCD Monitor....
...signal input is detected, orange if no signal . 6 Male Cable o 3.5 mm Male - Plug the AC power cord into place. 2. Package Contents LCD Monitor includes: • LCD Display • LCD Base Stand Attachable • Cables o DC Power Adapter Supply o AC Power Adapter Cord o VGA (HD15)...Monitor delivers a crisp and clear display optimized for future shipping needs. 1. press in and snap into a properly grounded AC outlet. 4. Turn Power On Press the power button on your PC to the LCD Monitor stand neck. Installation Congratulations on the front of a Westinghouse 17" LCD Monitor....
User Manual
Page 8
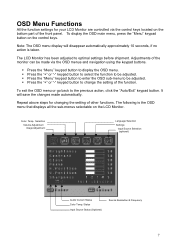
...be adjusted. Press the "Menu" keypad button to enter the OSD sub-menu to be made automatically. Repeat above steps for your LCD Monitor are controlled via the OSD menus and navigation using the keypad buttons. Color Temp. Selection Volume Adjustment Image Adjustment Language Selection Settings Input Source...The OSD menu display will save the changes made via the control keys located on the bottom part of the front panel. The LCD Monitor has been adjusted to display the OSD menu. It will disappear automatically approximately 10 seconds, if no action is the OSD menu that displays...
...be adjusted. Press the "Menu" keypad button to enter the OSD sub-menu to be made automatically. Repeat above steps for your LCD Monitor are controlled via the OSD menus and navigation using the keypad buttons. Color Temp. Selection Volume Adjustment Image Adjustment Language Selection Settings Input Source...The OSD menu display will save the changes made via the control keys located on the bottom part of the front panel. The LCD Monitor has been adjusted to display the OSD menu. It will disappear automatically approximately 10 seconds, if no action is the OSD menu that displays...
User Manual
Page 10
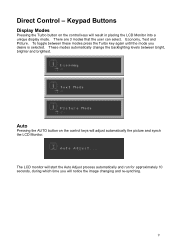
... the backlighting levels between these modes press the Turbo key again until the mode you will adjust automatically the picture and synch the LCD Monitor. There are 3 modes that the user can select. To toggle between bright, brighter and brightest. Auto Pressing the AUTO button on ...the control keys will result in placing the LCD Monitor into a unique display mode. Economy, Text and Picture. The LCD monitor will start the Auto Adjust process automatically and run for approximately 10 seconds, during which time you desire ...
... the backlighting levels between these modes press the Turbo key again until the mode you will adjust automatically the picture and synch the LCD Monitor. There are 3 modes that the user can select. To toggle between bright, brighter and brightest. Auto Pressing the AUTO button on ...the control keys will result in placing the LCD Monitor into a unique display mode. Economy, Text and Picture. The LCD monitor will start the Auto Adjust process automatically and run for approximately 10 seconds, during which time you desire ...
User Manual
Page 11
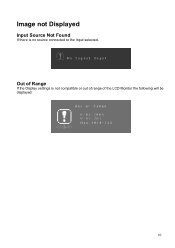
Image not Displayed Input Source Not Found If there is not compatible or out of range of Range If the Display settings is no source connected to the Input selected. Out of the LCD Monitor the following will be displayed: 10
Image not Displayed Input Source Not Found If there is not compatible or out of range of Range If the Display settings is no source connected to the Input selected. Out of the LCD Monitor the following will be displayed: 10
User Manual
Page 13
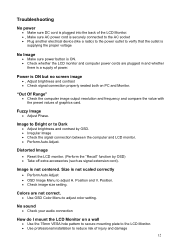
...centered. Position and V. Position. • Check image size setting. No sound • Check your audio connection How do I mount the LCD Monitor on PC and Monitor. Fuzzy Image • Adjust Phase. Image is not scaled correctly • Perform Auto Adjust • OSD Image Menu to adjust H. Colors are...8226; Check signal connection properly seated both on a wall • Use the 75mm VESA hole pattern to secure mounting plate to the LCD Monitor. • Use professional installation to reduce risk of injury and damage 12 Troubleshooting No power • Make sure DC cord is plugged into...
...centered. Position and V. Position. • Check image size setting. No sound • Check your audio connection How do I mount the LCD Monitor on PC and Monitor. Fuzzy Image • Adjust Phase. Image is not scaled correctly • Perform Auto Adjust • OSD Image Menu to adjust H. Colors are...8226; Check signal connection properly seated both on a wall • Use the 75mm VESA hole pattern to secure mounting plate to the LCD Monitor. • Use professional installation to reduce risk of injury and damage 12 Troubleshooting No power • Make sure DC cord is plugged into...


