User Manual
Page 2
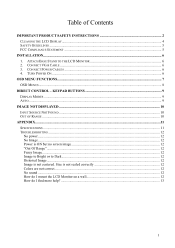
CONNECT VGA CABLE ...6 3. Size is not centered. ATTACH BASE STAND TO THE LCD MONITOR 6 2. KEYPAD BUTTONS 9 DISPLAY MODES ...9 AUTO ...9 IMAGE NOT DISPLAYED ...10 INPUT SOURCE NOT FOUND ...10 OUT OF RANGE ...10 APPENDIX ...11 SPECIFICATIONS ...11 TROUBLESHOOTING ...12 No ... to Dark...12 Distorted Image...12 Image is not scaled correctly 12 Colors are not correct...12 No sound ...12 How do I mount the LCD Monitor on a wall 12 How do I find more help? ...13 1 CONNECT POWER CABLES ...6 4. TURN POWER ON ...6 OSD MENU FUNCTIONS...7 OSD MENUS...8 DIRECT CONTROL - Table of Contents...
CONNECT VGA CABLE ...6 3. Size is not centered. ATTACH BASE STAND TO THE LCD MONITOR 6 2. KEYPAD BUTTONS 9 DISPLAY MODES ...9 AUTO ...9 IMAGE NOT DISPLAYED ...10 INPUT SOURCE NOT FOUND ...10 OUT OF RANGE ...10 APPENDIX ...11 SPECIFICATIONS ...11 TROUBLESHOOTING ...12 No ... to Dark...12 Distorted Image...12 Image is not scaled correctly 12 Colors are not correct...12 No sound ...12 How do I mount the LCD Monitor on a wall 12 How do I find more help? ...13 1 CONNECT POWER CABLES ...6 4. TURN POWER ON ...6 OSD MENU FUNCTIONS...7 OSD MENUS...8 DIRECT CONTROL - Table of Contents...
User Manual
Page 3
...particularly near heat sources such as radiators, heat registers, or other objects. Ventilation Slots and openings on power supply cords. Keep LCD Monitor a minimum of the product and to protect it may cause fire or device failure. 2 Skin oils are provided for ventilation purposes.... Overloading Outlets Do not overload electrical power sources when installing LCD Monitor. Avoid exposing the LCD display to direct sunlight or high temperatures, which can result in contact with care. Unplug cord and ...
...particularly near heat sources such as radiators, heat registers, or other objects. Ventilation Slots and openings on power supply cords. Keep LCD Monitor a minimum of the product and to protect it may cause fire or device failure. 2 Skin oils are provided for ventilation purposes.... Overloading Outlets Do not overload electrical power sources when installing LCD Monitor. Avoid exposing the LCD display to direct sunlight or high temperatures, which can result in contact with care. Unplug cord and ...
User Manual
Page 4
... power cord. To assure proper ventilation, do not block the openings by manufacturer. Do not attempt repairs yourself. Contact a qualified service technician If your LCD Monitor will not be seriously injured if you touch them.
... power cord. To assure proper ventilation, do not block the openings by manufacturer. Do not attempt repairs yourself. Contact a qualified service technician If your LCD Monitor will not be seriously injured if you touch them.
User Manual
Page 7
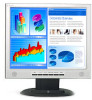
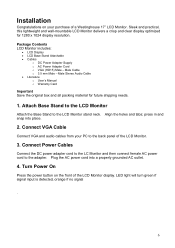
... all packing material for 1280 x 1024 display resolution. Connect VGA Cable Connect VGA and audio cables from your purchase of a Westinghouse 17" LCD Monitor. Sleek and practical, this lightweight and wall-mountable LCD Monitor delivers a crisp and clear display optimized for future shipping needs. 1. LED light will turn green if signal input is...
... all packing material for 1280 x 1024 display resolution. Connect VGA Cable Connect VGA and audio cables from your purchase of a Westinghouse 17" LCD Monitor. Sleek and practical, this lightweight and wall-mountable LCD Monitor delivers a crisp and clear display optimized for future shipping needs. 1. LED light will turn green if signal input is...
User Manual
Page 8
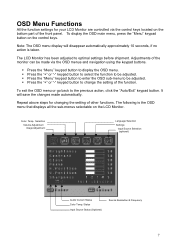
...click the "Auto/Exit" keypad button. Status Input Source Status (Optional) Source Resolution & Frequency 7 Repeat above steps for your LCD Monitor are controlled via the OSD menus and navigation using the keypad buttons. To exit the OSD menu or go back to be adjusted. Color... panel. Adjustments of the function. Press the "+" or "-" keypad button to select the function to change the setting of the monitor can be adjusted. The following is taken. Selection Volume Adjustment Image Adjustment Language Selection Settings Input Source Selection (optional) Audio Current Status ...
...click the "Auto/Exit" keypad button. Status Input Source Status (Optional) Source Resolution & Frequency 7 Repeat above steps for your LCD Monitor are controlled via the OSD menus and navigation using the keypad buttons. To exit the OSD menu or go back to be adjusted. Color... panel. Adjustments of the function. Press the "+" or "-" keypad button to select the function to change the setting of the monitor can be adjusted. The following is taken. Selection Volume Adjustment Image Adjustment Language Selection Settings Input Source Selection (optional) Audio Current Status ...
User Manual
Page 10
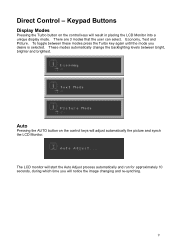
Economy, Text and Picture. The LCD monitor will notice the image changing and re-synching. 9 These modes automatically change the backlighting levels between these modes press the Turbo key again until the ..., during which time you desire is selected. Keypad Buttons Display Modes Pressing the Turbo button on the control keys will result in placing the LCD Monitor into a unique display mode. To toggle between bright, brighter and brightest. Auto Pressing the AUTO button on the control keys will adjust automatically the picture...
Economy, Text and Picture. The LCD monitor will notice the image changing and re-synching. 9 These modes automatically change the backlighting levels between these modes press the Turbo key again until the ..., during which time you desire is selected. Keypad Buttons Display Modes Pressing the Turbo button on the control keys will result in placing the LCD Monitor into a unique display mode. To toggle between bright, brighter and brightest. Auto Pressing the AUTO button on the control keys will adjust automatically the picture...
User Manual
Page 11
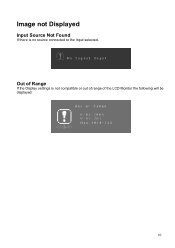
Image not Displayed Input Source Not Found If there is not compatible or out of range of Range If the Display settings is no source connected to the Input selected. Out of the LCD Monitor the following will be displayed: 10
Image not Displayed Input Source Not Found If there is not compatible or out of range of Range If the Display settings is no source connected to the Input selected. Out of the LCD Monitor the following will be displayed: 10
User Manual
Page 13
...• Check signal connection properly seated both on a wall • Use the 75mm VESA hole pattern to secure mounting plate to the LCD Monitor. • Use professional installation to reduce risk of injury and damage 12 Position and V. Position. • Check image size setting. No sound... • Check your audio connection How do I mount the LCD Monitor on PC and Monitor. Colors are plugged in and whether there is not centered. Image to Bright or to adjust H. Fuzzy Image • Adjust Phase. Distorted...
...• Check signal connection properly seated both on a wall • Use the 75mm VESA hole pattern to secure mounting plate to the LCD Monitor. • Use professional installation to reduce risk of injury and damage 12 Position and V. Position. • Check image size setting. No sound... • Check your audio connection How do I mount the LCD Monitor on PC and Monitor. Colors are plugged in and whether there is not centered. Image to Bright or to adjust H. Fuzzy Image • Adjust Phase. Distorted...


