
User Manual
Page 2
English Contents Product Safety Instructions 1 Safety Guidelines 2 Cleaning the LCD Monitor 3 INSTALLATION Package Contents 4 Front View of the LCD Monitor 4 Side View of the LCD Monitor 5 Rear View of the LCD Monitor 6 Installation 7 OSD Functions PICTURE PARAMETERS: Brightness / Contrast / Saturation / Hue / Color Temp / Sharpness / Aspect Ratio / Backlight / Reset 10 PC PARAMETERS: Auto Adjust / Clock / Phase...
English Contents Product Safety Instructions 1 Safety Guidelines 2 Cleaning the LCD Monitor 3 INSTALLATION Package Contents 4 Front View of the LCD Monitor 4 Side View of the LCD Monitor 5 Rear View of the LCD Monitor 6 Installation 7 OSD Functions PICTURE PARAMETERS: Brightness / Contrast / Saturation / Hue / Color Temp / Sharpness / Aspect Ratio / Backlight / Reset 10 PC PARAMETERS: Auto Adjust / Clock / Phase...

User Manual
Page 3
... not cover repairs or attempted repairs by anyone not authorized by Westinghouse Digital. • If the LCD monitor will not be walked on or pinched by placing the LCD monitor on the Monitor. 1 Skin oils are difficult to moisture or high humidity. • Do not attempt repairs yourself. Orient the ...items placed upon or against them . • Avoid exposing the LCD monitor to dripping or splashing and objects filled with care when moving it off and contact the Westinghouse Service Center. • WARNING - The LCD monitor shall be installed near a wall socket outlet and the plug on the...
... not cover repairs or attempted repairs by anyone not authorized by Westinghouse Digital. • If the LCD monitor will not be walked on or pinched by placing the LCD monitor on the Monitor. 1 Skin oils are difficult to moisture or high humidity. • Do not attempt repairs yourself. Orient the ...items placed upon or against them . • Avoid exposing the LCD monitor to dripping or splashing and objects filled with care when moving it off and contact the Westinghouse Service Center. • WARNING - The LCD monitor shall be installed near a wall socket outlet and the plug on the...
User Manual
Page 5
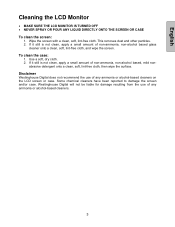
...ammonia or alcohol-based cleaners on the LCD screen or case. Some chemical cleaners have been reported to damage the screen and/or case. Disclaimer Westinghouse Digital does not recommend the use of any ammonia or alcohol-based cleaners. 3 To clean the case: 1. Wipe the screen with a clean..., soft, lint-free cloth. This removes dust and other particles. 2. Use a soft, dry cloth. 2. English Cleaning the LCD Monitor • MAKE SURE THE LCD MONITOR IS TURNED OFF • NEVER SPRAY OR POUR ANY LIQUID DIRECTLY ONTO THE SCREEN OR CASE To clean the screen: 1.
...ammonia or alcohol-based cleaners on the LCD screen or case. Some chemical cleaners have been reported to damage the screen and/or case. Disclaimer Westinghouse Digital does not recommend the use of any ammonia or alcohol-based cleaners. 3 To clean the case: 1. Wipe the screen with a clean..., soft, lint-free cloth. This removes dust and other particles. 2. Use a soft, dry cloth. 2. English Cleaning the LCD Monitor • MAKE SURE THE LCD MONITOR IS TURNED OFF • NEVER SPRAY OR POUR ANY LIQUID DIRECTLY ONTO THE SCREEN OR CASE To clean the screen: 1.
User Manual
Page 6
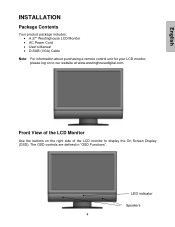
English INSTALLATION Package Contents Your product package includes: • A 27" Westinghouse LCD Monitor • AC Power Cord • User's Manual • D-SUB (VGA) Cable Note: For information about purchasing a remote control unit for your LCD monitor, please log on the right side of the LCD monitor to our website at www.westinghousedigital.com. LED indicator Speakers 4 The OSD controls are defined in "OSD Functions". Front View of the LCD Monitor Use the buttons on to display the On Screen Display (OSD).
English INSTALLATION Package Contents Your product package includes: • A 27" Westinghouse LCD Monitor • AC Power Cord • User's Manual • D-SUB (VGA) Cable Note: For information about purchasing a remote control unit for your LCD monitor, please log on the right side of the LCD monitor to our website at www.westinghousedigital.com. LED indicator Speakers 4 The OSD controls are defined in "OSD Functions". Front View of the LCD Monitor Use the buttons on to display the On Screen Display (OSD).
User Manual
Page 7
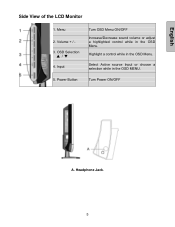
Volume + / 3. Highlight a control while in the OSD MENU. Menu 2. Turn Power ON/OFF A. Input 5. OSD Selection ▲ / ▼ 4. Select Active source Input or choose a selection while in the OSD Menu. Headphone Jack. 5 Power Button Turn OSD Menu ON/OFF Increase/Decrease sound volume or adjust a highlighted control while in the OSD Menu. English Side View of the LCD Monitor 1.
Volume + / 3. Highlight a control while in the OSD MENU. Menu 2. Turn Power ON/OFF A. Input 5. OSD Selection ▲ / ▼ 4. Select Active source Input or choose a selection while in the OSD Menu. Headphone Jack. 5 Power Button Turn OSD Menu ON/OFF Increase/Decrease sound volume or adjust a highlighted control while in the OSD Menu. English Side View of the LCD Monitor 1.
User Manual
Page 8
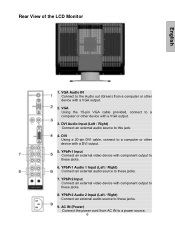
... external video device with a VGA output. 2. DVI Audio Input (Left / Right) Connect an external audio source to these jacks. 7. English Rear View of the LCD Monitor 1. DVI Using a 20-pin DVI cable, connect to a computer or other device with component output to this jack. 4.
... external video device with a VGA output. 2. DVI Audio Input (Left / Right) Connect an external audio source to these jacks. 7. English Rear View of the LCD Monitor 1. DVI Using a 20-pin DVI cable, connect to a computer or other device with component output to this jack. 4.
User Manual
Page 9
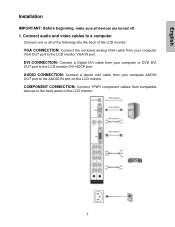
... a Digital DVI cable from your computer AUDIO OUT port to the AUDIO IN port on the LCD monitor. AUDIO CONNECTION: Connect a stereo mini cable from your computer VGA OUT port to the LCD monitor VGA IN port. COMPONENT CONNECTION: Connect YPbPr component cables from your computer or DVD DVI OUT port ...to the LCD monitor DVI-HDCP port. Connect audio and video cables to a computer Connect one or all devices are turned off. 1. English Installation IMPORTANT: Before beginning, make ...
... a Digital DVI cable from your computer AUDIO OUT port to the AUDIO IN port on the LCD monitor. AUDIO CONNECTION: Connect a stereo mini cable from your computer VGA OUT port to the LCD monitor VGA IN port. COMPONENT CONNECTION: Connect YPbPr component cables from your computer or DVD DVI OUT port ...to the LCD monitor DVI-HDCP port. Connect audio and video cables to a computer Connect one or all devices are turned off. 1. English Installation IMPORTANT: Before beginning, make ...
User Manual
Page 10
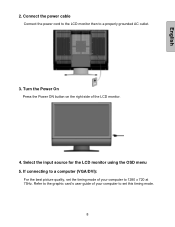
If connecting to set the timing mode of the LCD monitor. 4. Connect the power cable Connect the power cord to the LCD monitor then to 1280 x 720 at 75Hz. Select the input source for the LCD monitor using the OSD menu 5. Turn the Power On Press the Power ON button on the right side of your computer to a computer (VGA/DVI): For the best picture quality, set this timing mode. 8 English 2. Refer to the graphic card's user guide of your computer to a properly grounded AC outlet. 3.
If connecting to set the timing mode of the LCD monitor. 4. Connect the power cable Connect the power cord to the LCD monitor then to 1280 x 720 at 75Hz. Select the input source for the LCD monitor using the OSD menu 5. Turn the Power On Press the Power ON button on the right side of your computer to a computer (VGA/DVI): For the best picture quality, set this timing mode. 8 English 2. Refer to the graphic card's user guide of your computer to a properly grounded AC outlet. 3.
User Manual
Page 11
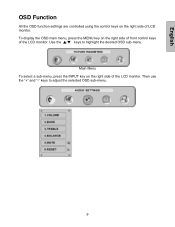
English OSD Function All the OSD function settings are controlled using the control keys on the right side of the LCD monitor. Then use the "+" and "-" keys to highlight the desired OSD sub-menu. Main Menu To select a sub-menu, press the INPUT key on the right side of front control keys of the LCD monitor. To display the OSD main menu, press the MENU key on the right side of LCD monitor. Use the ▲/▼ keys to adjust the selected OSD sub-menu. 9
English OSD Function All the OSD function settings are controlled using the control keys on the right side of the LCD monitor. Then use the "+" and "-" keys to highlight the desired OSD sub-menu. Main Menu To select a sub-menu, press the INPUT key on the right side of front control keys of the LCD monitor. To display the OSD main menu, press the MENU key on the right side of LCD monitor. Use the ▲/▼ keys to adjust the selected OSD sub-menu. 9
User Manual
Page 17
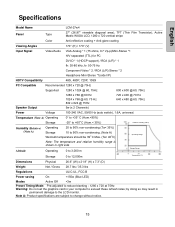
English Specifications Model Name LCM-27w4 Panel Type 27" (26.97" viewable diagonal area), TFT (Thin Film Transistor), Active Matrix WXGA LCD, 1280 x 720 vertical stripe Color Anti-reflective coating + Anti-...
English Specifications Model Name LCM-27w4 Panel Type 27" (26.97" viewable diagonal area), TFT (Thin Film Transistor), Active Matrix WXGA LCD, 1280 x 720 vertical stripe Color Anti-reflective coating + Anti-...

User Manual
Page 18
... No Screen Image • Make sure the video cable connected to the LCD monitor is connected securely. How Can I Find More Help? • Log on to: www.westinghousedigital.com • Contact Westinghouse Customer Service at (866) 287-5555 or write us at [email protected] ...16 Loose or broken pins in the cable connector could cause an improper connection. • Connect the LCD monitor to another electrical device (such as a radio)...
... No Screen Image • Make sure the video cable connected to the LCD monitor is connected securely. How Can I Find More Help? • Log on to: www.westinghousedigital.com • Contact Westinghouse Customer Service at (866) 287-5555 or write us at [email protected] ...16 Loose or broken pins in the cable connector could cause an improper connection. • Connect the LCD monitor to another electrical device (such as a radio)...


