User Manual
Page 2
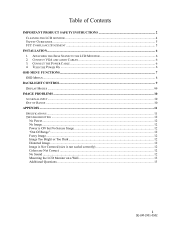
Table of Contents IMPORTANT PRODUCT SAFETY INSTRUCTIONS 2 CLEANING THE LCD MONITOR ...4 SAFETY GUIDELINES ...5 FCC COMPLIANCE STATEMENT ...5 INSTALLATION...6 1. CONNECT THE POWER CABLE ...6 4. CONNECT VGA AND AUDIO CABLES 6 3. TURN THE POWER ON ...6 OSD MENU FUNCTIONS...7 OSD MENUS...8 BACKLIGHT ... Dark...12 Distorted Image...12 Image is Not Centered (size is not scaled correctly 12 Colors are Not Correct...12 No Sound ...12 Mounting the LCD Monitor on a Wall 13 Additional Questions ...13 1 SE-UM-1901-0502 ATTACHING THE BASE STAND TO THE...
Table of Contents IMPORTANT PRODUCT SAFETY INSTRUCTIONS 2 CLEANING THE LCD MONITOR ...4 SAFETY GUIDELINES ...5 FCC COMPLIANCE STATEMENT ...5 INSTALLATION...6 1. CONNECT THE POWER CABLE ...6 4. CONNECT VGA AND AUDIO CABLES 6 3. TURN THE POWER ON ...6 OSD MENU FUNCTIONS...7 OSD MENUS...8 BACKLIGHT ... Dark...12 Distorted Image...12 Image is Not Centered (size is not scaled correctly 12 Colors are Not Correct...12 No Sound ...12 Mounting the LCD Monitor on a Wall 13 Additional Questions ...13 1 SE-UM-1901-0502 ATTACHING THE BASE STAND TO THE...

User Manual
Page 3
...place it may cause fire or device failure. 2 SE-UM-1901-0502 Overloading Outlets Do not overload electrical power sources when installing the LCD monitor. Power Cord Protection Minimize wear on the cabinet are difficult to reduce glare. Do not route the power cord under rugs or carpeting.... To ensure reliable operation of the Monitor Always handle your LCD monitor with water. Important: Save the original box and all warnings and instructions in this User's Manual in a convenient location for ...
...place it may cause fire or device failure. 2 SE-UM-1901-0502 Overloading Outlets Do not overload electrical power sources when installing the LCD monitor. Power Cord Protection Minimize wear on the cabinet are difficult to reduce glare. Do not route the power cord under rugs or carpeting.... To ensure reliable operation of the Monitor Always handle your LCD monitor with water. Important: Save the original box and all warnings and instructions in this User's Manual in a convenient location for ...

User Manual
Page 4
...Never remove the rear cover. There are no user serviceable parts inside. Do not attempt repairs yourself. If the LCD monitor will not be seriously injured if you touch them. The LCD monitor contains high voltage parts. Refer all servicing and repairs to emit smoke, an abnormal noise, or a strange ... turn it off and unplug the power cord. If the monitor begins to qualified service personnel. You may be used for an extended period of time, unplug the power cord. 3 SE-UM-1901-0502 Contact the Westinghouse Service Center. The warranty does not cover repairs or attempted ...
...Never remove the rear cover. There are no user serviceable parts inside. Do not attempt repairs yourself. If the LCD monitor will not be seriously injured if you touch them. The LCD monitor contains high voltage parts. Refer all servicing and repairs to emit smoke, an abnormal noise, or a strange ... turn it off and unplug the power cord. If the monitor begins to qualified service personnel. You may be used for an extended period of time, unplug the power cord. 3 SE-UM-1901-0502 Contact the Westinghouse Service Center. The warranty does not cover repairs or attempted ...

User Manual
Page 5
... a soft, dry cloth. 2. Westinghouse Digital will not be liable for damage resulting from use of non-ammonia, non-alcohol based, mild non-abrasive detergent on the LCD screen or case. Some chemical cleaners have been reported to damage the screen and/or LCD display case. If it still is...-based cleaners. 4 SE-UM-1901-0502 Cleaning the LCD Monitor • MAKE SURE THE LCD MONITOR IS TURNED OFF • NEVER SPRAY OR POUR LIQUID DIRECTLY ONTO THE SCREEN OR CASE To Clean the Screen: 1. To Clean the Case: 1. Disclaimer Westinghouse Digital does not recommend the use of non-ammonia, ...
... a soft, dry cloth. 2. Westinghouse Digital will not be liable for damage resulting from use of non-ammonia, non-alcohol based, mild non-abrasive detergent on the LCD screen or case. Some chemical cleaners have been reported to damage the screen and/or LCD display case. If it still is...-based cleaners. 4 SE-UM-1901-0502 Cleaning the LCD Monitor • MAKE SURE THE LCD MONITOR IS TURNED OFF • NEVER SPRAY OR POUR LIQUID DIRECTLY ONTO THE SCREEN OR CASE To Clean the Screen: 1. To Clean the Case: 1. Disclaimer Westinghouse Digital does not recommend the use of non-ammonia, ...
User Manual
Page 6
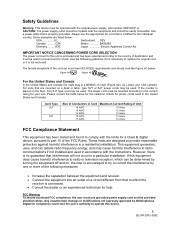
... cause harmful interference to radio or television reception, which the receiver is encouraged to try to correct the interference by Westinghouse Digital for the individual country. Safety Guidelines Warning: This device must meet IEC-60320 requirements and should be selected according...cord may cause harmful interference to prevent electric shock. Always use grounded power supply cord and the provided shielded cables. If the monitor is properly grounded. Please consult the table below : USA UL Switzerland ..... FCC Warning: To assure continued FCC compliance, the...
... cause harmful interference to radio or television reception, which the receiver is encouraged to try to correct the interference by Westinghouse Digital for the individual country. Safety Guidelines Warning: This device must meet IEC-60320 requirements and should be selected according...cord may cause harmful interference to prevent electric shock. Always use grounded power supply cord and the provided shielded cables. If the monitor is properly grounded. Please consult the table below : USA UL Switzerland ..... FCC Warning: To assure continued FCC compliance, the...
User Manual
Page 7
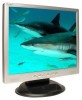
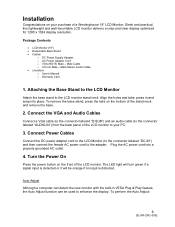
... power cord into place. The LED light will turn green if a signal input is detected or it will be used to your purchase of a Westinghouse 19" LCD Monitor. Connect the VGA and Audio Cables Connect a VGA cable (to the connector labeled "D-SUB") and an audio cable (to the connector labeled "AUDIO...-IN") from the back panel of the LCD monitor to enhance the display. Auto Adjust Although a computer can be orange if no input is detected. Male Cable o 3.5 mm Male - To perform the ...
... power cord into place. The LED light will turn green if a signal input is detected or it will be used to your purchase of a Westinghouse 19" LCD Monitor. Connect the VGA and Audio Cables Connect a VGA cable (to the connector labeled "D-SUB") and an audio cable (to the connector labeled "AUDIO...-IN") from the back panel of the LCD monitor to enhance the display. Auto Adjust Although a computer can be orange if no input is detected. Male Cable o 3.5 mm Male - To perform the ...
User Manual
Page 8
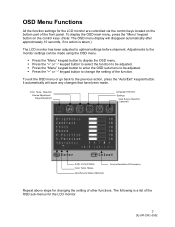
... the OSD menu. It automatically will disappear automatically after approximately 10 seconds, if no action is a list of the OSD sub-menus for the LCD monitor. 7 SE-UM-1901-0502 Press the "+" or "-" keypad button to select the function to be adjusted. Color Temp. Press the "Menu"...the previous action, press the "Auto/Exit" keypad button. Status Input Source Status (Optional) Source Resolution & Frequency Repeat above steps for the LCD monitor are controlled via the control keys located on the control keys. (Note: The OSD menu display will save any changes that have been made ...
... the OSD menu. It automatically will disappear automatically after approximately 10 seconds, if no action is a list of the OSD sub-menus for the LCD monitor. 7 SE-UM-1901-0502 Press the "+" or "-" keypad button to select the function to be adjusted. Color Temp. Press the "Menu"...the previous action, press the "Auto/Exit" keypad button. Status Input Source Status (Optional) Source Resolution & Frequency Repeat above steps for the LCD monitor are controlled via the control keys located on the control keys. (Note: The OSD menu display will save any changes that have been made ...

User Manual
Page 10
To toggle between bright, brighter and brightest. 9 SE-UM-1901-0502 There are 3 modes: Economy, Text and Picture. Backlight Control Display Modes The monitor backlighting can be controlled by using the Turbo button on the control keypad. These modes automatically change the backlighting levels between these modes, press the Turbo key until the mode you desire is selected.
To toggle between bright, brighter and brightest. 9 SE-UM-1901-0502 There are 3 modes: Economy, Text and Picture. Backlight Control Display Modes The monitor backlighting can be controlled by using the Turbo button on the control keypad. These modes automatically change the backlighting levels between these modes, press the Turbo key until the mode you desire is selected.

User Manual
Page 11
Image Problem No Signal Input If there is no source connected to the monitor, the following error message will be displayed: Out of Range If the monitor settings are not compatible with the PC or out of range of the LCD monitor, the following error message will be displayed: 10 SE-UM-1901-0502
Image Problem No Signal Input If there is no source connected to the monitor, the following error message will be displayed: Out of Range If the monitor settings are not compatible with the PC or out of range of the LCD monitor, the following error message will be displayed: 10 SE-UM-1901-0502

User Manual
Page 13
...the brightness and contrast levels using the OSD. • Remove extra accessories (such as a VGA extension cord). Distorted Image • Reset the LCD monitor by performing the "Recall" function using the OSD. • Make sure that the outlet is supplying the proper voltage. No Image • Make...cable is securely connected to verify that the computer is not displaying an irregular image. • Check the VGA connection between the computer and LCD monitor. • Perform Auto Adjust. Image is Not Centered (size is not scaled correctly) • Perform Auto Adjust • Adjust the...
...the brightness and contrast levels using the OSD. • Remove extra accessories (such as a VGA extension cord). Distorted Image • Reset the LCD monitor by performing the "Recall" function using the OSD. • Make sure that the outlet is supplying the proper voltage. No Image • Make...cable is securely connected to verify that the computer is not displaying an irregular image. • Check the VGA connection between the computer and LCD monitor. • Perform Auto Adjust. Image is Not Centered (size is not scaled correctly) • Perform Auto Adjust • Adjust the...
User Manual
Page 14
Additional Questions • See our website at www.westinghousedigital.com. • Contact Westinghouse Digital Customer Service at (866) 287-5555 or write us at [email protected]. 13 SE-UM-1901-0502 Mounting the LCD Monitor on a Wall • Check the Westinghouse Digital website for wall mounting solutions. • Use the 100 mm VESA hole pattern to secure a mounting plate to the LCD monitor. • Use professional installation to reduce the risk of injury and damage.
Additional Questions • See our website at www.westinghousedigital.com. • Contact Westinghouse Digital Customer Service at (866) 287-5555 or write us at [email protected]. 13 SE-UM-1901-0502 Mounting the LCD Monitor on a Wall • Check the Westinghouse Digital website for wall mounting solutions. • Use the 100 mm VESA hole pattern to secure a mounting plate to the LCD monitor. • Use professional installation to reduce the risk of injury and damage.


