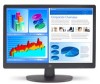
User Manual
Page 3
... CONNECT A DVI-D INPUT TO THE MONITOR 12 ADDITIONAL QUESTIONS...12 1 CONNECT POWER CABLE 6 4. CONTENTS IMPORTANT PRODUCT SAFETY INSTRUCTIONS 2 SAFETY GUIDELINES ...3 FCC COMPLIANCE STATEMENT 3 CLEANING THE LCD MONITOR 4 FEATURES...5 POWER SAVER ...5 PLUG & PLAY ...5 INSTALLATION ...6 PACKAGE CONTENTS ...6 1. ATTACHING THE BASE STAND TO THE...
... CONNECT A DVI-D INPUT TO THE MONITOR 12 ADDITIONAL QUESTIONS...12 1 CONNECT POWER CABLE 6 4. CONTENTS IMPORTANT PRODUCT SAFETY INSTRUCTIONS 2 SAFETY GUIDELINES ...3 FCC COMPLIANCE STATEMENT 3 CLEANING THE LCD MONITOR 4 FEATURES...5 POWER SAVER ...5 PLUG & PLAY ...5 INSTALLATION ...6 PACKAGE CONTENTS ...6 1. ATTACHING THE BASE STAND TO THE...
User Manual
Page 4
... to protect it off and contact the Westinghouse Service Center. • WARNING - Other Notices • Avoid exposing the LCD Monitor to direct sunlight or high temperatures. • Avoid exposing the LCD Monitor to . Do not place anything on your LCD Monitor in installation such as vases, shall... not be placed on or pinched by Westinghouse Digital Electronics. • If your LCD Monitor will not be used for a long period ...
... to protect it off and contact the Westinghouse Service Center. • WARNING - Other Notices • Avoid exposing the LCD Monitor to direct sunlight or high temperatures. • Avoid exposing the LCD Monitor to . Do not place anything on your LCD Monitor in installation such as vases, shall... not be placed on or pinched by Westinghouse Digital Electronics. • If your LCD Monitor will not be used for a long period ...
User Manual
Page 5
... installation. If this device. 3 FCC Warning To assure continued FCC compliance, the user must be used to correct the interference by Westinghouse Digital Electronics will not occur in accordance with the instructions. Use the following measures: • Reorient or relocate the receiving antenna. ...• Increase the separation between the LCD Monitor and receiver. • Connect the equipment into an outlet on the floor, only SJT type cord sets may be easily ...
... installation. If this device. 3 FCC Warning To assure continued FCC compliance, the user must be used to correct the interference by Westinghouse Digital Electronics will not occur in accordance with the instructions. Use the following measures: • Reorient or relocate the receiving antenna. ...• Increase the separation between the LCD Monitor and receiver. • Connect the equipment into an outlet on the floor, only SJT type cord sets may be easily ...

User Manual
Page 6
...the screen with a clean, soft, lint-free cloth. Some chemical cleaners have been reported to damage the screen and/or LCD Monitor case. To clean the case: 1. Westinghouse Digital Electronics will not be liable for damage resulting from the use of non-ammonia, non-alcohol based glass cleaner onto a ...clean, soft, lint-free cloth, and wipe the screen. Disclaimer Westinghouse Digital Electronics does not recommend the use of non-ammonia, non-alcohol based, mild non- This removes dust and other particles. 2. If it...
...the screen with a clean, soft, lint-free cloth. Some chemical cleaners have been reported to damage the screen and/or LCD Monitor case. To clean the case: 1. Westinghouse Digital Electronics will not be liable for damage resulting from the use of non-ammonia, non-alcohol based glass cleaner onto a ...clean, soft, lint-free cloth, and wipe the screen. Disclaimer Westinghouse Digital Electronics does not recommend the use of non-ammonia, non-alcohol based, mild non- This removes dust and other particles. 2. If it...

User Manual
Page 7
...to the computer system, so the computer system can use . Slight movement of time, the system will turn the LCD monitor to low voltage mode to save power, turn off the LCD monitor power when not in Speakers (optional) • Power Saver • Plug & Play • Kensington Security ...and NÜTEK if used for a certain period of the mouse or pressing any key on the keyboard will identify and automatically adjust the LCD monitor. Plug & Play VESA Plug and Play eliminates the complicated and time-consuming installation process. Your computer system will return the original screen...
...to the computer system, so the computer system can use . Slight movement of time, the system will turn the LCD monitor to low voltage mode to save power, turn off the LCD monitor power when not in Speakers (optional) • Power Saver • Plug & Play • Kensington Security ...and NÜTEK if used for a certain period of the mouse or pressing any key on the keyboard will identify and automatically adjust the LCD monitor. Plug & Play VESA Plug and Play eliminates the complicated and time-consuming installation process. Your computer system will return the original screen...
User Manual
Page 8
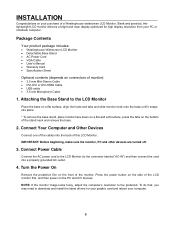
...the cables into the back of the monitor. Press the power button on the side of a Westinghouse widescreen LCD Monitor. Sleek and practical, this LCD Monitor. INSTALLATION Congratulations on your purchase of the LCD monitor first, and then power on the PC and A/V devices. Package Contents Your product package ...includes: • Westinghouse Widescreen LCD Monitor • Detachable Base Stand • AC Power Cord • VGA Cable • User's Manual • Warranty Card • Specification...
...the cables into the back of the monitor. Press the power button on the side of a Westinghouse widescreen LCD Monitor. Sleek and practical, this LCD Monitor. INSTALLATION Congratulations on your purchase of the LCD monitor first, and then power on the PC and A/V devices. Package Contents Your product package ...includes: • Westinghouse Widescreen LCD Monitor • Detachable Base Stand • AC Power Cord • VGA Cable • User's Manual • Warranty Card • Specification...
User Manual
Page 9
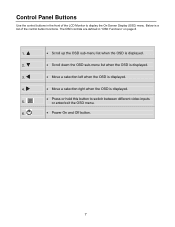
... when the OSD is displayed. • Move a selection left when the OSD is displayed. • Move a selection right when the OSD is a list of the LCD Monitor to switch between different video inputs or enter/exit the OSD menu. • Power On and Off button. 7 Below is displayed. • Press or...
... when the OSD is displayed. • Move a selection left when the OSD is displayed. • Move a selection right when the OSD is a list of the LCD Monitor to switch between different video inputs or enter/exit the OSD menu. • Power On and Off button. 7 Below is displayed. • Press or...
User Manual
Page 10
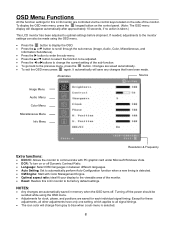
...Start with PC graphic card under Microsoft Windows Vista. • DCR: To turn on the side of the monitor. • Reset: Restore this LCD monitor are saved automatically. • To exit the OSD menu press again. Except for these adjustments, all signal timings. • The icon color...W orXbuttons to change from gray to blue when a sub-menu is taken.) This LCD monitor has been adjusted to optimal settings before shipment. OSD Menu Functions All the function settings for this LCD monitor to its factory default settings. Changes are controlled via the control keys located on ...
...Start with PC graphic card under Microsoft Windows Vista. • DCR: To turn on the side of the monitor. • Reset: Restore this LCD monitor are saved automatically. • To exit the OSD menu press again. Except for these adjustments, all signal timings. • The icon color...W orXbuttons to change from gray to blue when a sub-menu is taken.) This LCD monitor has been adjusted to optimal settings before shipment. OSD Menu Functions All the function settings for this LCD monitor to its factory default settings. Changes are controlled via the control keys located on ...
User Manual
Page 13
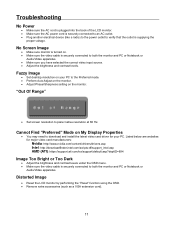
.... No Screen Image • Make sure monitor is turned on the monitor. Cannot Find "Preferred" Mode on your PC. Distorted Image • Reset the LCD monitor by performing the "Reset" function using the OSD. • Remove extra accessories (such as a VGA extension cord). 11 Fuzzy Image • Set... source. • Adjust the brightness and contrast levels. Troubleshooting No Power • Make sure the AC cord is plugged into the back of the LCD monitor. • Make sure the AC power cord is securely connected to an AC outlet. • Plug another electrical device (like a radio) ...
.... No Screen Image • Make sure monitor is turned on the monitor. Cannot Find "Preferred" Mode on your PC. Distorted Image • Reset the LCD monitor by performing the "Reset" function using the OSD. • Remove extra accessories (such as a VGA extension cord). 11 Fuzzy Image • Set... source. • Adjust the brightness and contrast levels. Troubleshooting No Power • Make sure the AC cord is plugged into the back of the LCD monitor. • Make sure the AC power cord is securely connected to an AC outlet. • Plug another electrical device (like a radio) ...


