
User Manual
Page 3
ATTACHING THE BASE STAND TO THE LCD MONITOR 6 2. CONNECT POWER CABLE 6 4. TURN THE POWER ON ...6 CONTROL PANEL BUTTONS 7 OSD MENU FUNCTIONS...8 QUICK ADJUSTMENTS...9 DISPLAY MODES ...10 TROUBLESHOOTING ...11 ... SCALED CORRECTLY 12 COLORS ARE INCORRECT 12 NO SOUND...12 HOW TO CONNECT A DVI-D INPUT TO THE MONITOR 12 ADDITIONAL QUESTIONS...12 1 CONTENTS IMPORTANT PRODUCT SAFETY INSTRUCTIONS 2 SAFETY GUIDELINES ...3 FCC COMPLIANCE STATEMENT 3 CLEANING THE LCD MONITOR 4 FEATURES...5 POWER SAVER ...5 PLUG & PLAY ...5 INSTALLATION ...6 PACKAGE CONTENTS ...6 1. CONNECT YOUR COMPUTER AND...
ATTACHING THE BASE STAND TO THE LCD MONITOR 6 2. CONNECT POWER CABLE 6 4. TURN THE POWER ON ...6 CONTROL PANEL BUTTONS 7 OSD MENU FUNCTIONS...8 QUICK ADJUSTMENTS...9 DISPLAY MODES ...10 TROUBLESHOOTING ...11 ... SCALED CORRECTLY 12 COLORS ARE INCORRECT 12 NO SOUND...12 HOW TO CONNECT A DVI-D INPUT TO THE MONITOR 12 ADDITIONAL QUESTIONS...12 1 CONTENTS IMPORTANT PRODUCT SAFETY INSTRUCTIONS 2 SAFETY GUIDELINES ...3 FCC COMPLIANCE STATEMENT 3 CLEANING THE LCD MONITOR 4 FEATURES...5 POWER SAVER ...5 PLUG & PLAY ...5 INSTALLATION ...6 PACKAGE CONTENTS ...6 1. CONNECT YOUR COMPUTER AND...

User Manual
Page 4
... the safety and operating instructions before you touch them . Your warranty does not cover repairs or attempted repairs by anyone not authorized by Westinghouse Digital Electronics. • If your LCD Monitor in installation such as vases, shall not be placed on power cord shall be readily accessible. Overloading Do not overload wall outlets...
... the safety and operating instructions before you touch them . Your warranty does not cover repairs or attempted repairs by anyone not authorized by Westinghouse Digital Electronics. • If your LCD Monitor in installation such as vases, shall not be placed on power cord shall be readily accessible. Overloading Do not overload wall outlets...

User Manual
Page 5
...cause harmful interference to radio or television reception, which the receiver is connected. • Consult the Westinghouse Service Center or an experienced radio/Monitor technician for your specific country. VDE Japan Electric Appliance Control Act IMPORTANT NOTICE CONCERNING POWER CORD SELECTION ...The specific power cord for power cords used , use only a shielded BNC (5) cable. For LCD Monitors that are placed on a circuit different from that to prevent electric shock. Use the following measures: • Reorient or relocate ...
...cause harmful interference to radio or television reception, which the receiver is connected. • Consult the Westinghouse Service Center or an experienced radio/Monitor technician for your specific country. VDE Japan Electric Appliance Control Act IMPORTANT NOTICE CONCERNING POWER CORD SELECTION ...The specific power cord for power cords used , use only a shielded BNC (5) cable. For LCD Monitors that are placed on a circuit different from that to prevent electric shock. Use the following measures: • Reorient or relocate ...

User Manual
Page 6
...Use a soft, dry cloth. 2. Disclaimer Westinghouse Digital Electronics does not recommend the use of non-ammonia, non-alcohol based, mild non- This removes dust and other particles. 2. Some chemical cleaners have been reported to damage the screen and/or LCD Monitor case. Wipe the screen with a clean,...-free cloth. If it still is not clean, apply a small amount of any ammonia or alcohol-based cleaners on the LCD Monitor screen or case. Westinghouse Digital Electronics will not be liable for damage resulting from the use of non-ammonia, non-alcohol based glass cleaner onto a...
...Use a soft, dry cloth. 2. Disclaimer Westinghouse Digital Electronics does not recommend the use of non-ammonia, non-alcohol based, mild non- This removes dust and other particles. 2. Some chemical cleaners have been reported to damage the screen and/or LCD Monitor case. Wipe the screen with a clean,...-free cloth. If it still is not clean, apply a small amount of any ammonia or alcohol-based cleaners on the LCD Monitor screen or case. Westinghouse Digital Electronics will not be liable for damage resulting from the use of non-ammonia, non-alcohol based glass cleaner onto a...

User Manual
Page 7
... system can use . Your computer system will return the original screen image. Slight movement of time, the system will turn off the LCD monitor power when not in Speakers (optional) • Power Saver • Plug & Play • Kensington Security Lock Compatible (optional) ...any key on the keyboard will identify and automatically adjust the LCD monitor. You can automatically adjust the LCD monitor. 5 If the LCD monitor has not been used with a VESA DPMS computer. The LCD monitor is installed inside the LCD monitor. Plug & Play VESA Plug and Play eliminates the complicated...
... system can use . Your computer system will return the original screen image. Slight movement of time, the system will turn off the LCD monitor power when not in Speakers (optional) • Power Saver • Plug & Play • Kensington Security Lock Compatible (optional) ...any key on the keyboard will identify and automatically adjust the LCD monitor. You can automatically adjust the LCD monitor. 5 If the LCD monitor has not been used with a VESA DPMS computer. The LCD monitor is installed inside the LCD monitor. Plug & Play VESA Plug and Play eliminates the complicated...
User Manual
Page 8
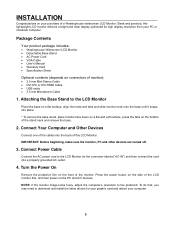
... Stand to download and install the latest drivers for high display resolution from your PC or notebook computer. Package Contents Your product package includes: • Westinghouse Widescreen LCD Monitor • Detachable Base Stand • AC Power Cord • VGA Cable • User's Manual • Warranty Card • Specification Sheet Optional contents (depends on...
... Stand to download and install the latest drivers for high display resolution from your PC or notebook computer. Package Contents Your product package includes: • Westinghouse Widescreen LCD Monitor • Detachable Base Stand • AC Power Cord • VGA Cable • User's Manual • Warranty Card • Specification Sheet Optional contents (depends on...

User Manual
Page 9
... when the OSD is displayed. • Move a selection left when the OSD is displayed. • Move a selection right when the OSD is a list of the LCD Monitor to switch between different video inputs or enter/exit the OSD menu. • Power On and Off button. 7 The OSD controls are defined in the...
... when the OSD is displayed. • Move a selection left when the OSD is displayed. • Move a selection right when the OSD is a list of the LCD Monitor to switch between different video inputs or enter/exit the OSD menu. • Power On and Off button. 7 The OSD controls are defined in the...

User Manual
Page 10
..., which applies to all signal timings. • The icon color will disappear automatically after approximately 10 seconds, if no action is taken.) This LCD monitor has been adjusted to blue when a sub-menu is detected. • CM Engine: Start with PC graphic card under Microsoft Windows Vista. &#...8226; DCR: To turn on the side of the monitor. • Reset: Restore this LCD monitor are saved automatically. • To exit the OSD menu press again. OSD Menu Functions All the function settings for this...
..., which applies to all signal timings. • The icon color will disappear automatically after approximately 10 seconds, if no action is taken.) This LCD monitor has been adjusted to blue when a sub-menu is detected. • CM Engine: Start with PC graphic card under Microsoft Windows Vista. &#...8226; DCR: To turn on the side of the monitor. • Reset: Restore this LCD monitor are saved automatically. • To exit the OSD menu press again. OSD Menu Functions All the function settings for this...

User Manual
Page 13
Troubleshooting No Power • Make sure the AC cord is plugged into the back of the LCD monitor. • Make sure the AC power cord is securely connected to an AC outlet. • Plug another electrical device (like a radio) to the power outlet ... or Notebook or Audio/Video apparatus. No Screen Image • Make sure monitor is turned on. • Make sure the video cable is supplying the proper voltage. Fuzzy Image • Set desktop resolution on the monitor. Distorted Image • Reset the LCD monitor by performing the "Reset" function using the OSD. • Remove extra...
Troubleshooting No Power • Make sure the AC cord is plugged into the back of the LCD monitor. • Make sure the AC power cord is securely connected to an AC outlet. • Plug another electrical device (like a radio) to the power outlet ... or Notebook or Audio/Video apparatus. No Screen Image • Make sure monitor is turned on. • Make sure the video cable is supplying the proper voltage. Fuzzy Image • Set desktop resolution on the monitor. Distorted Image • Reset the LCD monitor by performing the "Reset" function using the OSD. • Remove extra...


