

English Manual
Page 3
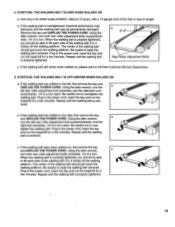
... in general. 19. Do not place the treadmill on any surface that all times. 7, The treadmill should be able to safely lift 45 pounds (20 kg) in the treadmill. Never move the walking belt while the power is turned off " position when the treadmill is not in length. Adjust the speed in... speed. 16. To reduce the risk of the owner to raise, lower, or move the treadmill. 20. perso read e following ...
... in general. 19. Do not place the treadmill on any surface that all times. 7, The treadmill should be able to safely lift 45 pounds (20 kg) in the treadmill. Never move the walking belt while the power is turned off " position when the treadmill is not in length. Adjust the speed in... speed. 16. To reduce the risk of the owner to raise, lower, or move the treadmill. 20. perso read e following ...
English Manual
Page 5
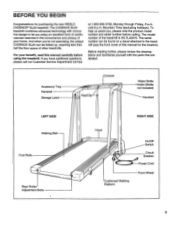
...Tray Handrail Storage Latch Console Key/Clip Water Bottle Holder (Bottle not included) Handrail LEFT SIDE Walking Belt Foot Rails Rear Roller Adjustment Bolts RIGHT SIDE Hood Cushioned Walking Platform On/Off Switch Circuit Breaker Power Cord Front Wheel 5 The model number of this manual ... Friday, 6 a.m. If you 're not exercising, the unique CADENCE SL20 can be folded up, requiring less than half the floor space of your benefit, read this manual for purchasing the new WESLO CADENCES SL20 treadmill. Mountain Time (excluding holidays). To help us assist you enjoy ...
...Tray Handrail Storage Latch Console Key/Clip Water Bottle Holder (Bottle not included) Handrail LEFT SIDE Walking Belt Foot Rails Rear Roller Adjustment Bolts RIGHT SIDE Hood Cushioned Walking Platform On/Off Switch Circuit Breaker Power Cord Front Wheel 5 The model number of this manual ... Friday, 6 a.m. If you 're not exercising, the unique CADENCE SL20 can be folded up, requiring less than half the floor space of your benefit, read this manual for purchasing the new WESLO CADENCES SL20 treadmill. Mountain Time (excluding holidays). To help us assist you enjoy ...
English Manual
Page 7
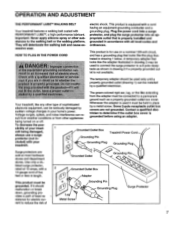
... temporary adapter that looks like the adapter illustrated in drawing 2 may be used to connect the surge protector to the walking belt or the walking platform. The green-colored rigid ear, lug, or the like any other type of five % feet or less in...by sudden voltage changes in place by a qualified electrician. To decrease the pos- OPERATION AND ADJUSTMENT THE PERFORMANT LUBETu WALKING BELT Your treadmill features a walking belt coated with your treadmill. Contact a qualified electrician to a permanent ground such as shown in accordance with a cord having an equipment-grounding ...
... temporary adapter that looks like the adapter illustrated in drawing 2 may be used to connect the surge protector to the walking belt or the walking platform. The green-colored rigid ear, lug, or the like any other type of five % feet or less in...by sudden voltage changes in place by a qualified electrician. To decrease the pos- OPERATION AND ADJUSTMENT THE PERFORMANT LUBETu WALKING BELT Your treadmill features a walking belt coated with your treadmill. Contact a qualified electrician to a permanent ground such as shown in accordance with a cord having an equipment-grounding ...
English Manual
Page 8
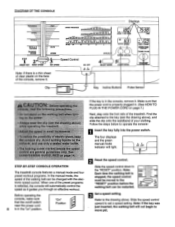
... the key is stopped, the speed control SPE must be restarted. STEP-BY-STEP CONSOLE OPERATION The treadmill console features a manual mode and four preset workout programs. In the manual mode, the speed of the treadmill. Slide the speed control upward to operate the console: Insert the key fully into the power... SET SPEED Note: If there is in . (See HOW TO PLUG IN THE POWER CORD on page 7.) Next, step onto the foot rails of the walking belt can be moved to the key (see the drawing above . Follow the steps below to set a speed setting. Refer to move yet. DIAGRAM OF THE...
... the key is stopped, the speed control SPE must be restarted. STEP-BY-STEP CONSOLE OPERATION The treadmill console features a manual mode and four preset workout programs. In the manual mode, the speed of the treadmill. Slide the speed control upward to operate the console: Insert the key fully into the power... SET SPEED Note: If there is in . (See HOW TO PLUG IN THE POWER CORD on page 7.) Next, step onto the foot rails of the walking belt can be moved to the key (see the drawing above . Follow the steps below to set a speed setting. Refer to move yet. DIAGRAM OF THE...
English Manual
Page 9
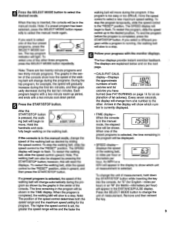
... graphs in the center of the preset programs is selected, the time remaining in If the console is currently displayed. one of the walking belt, in the program will be shown. The top program indicator will be will selected, press the SELECT MODE button repeat- press the...the "RESET" position, slide it upward, and of the the START/STOP button while inserting the key walking belt will change the completed, the walking belt will move . To stop . Note: The walking belt can also be displayed. Remove and then reinsert The position of both the the key. ter of ...
... graphs in the center of the preset programs is selected, the time remaining in If the console is currently displayed. one of the walking belt, in the program will be shown. The top program indicator will be will selected, press the SELECT MODE button repeat- press the...the "RESET" position, slide it upward, and of the the START/STOP button while inserting the key walking belt will change the completed, the walking belt will move . To stop . Note: The walking belt can also be displayed. Remove and then reinsert The position of both the the key. ter of ...
English Manual
Page 13
... CORD. If the walking belt has shifted to overtighten the walking belt. Plug in the power cord, insert the key and run the treadmill for a few minutes. Be careful to keep the walking belt centered. b. Be careful to keep the walking belt centered. Repeat until the walking belt is centered. Repeat until the walking belt is centered. If the walking belt has shifted to 4 inches...
... CORD. If the walking belt has shifted to overtighten the walking belt. Plug in the power cord, insert the key and run the treadmill for a few minutes. Be careful to keep the walking belt centered. b. Be careful to keep the walking belt centered. Repeat until the walking belt is centered. Repeat until the walking belt is centered. If the walking belt has shifted to 4 inches...

English Manual
Page 18
... 73 1 Allen Wrench 74 1 Adhesive Clip 75 1 Left Foot Rail 76 1 Rear Roller 77 4 Platform Screw 78 1 Latch Catch 79 1 Walking Platform 80 1 Walking Belt 81 1 Front Roller Adjustment Bolt 82 1 Shock 83 1 Right Foot Rail 84 1 Sensor Clip 85 1 Front Roller/Pulley 86 1 Reed Switch ...Handrail Cap Handrail Nut Battery Cover Incline Motor Console Assembly Storage Latch Speed Potentiometer Upright/Base Handrail Bolt Handrail Washer Motor Belt Motor Swivel Nut Motor/Pulley/Flywheel/Fan Pulley/FlywheeVFan Motor Motor Tension Bolt/Incline Bolt Motor Tension Washer Motor Tension ...
... 73 1 Allen Wrench 74 1 Adhesive Clip 75 1 Left Foot Rail 76 1 Rear Roller 77 4 Platform Screw 78 1 Latch Catch 79 1 Walking Platform 80 1 Walking Belt 81 1 Front Roller Adjustment Bolt 82 1 Shock 83 1 Right Foot Rail 84 1 Sensor Clip 85 1 Front Roller/Pulley 86 1 Reed Switch ...Handrail Cap Handrail Nut Battery Cover Incline Motor Console Assembly Storage Latch Speed Potentiometer Upright/Base Handrail Bolt Handrail Washer Motor Belt Motor Swivel Nut Motor/Pulley/Flywheel/Fan Pulley/FlywheeVFan Motor Motor Tension Bolt/Incline Bolt Motor Tension Washer Motor Tension ...


