

English Manual
Page 1
... TOLL-FREE CUSTOMER HOT LINE. The trained technicians on our Customer Hot Line will guarantee complete satisfaction through direct assistance from our factory. If you . CUSTOMER HOT LINE: 1-800-999-3756 Mon.-Fri., 6 a.m.-6 p.m. Serial Number Decal QUESTIONS? WLTL42070 Serial No. MST \546E0,, SEP 0 8 1991 -474e/ /FA 3120 :4> •=9: .gi x• ... • - 5•& !:• ns. 01futurereferer USER'S MANUAL Model No...
... TOLL-FREE CUSTOMER HOT LINE. The trained technicians on our Customer Hot Line will guarantee complete satisfaction through direct assistance from our factory. If you . CUSTOMER HOT LINE: 1-800-999-3756 Mon.-Fri., 6 a.m.-6 p.m. Serial Number Decal QUESTIONS? WLTL42070 Serial No. MST \546E0,, SEP 0 8 1991 -474e/ /FA 3120 :4> •=9: .gi x• ... • - 5•& !:• ns. 01futurereferer USER'S MANUAL Model No...

English Manual
Page 2
0 6120 TABLE OF CONTENTS IMPORTANT PRECAUTIONS BEFORE YOU BEGIN ASSEMBLY OPERATION AND ADJUSTMENT HOW TO FOLD AND MOVE THE TREADMILL MAINTENANCE AND TROUBLE-SHOOTING CONDITIONING GUIDELINES ORDERING REPLACEMENT PARTS LIMITED WARRANTY 3 5 6 7 10 12 14 Back Cover Back Cover Note: An EXPLODED DRAWING and a PART LIST are attached to the center of this manual. Please save them for future reference. 2
0 6120 TABLE OF CONTENTS IMPORTANT PRECAUTIONS BEFORE YOU BEGIN ASSEMBLY OPERATION AND ADJUSTMENT HOW TO FOLD AND MOVE THE TREADMILL MAINTENANCE AND TROUBLE-SHOOTING CONDITIONING GUIDELINES ORDERING REPLACEMENT PARTS LIMITED WARRANTY 3 5 6 7 10 12 14 Back Cover Back Cover Note: An EXPLODED DRAWING and a PART LIST are attached to the center of this manual. Please save them for future reference. 2

English Manual
Page 3
.... When connecting the power cord (see HOW TO PLUG IN THE POWER CORD on the walking belt. Inspect and tighten all warnings and precautions. 2. Use the treadmill only as an exercise aid in determining heart rate trends in length. Always remove the key and move the treadmill. 20. Never start the treadmill while you are recommended for the location of the on any surface that all users of this manual. 3 Place the treadmill on...
.... When connecting the power cord (see HOW TO PLUG IN THE POWER CORD on the walking belt. Inspect and tighten all warnings and precautions. 2. Use the treadmill only as an exercise aid in determining heart rate trends in length. Always remove the key and move the treadmill. 20. Never start the treadmill while you are recommended for the location of the on any surface that all users of this manual. 3 Place the treadmill on...
English Manual
Page 4
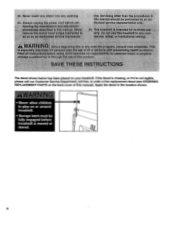
... a o . ever wnef! If the decal is missing, or if it is moved or stored. 4 Apply the decal in the location shown. • Never allow children to play on or around treadmill. • Storage latch must be fully engaged before treadmill is not legible, please call our Customer Service Department, toll-free, to order a free replacement decal (see ORDERING REPLACEMENT PARTS on your...
... a o . ever wnef! If the decal is missing, or if it is moved or stored. 4 Apply the decal in the location shown. • Never allow children to play on or around treadmill. • Storage latch must be fully engaged before treadmill is not legible, please call our Customer Service Department, toll-free, to order a free replacement decal (see ORDERING REPLACEMENT PARTS on your...
English Manual
Page 5
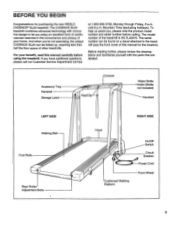
... Customer Service Department toll-free at 1-800-999-3756, Monday through Friday, 6 a.m. Accessory Tray Handrail Storage Latch Console Key/Clip Water Bottle Holder (Bottle not included) Handrail LEFT SIDE Walking Belt Foot Rails Rear Roller Adjustment Bolts RIGHT SIDE Hood Cushioned Walking Platform On/Off Switch Circuit Breaker Power Cord Front Wheel 5 If you , please note the product model number and serial number before using the treadmill. The serial number can be found on a decal attached...
... Customer Service Department toll-free at 1-800-999-3756, Monday through Friday, 6 a.m. Accessory Tray Handrail Storage Latch Console Key/Clip Water Bottle Holder (Bottle not included) Handrail LEFT SIDE Walking Belt Foot Rails Rear Roller Adjustment Bolts RIGHT SIDE Hood Cushioned Walking Platform On/Off Switch Circuit Breaker Power Cord Front Wheel 5 If you , please note the product model number and serial number before using the treadmill. The serial number can be found on a decal attached...

English Manual
Page 6
... overtighten the Screws. 14 12 3. Be careful not to HOW TO LOWER THE TREADMILL FOR USE on page 11. Press the Allen Wrench (73) into the treadmill. Do not dispose of the Uprights (14) in 3 the indicated location. Follow the instructions in a cleared area and remove all parts are on the floor. 41 36 34 2. Attach the Storage Latch (12) to lower the 2 treadmill. Press the Adhesive...
... overtighten the Screws. 14 12 3. Be careful not to HOW TO LOWER THE TREADMILL FOR USE on page 11. Press the Allen Wrench (73) into the treadmill. Do not dispose of the Uprights (14) in 3 the indicated location. Follow the instructions in a cleared area and remove all parts are on the floor. 41 36 34 2. Attach the Storage Latch (12) to lower the 2 treadmill. Press the Adhesive...
English Manual
Page 7
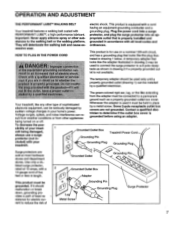
... can be used it should be installed by sudden voltage changes in your treadmill. Grounded Outlet Box Grounding Pin Treadmill Power Cord cluded) with all local codes and ordinances. Use only a UL- listed surge protector, rated at most hardware Grounded Outlet Grounding Pin stores and department stores. HOW TO PLUG IN THE POWER CORD Inert - This product is properly installed and grounded in accordance with your home's power. Contact...
... can be used it should be installed by sudden voltage changes in your treadmill. Grounded Outlet Box Grounding Pin Treadmill Power Cord cluded) with all local codes and ordinances. Use only a UL- listed surge protector, rated at most hardware Grounded Outlet Grounding Pin stores and department stores. HOW TO PLUG IN THE POWER CORD Inert - This product is properly installed and grounded in accordance with your home's power. Contact...
English Manual
Page 8
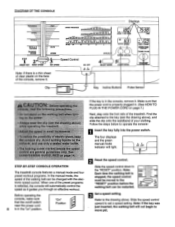
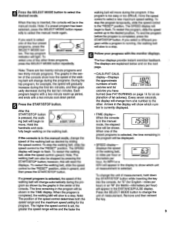
... Key Incline Buttons Pulse Sensor ow n. 'OW era an A::F;k3reo, n e r es eln s• If the key is in . (See HOW TO PLUG IN THE POWER CORD on /off switch near the power cord 8 is stopped, the speed control SPE must be moved to the "RESET" position before the 2 walking belt can be restarted. Make sure that the on page 7.) Next, step onto the foot rails of the treadmill. STEP-BY-STEP CONSOLE OPERATION The treadmill console...
... Key Incline Buttons Pulse Sensor ow n. 'OW era an A::F;k3reo, n e r es eln s• If the key is in . (See HOW TO PLUG IN THE POWER CORD on /off switch near the power cord 8 is stopped, the speed control SPE must be moved to the "RESET" position before the 2 walking belt can be restarted. Make sure that the on page 7.) Next, step onto the foot rails of the treadmill. STEP-BY-STEP CONSOLE OPERATION The treadmill console...
English Manual
Page 9
... C LL-i SPEED START/STOP button; press the SELECT MODE button repeatedly. display-Displays ing belt will change automatically during the pro- the approximate numbers of measurement. and ends with the monitor displays. other three programs, The four displays provide instant exercise feedback. into the console. To restart the program, slide the speed edly to the "RESET" position. To stop the program temporarily, slide the speed control manual mode. Note: unit of both the the key. To When the key is...
... C LL-i SPEED START/STOP button; press the SELECT MODE button repeatedly. display-Displays ing belt will change automatically during the pro- the approximate numbers of measurement. and ends with the monitor displays. other three programs, The four displays provide instant exercise feedback. into the console. To restart the program, slide the speed edly to the "RESET" position. To stop the program temporarily, slide the speed control manual mode. Note: unit of both the the key. To When the key is...

English Manual
Page 10
... displayed in the locations shown at this mode, hold down the START/ STOP button while inserting the key into the console. Make sure that your hands in miles. If DIST. / PULSE the MPH indicator appears in the SPEED display, the distance will be able to safely lift 45 pounds (20 kg) in distance you raise the treadmill, make sure to raise, lower, or move the on the sensor...
... displayed in the locations shown at this mode, hold down the START/ STOP button while inserting the key into the console. Make sure that your hands in miles. If DIST. / PULSE the MPH indicator appears in the SPEED display, the distance will be able to safely lift 45 pounds (20 kg) in distance you raise the treadmill, make sure to raise, lower, or move the on the sensor...
English Manual
Page 11
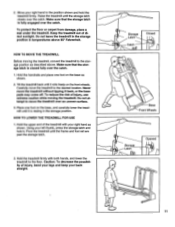
... lower the treadmill to the desired location. HOW TO MOVE THE TREADMILL Before moving the treadmill. Hold the handrails and place one foot on the base as shown. 2. HOW TO LOWER THE TREADMILL FOR USE 1. To protect the floor or carpet from damage, place a mat under the treadmill. Storage Latch Catch Closed Base Front Wheels Storage Latch 17fln Opened 11 To reduce the risk of direct sunlight...
... lower the treadmill to the desired location. HOW TO MOVE THE TREADMILL Before moving the treadmill. Hold the handrails and place one foot on the base as shown. 2. HOW TO LOWER THE TREADMILL FOR USE 1. To protect the floor or carpet from damage, place a mat under the treadmill. Storage Latch Catch Closed Base Front Wheels Storage Latch 17fln Opened 11 To reduce the risk of direct sunlight...
English Manual
Page 12
... and the Reed Switch is needed, please call our Customer Service Department, toll-free. 3. MAINTENANCE AND TROUBLE-SHOOTING Most treadmill problems can be in the "on the treadmill near the power cord. After the power cord has been plugged in, make sure that applies, and follow the steps listed. Remove the key from the hood. Turn the Pulley until 6 p.m. b. If necessary, loosen the Screw (35) and move the Reed Switch slightly. Check the circuit breaker located on...
... and the Reed Switch is needed, please call our Customer Service Department, toll-free. 3. MAINTENANCE AND TROUBLE-SHOOTING Most treadmill problems can be in the "on the treadmill near the power cord. After the power cord has been plugged in, make sure that applies, and follow the steps listed. Remove the key from the hood. Turn the Pulley until 6 p.m. b. If necessary, loosen the Screw (35) and move the Reed Switch slightly. Check the circuit breaker located on...
English Manual
Page 13
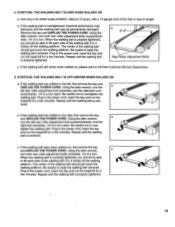
... remove the key and UNPLUG THE POWER CORD. b. b. Repeat until the walking belt is properly tightened. 13 If the walking belt has shifted to the right, first remove the key and UNPLUG THE POWER CORD. Using the alien wrench, turn both rear roller adjustment bolts clockwise, 1/4 of a turn . If the walking belt slips when walked on , please call our toll-free Customer Service Department. 5. Plug in the power cord, insert the key and run the treadmill for a few minutes. SYMPTOM: THE WALKING BELT...
... remove the key and UNPLUG THE POWER CORD. b. b. Repeat until the walking belt is properly tightened. 13 If the walking belt has shifted to the right, first remove the key and UNPLUG THE POWER CORD. Using the alien wrench, turn both rear roller adjustment bolts clockwise, 1/4 of a turn . If the walking belt slips when walked on , please call our toll-free Customer Service Department. 5. Plug in the power cord, insert the key and run the treadmill for a few minutes. SYMPTOM: THE WALKING BELT...

English Manual
Page 14
... kept at the top of your body uses easily accessible carbohydrate calories for aerobic exercise can find your training zone in the table at a level between 70% and 85% of time. During the first few minutes of time. If your pulse is to burn fat, adjust the speed control on the console to AEROBIC to plan your goal is...
... kept at the top of your body uses easily accessible carbohydrate calories for aerobic exercise can find your training zone in the table at a level between 70% and 85% of time. During the first few minutes of time. If your pulse is to burn fat, adjust the speed control on the console to AEROBIC to plan your goal is...
English Manual
Page 15
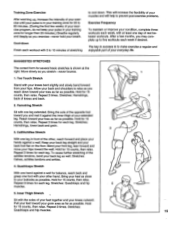
... 15 counts, then relax. Repeat 3 times for each leg. Training Zone Exercise After warming up to five workouts each week, with at the right. Cool-down toward your extended leg. Bend your front leg, lean forward and move your back foot flat on the floor. Repeat 3 times...form for several basic stretches is in your groin area as far as possible. Pull your feet toward you may complete up , increase the intensity of the achilles tendons, bend your knees outward. Stretches: Quadriceps and hip muscles. 2 4 15 After a few weeks of your exercise program, do not keep your pulse...
... 15 counts, then relax. Repeat 3 times for each leg. Training Zone Exercise After warming up to five workouts each week, with at the right. Cool-down toward your extended leg. Bend your front leg, lean forward and move your back foot flat on the floor. Repeat 3 times...form for several basic stretches is in your groin area as far as possible. Pull your feet toward you may complete up , increase the intensity of the achilles tendons, bend your knees outward. Stretches: Quadriceps and hip muscles. 2 4 15 After a few weeks of your exercise program, do not keep your pulse...

English Manual
Page 16
... allow the exclusion or limitation of ICON Health & Fitness, Inc. WESLO is made must be prepared to give the following information: • The MODEL NUMBER OF THE PRODUCT (WLTL42070). • The NAME OF THE PRODUCT (WESLO CADENCE® SL20 treadmill). • The SERIAL NUMBER OF THE PRODUCT (see the front cover of this manual). • The KEY NUMBER OF THE PART(S) (see the EXPLODED DRAWING and PART LIST attached to the center...
... allow the exclusion or limitation of ICON Health & Fitness, Inc. WESLO is made must be prepared to give the following information: • The MODEL NUMBER OF THE PRODUCT (WLTL42070). • The NAME OF THE PRODUCT (WESLO CADENCE® SL20 treadmill). • The SERIAL NUMBER OF THE PRODUCT (see the front cover of this manual). • The KEY NUMBER OF THE PART(S) (see the EXPLODED DRAWING and PART LIST attached to the center...

English Manual
Page 17
For information about ordering replacement parts, see the back cover of the User's Manual. REMOVE THIS EXPLODED DRAWING AND PART LIST FROM THE MANUAL. Save this page for future reference. o Note: Specifications are subject to change without notice.
For information about ordering replacement parts, see the back cover of the User's Manual. REMOVE THIS EXPLODED DRAWING AND PART LIST FROM THE MANUAL. Save this page for future reference. o Note: Specifications are subject to change without notice.

English Manual
Page 18
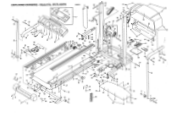
...Pivot Bolt Rear Isolator Screw Console Base Lower Handrail Cap Handrail Nut Battery Cover Incline Motor Console Assembly Storage Latch Speed Potentiometer Upright/Base Handrail Bolt Handrail Washer Motor Belt Motor Swivel Nut Motor/Pulley/Flywheel/Fan Pulley/FlywheeVFan Motor Motor Tension Bolt/Incline Bolt Motor Tension Washer Motor Tension Star Washer Motor Swivel Bolt Wire Harness Ground Wire Screw Hood Hood Shield Screw Latch Decal Handrail Frame Pivot Bolt Extension Leg Screw Electronics Screw Base Pad Wheel Bolt Wheel Speed Control Knob Controller Extension Leg Circuit Breaker Power Cord...
...Pivot Bolt Rear Isolator Screw Console Base Lower Handrail Cap Handrail Nut Battery Cover Incline Motor Console Assembly Storage Latch Speed Potentiometer Upright/Base Handrail Bolt Handrail Washer Motor Belt Motor Swivel Nut Motor/Pulley/Flywheel/Fan Pulley/FlywheeVFan Motor Motor Tension Bolt/Incline Bolt Motor Tension Washer Motor Tension Star Washer Motor Swivel Bolt Wire Harness Ground Wire Screw Hood Hood Shield Screw Latch Decal Handrail Frame Pivot Bolt Extension Leg Screw Electronics Screw Base Pad Wheel Bolt Wheel Speed Control Knob Controller Extension Leg Circuit Breaker Power Cord...
English Manual
Page 19
EXPLODED DRAWING-Model No. I1 80 79 \ 91 34 5 4 46 28 29 35 35 40 35 61 59 33 74 72 75 62 90 76 31 47 65 ...
EXPLODED DRAWING-Model No. I1 80 79 \ 91 34 5 4 46 28 29 35 35 40 35 61 59 33 74 72 75 62 90 76 31 47 65 ...

