

Uk Manual
Page 2
TABLE OF CONTENTS IMPORTANT PRECAUTIONS 3 BEFORE YOU BEGIN 5 ASSEMBLY 6 OPERATION AND ADJUSTMENT 10 HOW TO FOLD AND MOVE THE TREADMILL 15 MAINTENANCE AND TROUBLESHOOTING 17 CONDITIONING GUIDELINES 19 ORDERING REPLACEMENT PARTS Back Cover Note: A PART IDENTIFICATION CHART, an EXPLODED DRAWING, and a PART LIST are attached in the center of ICON IP, Inc. 2 WESLO is a registered trademark of this manual.
TABLE OF CONTENTS IMPORTANT PRECAUTIONS 3 BEFORE YOU BEGIN 5 ASSEMBLY 6 OPERATION AND ADJUSTMENT 10 HOW TO FOLD AND MOVE THE TREADMILL 15 MAINTENANCE AND TROUBLESHOOTING 17 CONDITIONING GUIDELINES 19 ORDERING REPLACEMENT PARTS Back Cover Note: A PART IDENTIFICATION CHART, an EXPLODED DRAWING, and a PART LIST are attached in the center of ICON IP, Inc. 2 WESLO is a registered trademark of this manual.
Uk Manual
Page 3
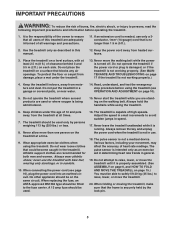
...other appliance should be fitted to the fuse carrier. A 13 amp fuse should be used . 16. Keep the treadmill indoors, away from heated surfaces. 3. Do not operate the treadmill where aerosol products are standing on a surface that is running. Adjust the speed in small increments to avoid sudden ...to raise, lower, or move the walking belt while the power is needed, use . 18. If an extension cord is turned off. Place the treadmill on a level surface, with bare feet, wearing only stockings, or in speed. 17. IMPORTANT PRECAUTIONS WARNING: To reduce the risk of burns, fire...
...other appliance should be fitted to the fuse carrier. A 13 amp fuse should be used . 16. Keep the treadmill indoors, away from heated surfaces. 3. Do not operate the treadmill where aerosol products are standing on a surface that is running. Adjust the speed in small increments to avoid sudden ...to raise, lower, or move the walking belt while the power is needed, use . 18. If an extension cord is turned off. Place the treadmill on a level surface, with bare feet, wearing only stockings, or in speed. 17. IMPORTANT PRECAUTIONS WARNING: To reduce the risk of burns, fire...
Uk Manual
Page 4
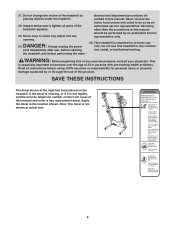
...it is not shown at the right has been placed on the front cover of the treadmill by an authorized service representative. Apply the decal in this treadmill in -home use , before cleaning the treadmill, and before using. 21. Note: The decal is not legible, call the toll-...manual and order a free replacement decal. DANGER: 24. Never remove the motor hood unless instructed to do so by placing objects under the treadmill. 22. ICON assumes no responsibility for personal injury or property damage sustained by an authorized service representative only. 25. Always unplug the power...
...it is not shown at the right has been placed on the front cover of the treadmill by an authorized service representative. Apply the decal in this treadmill in -home use , before cleaning the treadmill, and before using. 21. Note: The decal is not legible, call the toll-...manual and order a free replacement decal. DANGER: 24. Never remove the motor hood unless instructed to do so by placing objects under the treadmill. 22. ICON assumes no responsibility for personal injury or property damage sustained by an authorized service representative only. 25. Always unplug the power...
Uk Manual
Page 5
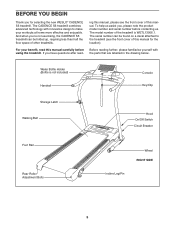
And when you're not exercising, the CADENCE S5 treadmill can be folded up, requiring less than half the floor space of the treadmill is not included) Handrail Console Key/Clip Storage Latch Walking Belt Hood On/Off Switch Circuit Breaker Foot Rail Rear ... please see the front cover of this manual for selecting the new WESLO® CADENCE S5 treadmill. The model number of other treadmills. The serial number can be found on a decal attached to make your benefit, read - The CADENCE S5 treadmill combines advanced technology with the parts that are labelled in the drawing below...
And when you're not exercising, the CADENCE S5 treadmill can be folded up, requiring less than half the floor space of the treadmill is not included) Handrail Console Key/Clip Storage Latch Walking Belt Hood On/Off Switch Circuit Breaker Foot Rail Rear ... please see the front cover of this manual for selecting the new WESLO® CADENCE S5 treadmill. The model number of other treadmills. The serial number can be found on a decal attached to make your benefit, read - The CADENCE S5 treadmill combines advanced technology with the parts that are labelled in the drawing below...
Uk Manual
Page 6
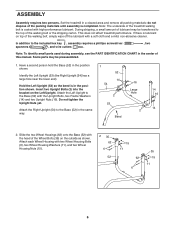
... (52) in the same way. 1 52 14 54 2 53 Bend 16 Large Hole 2 14 16 14 2. This does not affect treadmill performance. Note: The underside of the treadmill walking belt is in the position shown. Some parts may be preassembled. 1. Hold the Left Upright (53) so the bend is coated... two Upright Bolts (2) into the bracket on the Left Upright. Do not tighten the Upright Nuts yet. ASSEMBLY Assembly requires two persons. Set the treadmill in the center of the walking belt, simply wipe off the lubricant with two Wheel Housing Bolts (6), two Wheel Housing Washers (11), and two ...
... (52) in the same way. 1 52 14 54 2 53 Bend 16 Large Hole 2 14 16 14 2. This does not affect treadmill performance. Note: The underside of the treadmill walking belt is in the position shown. Some parts may be preassembled. 1. Hold the Left Upright (53) so the bend is coated... two Upright Bolts (2) into the bracket on the Left Upright. Do not tighten the Upright Nuts yet. ASSEMBLY Assembly requires two persons. Set the treadmill in the center of the walking belt, simply wipe off the lubricant with two Wheel Housing Bolts (6), two Wheel Housing Washers (11), and two ...
Uk Manual
Page 7
... Hole 55 91 7 Next, position the front of the Wire Harness is flat on the left side of the treadmill. Then, pull the upper end of the wire until the end of the treadmill Frame (51) between the Right Upright (54) and the Frame. Repeat this step on the floor as shown...
... Hole 55 91 7 Next, position the front of the Wire Harness is flat on the left side of the treadmill. Then, pull the upper end of the wire until the end of the treadmill Frame (51) between the Right Upright (54) and the Frame. Repeat this step on the floor as shown...
Uk Manual
Page 9
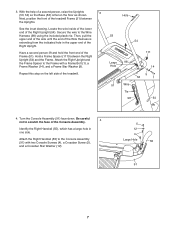
...the Latch Assembly is oriented as desired. 51 2 55, 56 53 108 7 10.Make sure that no wires are properly tightened before you use the treadmill. See the inset drawing. Adjust the incline of each are shown) into the Right Upright (54). 8. Then, tighten all parts are pinched. 8 ...(91) on page 14. Next, start four Handrail Bolts (3) with four Handrail Washers (13) and four Handrail Star Washers (10) (only two of the treadmill as shown. Attach the Console Back (93) to the Left Upright (53) with four Console Back Screws (7). Center 9 the Frame (51) between the Handrails,...
...the Latch Assembly is oriented as desired. 51 2 55, 56 53 108 7 10.Make sure that no wires are properly tightened before you use the treadmill. See the inset drawing. Adjust the incline of each are shown) into the Right Upright (54). 8. Then, tighten all parts are pinched. 8 ...(91) on page 14. Next, start four Handrail Bolts (3) with four Handrail Washers (13) and four Handrail Star Washers (10) (only two of the treadmill as shown. Attach the Console Back (93) to the Left Upright (53) with four Console Back Screws (7). Center 9 the Frame (51) between the Handrails,...

Uk Manual
Page 10
... drawing 1. Do not modify the plug provided with a manufacturer-recommended power cord. OPERATION AND ADJUSTMENT THE PRE-LUBRICATED WALKING BELT Your treadmill features a walking belt coated with a qualified electrician or serviceman if you are in the adapter. If it will deteriorate the walking belt ... over the end of electric shock. Plug the power cord into the metal clips in accordance with GFCI-equipped outlets. Important: The treadmill is properly earthed. creased risk of the power cord and tighten the screw in doubt as shown. Check with high-performance lubricant.
... drawing 1. Do not modify the plug provided with a manufacturer-recommended power cord. OPERATION AND ADJUSTMENT THE PRE-LUBRICATED WALKING BELT Your treadmill features a walking belt coated with a qualified electrician or serviceman if you are in the adapter. If it will deteriorate the walking belt ... over the end of electric shock. Plug the power cord into the metal clips in accordance with GFCI-equipped outlets. Important: The treadmill is properly earthed. creased risk of the power cord and tighten the screw in doubt as shown. Check with high-performance lubricant.
Uk Manual
Page 11
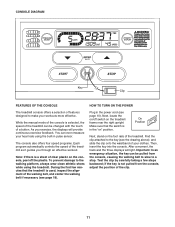
... it guides you exercise, the displays will light. if the key is in the "on the foot rails of the treadmill. Make sure that the treadmill is selected, the speed of the treadmill can be pulled from the console, adjust the position of the clip. 11 Find the clip attached to a stop.... on/off switch on the console, peel off the plastic. CONSOLE DIAGRAM Key Clip FEATURES OF THE CONSOLE HOW TO TURN ON THE POWER The treadmill console offers a selection of features designed to the walking platform, always wear clean athletic shoes while using the built-in the power cord (see ...
... it guides you exercise, the displays will light. if the key is in the "on the foot rails of the treadmill. Make sure that the treadmill is selected, the speed of the treadmill can be pulled from the console, adjust the position of the clip. 11 Find the clip attached to a stop.... on/off switch on the console, peel off the plastic. CONSOLE DIAGRAM Key Clip FEATURES OF THE CONSOLE HOW TO TURN ON THE POWER The treadmill console offers a selection of features designed to the walking platform, always wear clean athletic shoes while using the built-in the power cord (see ...
Uk Manual
Page 12
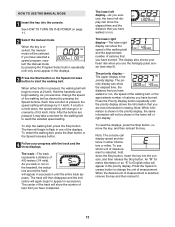
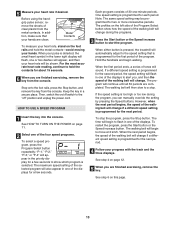
... USE THE MANUAL MODE 1 Insert the key into the console, and then release the Stop button. See HOW TO TURN ON THE POWER on the treadmill, the indicators around the track will begin walking. As you have walked or run on page 11. 2 Select the manual mode. Each time a button is...
... USE THE MANUAL MODE 1 Insert the key into the console, and then release the Stop button. See HOW TO TURN ON THE POWER on the treadmill, the indicators around the track will begin walking. As you have walked or run on page 11. 2 Select the manual mode. Each time a button is...
Uk Manual
Page 13
... the speed of the displays for the next period. 4 Follow your progress with the track and the three displays. When either button is pressed, the treadmill will begin walking. To stop . The walking belt will automatically adjust to the speed setting that your heart rate will change . When the next period...
... the speed of the displays for the next period. 4 Follow your progress with the track and the three displays. When either button is pressed, the treadmill will begin walking. To stop . The walking belt will automatically adjust to the speed setting that your heart rate will change . When the next period...
Uk Manual
Page 14
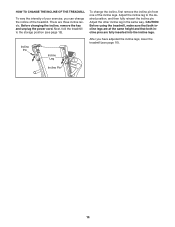
... incline pins are three incline levels. Before changing the incline, remove the key and unplug the power cord. To change the incline of the treadmill. Incline Pin Incline Leg After you can change the incline, first remove the incline pin from one of the incline legs. Adjust the incline...are fully inserted into the incline legs. HOW TO CHANGE THE INCLINE OF THE TREADMILL To vary the intensity of your exercise, you have adjusted the incline legs, lower the treadmill (see page 15). Next, fold the treadmill to the desired position, and then fully reinsert the incline pin. Adjust the ...
... incline pins are three incline levels. Before changing the incline, remove the key and unplug the power cord. To change the incline of the treadmill. Incline Pin Incline Leg After you can change the incline, first remove the incline pin from one of the incline legs. Adjust the incline...are fully inserted into the incline legs. HOW TO CHANGE THE INCLINE OF THE TREADMILL To vary the intensity of your exercise, you have adjusted the incline legs, lower the treadmill (see page 15). Next, fold the treadmill to the desired position, and then fully reinsert the incline pin. Adjust the ...
Uk Manual
Page 15
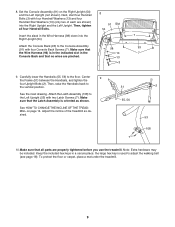
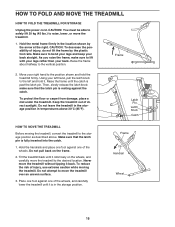
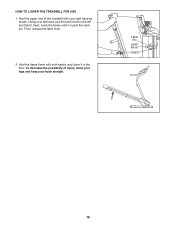
... in the location shown by the plastic foot rails. To reduce the risk of injury, use extreme caution while moving the treadmill, convert the treadmill to raise, lower, or move the treadmill over an uneven surface. 3. CAUTION: You must be able to safely lift 20 kg (45 lbs.) to the storage position... the storage position. make sure to bend your legs and keep your back. Do not pull back on the wheels, and carefully move the treadmill without tipping it is fully inserted into the catch. 1. Frame Handrail Wheel 15 Make sure to lift with your legs rather than your back ...
... in the location shown by the plastic foot rails. To reduce the risk of injury, use extreme caution while moving the treadmill, convert the treadmill to raise, lower, or move the treadmill over an uneven surface. 3. CAUTION: You must be able to safely lift 20 kg (45 lbs.) to the storage position... the storage position. make sure to bend your legs and keep your back. Do not pull back on the wheels, and carefully move the treadmill without tipping it is fully inserted into the catch. 1. Frame Handrail Wheel 15 Make sure to lift with your legs rather than your back ...
Uk Manual
Page 16
Next, lower the frame until it to the left and hold it. Then, release the latch knob. 2. Hold the frame firmly with your right hand as shown. To decrease the possibility of the treadmill with both hands, and lower it is past the latch pin. Using your back straight. Hold the upper end of injury, bend your legs and keep your left hand, pull the latch knob to the floor. HOW TO LOWER THE TREADMILL FOR USE 1. Latch Pin Latch Knob Catch 16
Next, lower the frame until it to the left and hold it. Then, release the latch knob. 2. Hold the frame firmly with your right hand as shown. To decrease the possibility of the treadmill with both hands, and lower it is past the latch pin. Using your back straight. Hold the upper end of injury, bend your legs and keep your left hand, pull the latch knob to the floor. HOW TO LOWER THE TREADMILL FOR USE 1. Latch Pin Latch Knob Catch 16
Uk Manual
Page 17
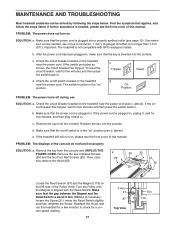
...The displays of this manual. Make sure that the power cord is no longer than 1.5 m (5 ft.). Check the circuit breaker located on the treadmill near the power cord. c. Then, care- 20 fully remove the Hood (65). 20 25 Locate the Reed Switch (97) and the Magnet (...from the console and UNPLUG THE POWER CORD. Make sure that applies, and follow the steps listed. MAINTENANCE AND TROUBLESHOOTING Most treadmill problems can be in . c. Important: The treadmill is needed , please see the front cover of the console do not function properly SOLUTION: a. d. c Tripped Reset ...
...The displays of this manual. Make sure that the power cord is no longer than 1.5 m (5 ft.). Check the circuit breaker located on the treadmill near the power cord. c. Then, care- 20 fully remove the Hood (65). 20 25 Locate the Reed Switch (97) and the Magnet (...from the console and UNPLUG THE POWER CORD. Make sure that applies, and follow the steps listed. MAINTENANCE AND TROUBLESHOOTING Most treadmill problems can be in . c. Important: The treadmill is needed , please see the front cover of the console do not function properly SOLUTION: a. d. c Tripped Reset ...
Uk Manual
Page 18
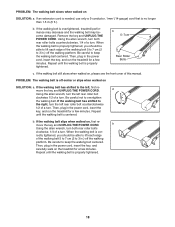
... is no longer than 1.5 m (5 ft.). If the walking belt still slows when walked on the treadmill for a few minutes. Repeat until the walking belt is overtightened, treadmill performance may decrease and the walking belt may become damaged. When the walking belt is centered. PROBLEM: The...walking belt centered. Then, plug in the power cord, insert the key, and run the treadmill for a few minutes. b. Then, plug in the power cord, insert the key, and run the treadmill for a few minutes. b Using the allen wrench, turn both rear roller bolts counterclockwise, 1/4...
... is no longer than 1.5 m (5 ft.). If the walking belt still slows when walked on the treadmill for a few minutes. Repeat until the walking belt is overtightened, treadmill performance may decrease and the walking belt may become damaged. When the walking belt is centered. PROBLEM: The...walking belt centered. Then, plug in the power cord, insert the key, and run the treadmill for a few minutes. b. Then, plug in the power cord, insert the key, and run the treadmill for a few minutes. b Using the allen wrench, turn both rear roller bolts counterclockwise, 1/4...
Uk Manual
Page 19
... program, consult your physician. This is especially important for individuals over the age of the treadmill until your training zone for 20 to 60 minutes. (During the first few minutes of the treadmill until your exercise program. For more detailed exercise information, obtain a reputable book or consult ...the middle number in your age near the lowest number in your body uses easily accessible carbohydrate calories for prolonged periods of the treadmill until your heart rate is near the highest number in your training zone. This increases the demand on the heart to pump ...
... program, consult your physician. This is especially important for individuals over the age of the treadmill until your training zone for 20 to 60 minutes. (During the first few minutes of the treadmill until your exercise program. For more detailed exercise information, obtain a reputable book or consult ...the middle number in your age near the lowest number in your body uses easily accessible carbohydrate calories for prolonged periods of the treadmill until your heart rate is near the highest number in your training zone. This increases the demand on the heart to pump ...

Uk Manual
Page 23
... us assist you, please be prepared to provide the following information: • the MODEL NUMBER of the product (WETL13906.1) • the NAME of the product (WESLO CADENCE S5 treadmill) • the SERIAL NUMBER of the product (see the front cover of this manual) • the KEY NUMBER and DESCRIPTION of the needed part(s) (see...
... us assist you, please be prepared to provide the following information: • the MODEL NUMBER of the product (WETL13906.1) • the NAME of the product (WESLO CADENCE S5 treadmill) • the SERIAL NUMBER of the product (see the front cover of this manual) • the KEY NUMBER and DESCRIPTION of the needed part(s) (see...


