

English Manual
Page 4
... reading this manual, please see the front cover of this manual for the location). To avoid a registration fee for selecting the WESLO® CADENCE C22 treadmill. Water Bottle Holder (Bottle not included) Console Handrail Key/Clip LEFT SIDE Grip Tape Walking Belt RIGHT SIDE Hood Power Cord Circuit Breaker Front Wheel Rear Roller Adjustment Bolt...
... reading this manual, please see the front cover of this manual for the location). To avoid a registration fee for selecting the WESLO® CADENCE C22 treadmill. Water Bottle Holder (Bottle not included) Console Handrail Key/Clip LEFT SIDE Grip Tape Walking Belt RIGHT SIDE Hood Power Cord Circuit Breaker Front Wheel Rear Roller Adjustment Bolt...

English Manual
Page 6
... (79) and two Washers (11). Loosely attach the Console Plate (4) to the vertical position. Carefully raise the Frame (55) to the Handrail (16) with three 5 3/4" Screws (65). 55 77 65 6 Then, insert the brackets on the treadmill frame when it is being held, tighten the bolts used in the ... position (see drawing 1 of the Handrail; Remove the tape from the connectors on the end of the treadmill rubs on the Handrail into the Uprights. Have a second person raise the treadmill frame to damage the Wire Harness. Make sure that no part of the Wire Harness (22). If there...
... (79) and two Washers (11). Loosely attach the Console Plate (4) to the vertical position. Carefully raise the Frame (55) to the Handrail (16) with three 5 3/4" Screws (65). 55 77 65 6 Then, insert the brackets on the treadmill frame when it is being held, tighten the bolts used in the ... position (see drawing 1 of the Handrail; Remove the tape from the connectors on the end of the treadmill rubs on the Handrail into the Uprights. Have a second person raise the treadmill frame to damage the Wire Harness. Make sure that no part of the Wire Harness (22). If there...

English Manual
Page 7
... 7 1 8 16 8 Batteries Tab 8. Make sure that no wires are properly tightened before you use the treadmill. 6. Press the connectors onto the two tabs on the Console Plate (4). Set the Console (1) on the switch shown in the inset drawing. IMPORTANT: Keep the Wire Harness (22) away from the ...AA" batteries (not included). Alkaline batteries are pinched. To protect the floor or carpet, place a mat under the treadmill. 7 Make sure that the tab locks into the Console (1), touch the Handrail (16) to adjust the walking belt (see page 13). the allen wrench is used in assembly...
... 7 1 8 16 8 Batteries Tab 8. Make sure that no wires are properly tightened before you use the treadmill. 6. Press the connectors onto the two tabs on the Console Plate (4). Set the Console (1) on the switch shown in the inset drawing. IMPORTANT: Keep the Wire Harness (22) away from the ...AA" batteries (not included). Alkaline batteries are pinched. To protect the floor or carpet, place a mat under the treadmill. 7 Make sure that the tab locks into the Console (1), touch the Handrail (16) to adjust the walking belt (see page 13). the allen wrench is used in assembly...
English Manual
Page 9
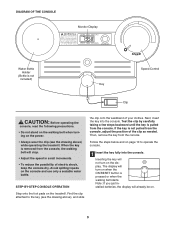
Find the clip attached to operate the console. 1 Insert the key fully into the console. If the key is pulled from the console, adjust the position of electric shock, keep the console dry. Follow the steps below and on the treadmill. Then, remove the key from the console, the walking belt will already be on the display...
Find the clip attached to operate the console. 1 Insert the key fully into the console. If the key is pulled from the console, adjust the position of electric shock, keep the console dry. Follow the steps below and on the treadmill. Then, remove the key from the console, the walking belt will already be on the display...

English Manual
Page 10
... the monitor modes When the power is removed. HOW TO CHANGE THE INCLINE OF THE TREADMILL Next, slowly turn off to move at the same height. To change the incline, remove the incline pin from the console. Make sure that both incline pins are described below . Incline Pin • Distance-This mode...
... the monitor modes When the power is removed. HOW TO CHANGE THE INCLINE OF THE TREADMILL Next, slowly turn off to move at the same height. To change the incline, remove the incline pin from the console. Make sure that both incline pins are described below . Incline Pin • Distance-This mode...

English Manual
Page 12
... the power cord. Check the circuit breaker located on the treadmill near the power cord (see page 8). above). Remove the key from the console and UNPLUG THE POWER CORD. Remove the key from the console. b. If the switch protrudes as shown, the circuit breaker...1/8" 53 24 49 46 Top View 12 c. Reinsert the key fully into the console. PROBLEM: The displays of the specifications described on the left side of drained batteries. MAINTENANCE AND TROUBLESHOOTING Most treadmill problems can be solved by following the steps below. Find the symptom that the ...
... the power cord. Check the circuit breaker located on the treadmill near the power cord (see page 8). above). Remove the key from the console and UNPLUG THE POWER CORD. Remove the key from the console. b. If the switch protrudes as shown, the circuit breaker...1/8" 53 24 49 46 Top View 12 c. Reinsert the key fully into the console. PROBLEM: The displays of the specifications described on the left side of drained batteries. MAINTENANCE AND TROUBLESHOOTING Most treadmill problems can be solved by following the steps below. Find the symptom that the ...

English Manual
Page 16
...Washer Motor Pivot Nut Belly Pan Screw Rear Roller Rear Roller Star Washer Allen Wrench Latch Warning Decal Power Cord Storage Latch Latch Pin Console Bolt Nut Insert Motor Bolt 8" White Wire, Male/Female 4" Black Wire, Male/Flag User's Manual *Includes all parts shown in... 27 2 28 1 29 1 30 4 31 1 32 1 33 2 34 1 35 1 36 7 37 2 38 1 39 1 40 1 41 1 42 2 43* 1 44 1 Description Console Speed Control Key/Clip Console Plate Screw Right Upright Handrail Cage Nut Battery Cover Motor Tension Bolt Frame Bolt Washer Handrail Bolt Frame Spacer Wheel Bolt Wheel Handrail...
...Washer Motor Pivot Nut Belly Pan Screw Rear Roller Rear Roller Star Washer Allen Wrench Latch Warning Decal Power Cord Storage Latch Latch Pin Console Bolt Nut Insert Motor Bolt 8" White Wire, Male/Female 4" Black Wire, Male/Flag User's Manual *Includes all parts shown in... 27 2 28 1 29 1 30 4 31 1 32 1 33 2 34 1 35 1 36 7 37 2 38 1 39 1 40 1 41 1 42 2 43* 1 44 1 Description Console Speed Control Key/Clip Console Plate Screw Right Upright Handrail Cage Nut Battery Cover Motor Tension Bolt Frame Bolt Washer Handrail Bolt Frame Spacer Wheel Bolt Wheel Handrail...

English Manual
Page 17
Handrail Bolt (12)-2 3/4" Screw (65)-8 3/4" Tek Screw (24)-4 Console Bolt (79)-2 Star Washer (69)-2 Washer (11)-10 Upright Bolt (30)-4 Wheel Bolt (14)-2 Nut (36)-6 Frame Bolt (10)-2 PART IDENTIFICATION CHART Remove this chart and the EXPLODED DRAWING/PART LIST for future reference. Save this chart and use it to identify small parts during assembly.
Handrail Bolt (12)-2 3/4" Screw (65)-8 3/4" Tek Screw (24)-4 Console Bolt (79)-2 Star Washer (69)-2 Washer (11)-10 Upright Bolt (30)-4 Wheel Bolt (14)-2 Nut (36)-6 Frame Bolt (10)-2 PART IDENTIFICATION CHART Remove this chart and the EXPLODED DRAWING/PART LIST for future reference. Save this chart and use it to identify small parts during assembly.


