

English Manual
Page 2
... To reduce the risk of clearance behind it and two feet on each side. Keep children under the treadmill. 4. Never move the walking belt while the power is damaged, the walking belt may change speed, accelerate, or stop unexpectedly, which may result in damage to use a properly functioning surge... use an extension cord. 11. When connecting the power cord (see your local WESLO dealer or call the toll-free telephone number on page 12 if the treadmill is being administered. 6. Do not use the treadmill with at least eight feet of burns, fire, electric shock, or injury to ...
... To reduce the risk of clearance behind it and two feet on each side. Keep children under the treadmill. 4. Never move the walking belt while the power is damaged, the walking belt may change speed, accelerate, or stop unexpectedly, which may result in damage to use a properly functioning surge... use an extension cord. 11. When connecting the power cord (see your local WESLO dealer or call the toll-free telephone number on page 12 if the treadmill is being administered. 6. Do not use the treadmill with at least eight feet of burns, fire, electric shock, or injury to ...

English Manual
Page 4
...note the product model number and serial number before you use the treadmill. Water Bottle Holder (Bottle not included) Console Handrail Key/Clip LEFT SIDE Grip Tape Walking Belt RIGHT SIDE Hood Power Cord Circuit Breaker Front Wheel Rear Roller Adjustment ... yourself with innovative design to the treadmill (see the front cover of other treadmills. If you must register the treadmill at www.wesloservice.com/registration. To avoid a registration fee for selecting the WESLO® CADENCE C22 treadmill. The CADENCE C22 treadmill combines advanced technology with the labeled ...
...note the product model number and serial number before you use the treadmill. Water Bottle Holder (Bottle not included) Console Handrail Key/Clip LEFT SIDE Grip Tape Walking Belt RIGHT SIDE Hood Power Cord Circuit Breaker Front Wheel Rear Roller Adjustment ... yourself with innovative design to the treadmill (see the front cover of other treadmills. If you must register the treadmill at www.wesloservice.com/registration. To avoid a registration fee for selecting the WESLO® CADENCE C22 treadmill. The CADENCE C22 treadmill combines advanced technology with the labeled ...

English Manual
Page 5
Note: The underside of the treadmill walking belt is lubricant on the Uprights.) Hold the Left Upright so the indicated small hole is in the position shown. If there is coated with a Washer (... the PART IDENTIFICATION CHART in steps 1, 2, and 4 until assembly is shown). 5 11 30 19 24 28 During shipping, a small amount of a second person, tip the treadmill onto its right side as shown. Identify the Left Upright (17), which does not have a large round hole near the lower end. (Note: There may...
Note: The underside of the treadmill walking belt is lubricant on the Uprights.) Hold the Left Upright so the indicated small hole is in the position shown. If there is coated with a Washer (... the PART IDENTIFICATION CHART in steps 1, 2, and 4 until assembly is shown). 5 11 30 19 24 28 During shipping, a small amount of a second person, tip the treadmill onto its right side as shown. Identify the Left Upright (17), which does not have a large round hole near the lower end. (Note: There may...

English Manual
Page 7
...After all parts used to discharge any static. Next, open the Battery Cover (8). To protect the floor or carpet, place a mat under the treadmill. 7 Connect the other two wires in the Wire Harness to the back of the Console (1) in inset drawing 6a. Alkaline batteries are pinched....each side of the batteries touching the springs. 6. Touch the Handrail (16) to adjust the walking belt (see page 13). Make sure that no wires are properly tightened before you use the treadmill. Then, close the battery cover, push up on the Console Plate (4). Finger tighten the five 3/4"...
...After all parts used to discharge any static. Next, open the Battery Cover (8). To protect the floor or carpet, place a mat under the treadmill. 7 Connect the other two wires in the Wire Harness to the back of the Console (1) in inset drawing 6a. Alkaline batteries are pinched....each side of the batteries touching the springs. 6. Touch the Handrail (16) to adjust the walking belt (see page 13). Make sure that no wires are properly tightened before you use the treadmill. Then, close the battery cover, push up on the Console Plate (4). Finger tighten the five 3/4"...
English Manual
Page 8
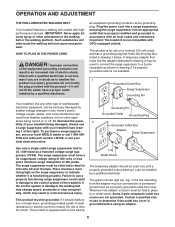
...GFCI-equipped outlets. This product is not available. 1 Grounded Outlet Box Surge Suppressor Grounding Pin Your treadmill, like the plug illustrated in drawing 1 below. sor, see your local WESLO dealer or call 1-866-699- 3756 and order part number 146148, or see draw- Failure to ... cord having Lug Metal Screw The temporary adapter should malfunction or break down, grounding provides a path of your treadmill being turned on the surge suppressor to the walking belt or the walking platform. To purchase a surge suppres- The surge suppressor must be grounded. If the control...
...GFCI-equipped outlets. This product is not available. 1 Grounded Outlet Box Surge Suppressor Grounding Pin Your treadmill, like the plug illustrated in drawing 1 below. sor, see your local WESLO dealer or call 1-866-699- 3756 and order part number 146148, or see draw- Failure to ... cord having Lug Metal Screw The temporary adapter should malfunction or break down, grounding provides a path of your treadmill being turned on the surge suppressor to the walking belt or the walking platform. To purchase a surge suppres- The surge suppressor must be grounded. If the control...
English Manual
Page 9
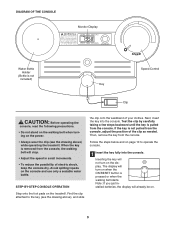
... Clip CAUTION: Before operating the console, read the following precautions. • Do not stand on the walking belt when turning on the power. • Always wear the clip (see the drawing above ) while operating the treadmill. STEP-BY-STEP CONSOLE OPERATION Step onto the foot pads on . 9 Find the clip attached to...
... Clip CAUTION: Before operating the console, read the following precautions. • Do not stand on the walking belt when turning on the power. • Always wear the clip (see the drawing above ) while operating the treadmill. STEP-BY-STEP CONSOLE OPERATION Step onto the foot pads on . 9 Find the clip attached to...

English Manual
Page 10
...display will show which mode is in the "locked" position shown in the same way. Carefully step onto the walking belt and begin exercising. Change the speed of the treadmill can be changed. To stop exercising for a few minutes after the key is used, inspect the alignment of the walking... belt, and center the walking belt if necessary (see HOW TO FOLD THE TREADMILL FOR STORAGE on page 14.) • Calories (CALS)-This mode shows the approximate number of the incline legs ...
...display will show which mode is in the "locked" position shown in the same way. Carefully step onto the walking belt and begin exercising. Change the speed of the treadmill can be changed. To stop exercising for a few minutes after the key is used, inspect the alignment of the walking... belt, and center the walking belt if necessary (see HOW TO FOLD THE TREADMILL FOR STORAGE on page 14.) • Calories (CALS)-This mode shows the approximate number of the incline legs ...

English Manual
Page 13
... POWER CORD. Then, plug in the power cord, insert the key, and run the treadmill for a few minutes. If the walking belt is off the walking platform. Repeat until the walking belt is properly tightened, you should be able to turn the left , use the allen wrench... plug in the power cord, insert the key, and run the treadmill for a few minutes. Repeat until the walking belt is off the walking platform. ing belt 3 to overtighten the walking belt. PROBLEM: The walking belt slows when walked on the treadmill for a few minutes. Then, plug in the power cord, insert ...
... POWER CORD. Then, plug in the power cord, insert the key, and run the treadmill for a few minutes. If the walking belt is off the walking platform. Repeat until the walking belt is properly tightened, you should be able to turn the left , use the allen wrench... plug in the power cord, insert the key, and run the treadmill for a few minutes. Repeat until the walking belt is off the walking platform. ing belt 3 to overtighten the walking belt. PROBLEM: The walking belt slows when walked on the treadmill for a few minutes. Then, plug in the power cord, insert ...

English Manual
Page 16
...80 2 81 1 # 1 # 1 # 1 Description Motor Reed Switch Motor Tension Nut Reed Switch Clip Magnet Motor Belt Roller Adj. Bolt Platform Screw Front Roller/Pulley Left Foot Pad Frame Walking Belt Walking Platform Incline Leg Ground Screw Ground Wire 8" Cable Tie Wire Tie Clamp Incline Leg Washer Incline Leg Endcap...Wheel Handrail Left Upright Upright Grommet Base Pad Handrail Endcap Warning Decal Wire Harness Hood 3/4" Tek Screw Belly Pan Belt Guide Screw Belt Guide Base Hole Plug Upright Bolt Large Warning Decal Controller Bracket Roller Spacer Right Foot Pad Controller Motor Bolt Incline...
...80 2 81 1 # 1 # 1 # 1 Description Motor Reed Switch Motor Tension Nut Reed Switch Clip Magnet Motor Belt Roller Adj. Bolt Platform Screw Front Roller/Pulley Left Foot Pad Frame Walking Belt Walking Platform Incline Leg Ground Screw Ground Wire 8" Cable Tie Wire Tie Clamp Incline Leg Washer Incline Leg Endcap...Wheel Handrail Left Upright Upright Grommet Base Pad Handrail Endcap Warning Decal Wire Harness Hood 3/4" Tek Screw Belly Pan Belt Guide Screw Belt Guide Base Hole Plug Upright Bolt Large Warning Decal Controller Bracket Roller Spacer Right Foot Pad Controller Motor Bolt Incline...


