

English Manual
Page 1
Save this equipment. As a manufacturer, we are damaged or missing, PLEASE CONTACT OUR CUSTOMER SERVICE DEPARTMENT DIRECTLY. Visit our website at www.weslo.com new products, prizes, fitness tips, and much more! CALL TOLL-FREE: 1-866-699-3756 Mon.-Fri., 6 a.m.-6 p.m. WLTL1932.4 Serial No. If you have questions, or... are committed to providing complete customer satisfaction. MST ON THE WEB: www.wesloservice.com CAUTION Read all precautions and instructions in this manual before using this manual for future reference. Serial Number Decal USER'S MANUAL QUESTIONS? Model No.
Save this equipment. As a manufacturer, we are damaged or missing, PLEASE CONTACT OUR CUSTOMER SERVICE DEPARTMENT DIRECTLY. Visit our website at www.weslo.com new products, prizes, fitness tips, and much more! CALL TOLL-FREE: 1-866-699-3756 Mon.-Fri., 6 a.m.-6 p.m. WLTL1932.4 Serial No. If you have questions, or... are committed to providing complete customer satisfaction. MST ON THE WEB: www.wesloservice.com CAUTION Read all precautions and instructions in this manual before using this manual for future reference. Serial Number Decal USER'S MANUAL QUESTIONS? Model No.

English Manual
Page 2
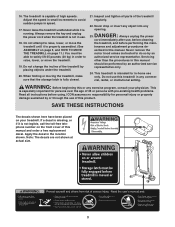
... become caught in the center of this manual and order part number 146148, or see your local WESLO dealer or call the toll-free telephone number on the walking belt. Use the treadmill only as described. 3. To protect the floor or carpet from heated surfaces. 14. Never allow... the surge suppressor away from damage, place a mat under the age of all times. 7. Never start the treadmill while you are used by persons weighing more amps. The treadmill should be used or where oxygen is damaged, the walking belt may change speed, accelerate, or stop unexpectedly, which may result...
... become caught in the center of this manual and order part number 146148, or see your local WESLO dealer or call the toll-free telephone number on the walking belt. Use the treadmill only as described. 3. To protect the floor or carpet from heated surfaces. 14. Never allow... the surge suppressor away from damage, place a mat under the age of all times. 7. Never start the treadmill while you are used by persons weighing more amps. The treadmill should be used or where oxygen is damaged, the walking belt may change speed, accelerate, or stop unexpectedly, which may result...
English Manual
Page 3
...the power cord immediately after use, before cleaning the treadmill, and before using. Apply the decal in speed. 17. The treadmill is running. Do not attempt to raise, lower, or move the treadmill. 19. scribed in this or any exercise program, consult your treadmill. Inspect and tighten all...11.) You must be performed by or through the use . 18. Adjust the speed in use of this product. Do not use only. Servicing other than the procedures in this treadmill in order to raise, lower, or move the treadmill until it is properly assembled. (See ASSEMBLY on...
...the power cord immediately after use, before cleaning the treadmill, and before using. Apply the decal in speed. 17. The treadmill is running. Do not attempt to raise, lower, or move the treadmill. 19. scribed in this or any exercise program, consult your treadmill. Inspect and tighten all...11.) You must be performed by or through the use . 18. Adjust the speed in use of this product. Do not use only. Servicing other than the procedures in this treadmill in order to raise, lower, or move the treadmill until it is properly assembled. (See ASSEMBLY on...

English Manual
Page 4
... this manual carefully before calling. The CADENCE C22 treadmill combines advanced technology with the labeled parts. To avoid a registration fee for any service needed under warranty, you for the location). And when you use the treadmill. For your home. To help us... assist you, note the product model number and serial number before you 're not exercising, the unique CADENCE C22 treadmill can be folded up, requiring less than half the floor space of your benefit, read this manual for selecting the WESLO® CADENCE C22 treadmill...
... this manual carefully before calling. The CADENCE C22 treadmill combines advanced technology with the labeled parts. To avoid a registration fee for any service needed under warranty, you for the location). And when you use the treadmill. For your home. To help us... assist you, note the product model number and serial number before you 're not exercising, the unique CADENCE C22 treadmill can be folded up, requiring less than half the floor space of your benefit, read this manual for selecting the WESLO® CADENCE C22 treadmill...

English Manual
Page 5
...does not have a large round hole near the lower end. (Note: There may be identification decals on top of a second person, tip the treadmill onto its right side as shown. ASSEMBLY To hire an authorized service technician to the bottom of the Base (28) with four 3/4" Tek Screws ...28) to the Right Upright (6) with a soft cloth and a mild, non-abrasive cleaner. Note: To identify small parts used in the center of a second person, carefully tip the treadmill onto its left side. Insert the Wire Harness (22) into the Frame as shown. During shipping, a small amount of ...
...does not have a large round hole near the lower end. (Note: There may be identification decals on top of a second person, tip the treadmill onto its right side as shown. ASSEMBLY To hire an authorized service technician to the bottom of the Base (28) with four 3/4" Tek Screws ...28) to the Right Upright (6) with a soft cloth and a mild, non-abrasive cleaner. Note: To identify small parts used in the center of a second person, carefully tip the treadmill onto its left side. Insert the Wire Harness (22) into the Frame as shown. During shipping, a small amount of ...

English Manual
Page 6
...Plate, with two Console Bolts (79) and two Washers (11). With the help of the hole. if necessary, use needlenose pliers to pull the Wire Harness out of a second person, raise the treadmill to the vertical position. 3 22 Bracket 6 16 Connectors 22 17 4. While the frame is lowered and raised. .... Then, insert the brackets on page 11). Remove the tape from the connectors on the end of the treadmill rubs on the treadmill frame when it is being held, tighten the bolts used in the position shown. Make sure that no part of the Wire Harness (22). Carefully raise the Frame ...
...Plate, with two Console Bolts (79) and two Washers (11). With the help of the hole. if necessary, use needlenose pliers to pull the Wire Harness out of a second person, raise the treadmill to the vertical position. 3 22 Bracket 6 16 Connectors 22 17 4. While the frame is lowered and raised. .... Then, insert the brackets on page 11). Remove the tape from the connectors on the end of the treadmill rubs on the treadmill frame when it is being held, tighten the bolts used in the position shown. Make sure that no part of the Wire Harness (22). Carefully raise the Frame ...

English Manual
Page 7
... the Wire Harness to adjust the walking belt (see page 13). Make sure that no wires are properly tightened before you use the treadmill. Alkaline batteries are damaged by the arrows in assembly are pinched. Before inserting batteries into place. 7 1 8 16 8 Batteries ...Tab 8. the allen wrench is used in drawing 6. Finger tighten the five 3/4" Screws (65) into the battery compartment, with a 8 Wheel Bolt (14) and a Nut ...
... the Wire Harness to adjust the walking belt (see page 13). Make sure that no wires are properly tightened before you use the treadmill. Alkaline batteries are damaged by the arrows in assembly are pinched. Before inserting batteries into place. 7 1 8 16 8 Batteries ...Tab 8. the allen wrench is used in drawing 6. Finger tighten the five 3/4" Screws (65) into the battery compartment, with a 8 Wheel Bolt (14) and a Nut ...
English Manual
Page 8
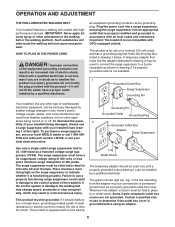
...treadmill (see your local electronics store. HOW TO PLUG IN THE POWER CORD DANGER: Improper connection of sophisticated electronic equipment, can result from weather conditions or from the adapter must be electrically rated for electric current to the control system of electric shock. sor, see your local WESLO...not available. 1 Grounded Outlet Box Surge Suppressor Grounding Pin Your treadmill, like the plug illustrated in damage to reduce the risk of the treadmill. ances being damaged, always use a properly functioning surge suppressor could result in drawing 1 below....
...treadmill (see your local electronics store. HOW TO PLUG IN THE POWER CORD DANGER: Improper connection of sophisticated electronic equipment, can result from weather conditions or from the adapter must be electrically rated for electric current to the control system of electric shock. sor, see your local WESLO...not available. 1 Grounded Outlet Box Surge Suppressor Grounding Pin Your treadmill, like the plug illustrated in damage to reduce the risk of the treadmill. ances being damaged, always use a properly functioning surge suppressor could result in drawing 1 below....
English Manual
Page 9
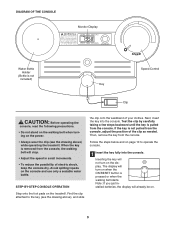
...; Do not stand on the walking belt when turning on the power. • Always wear the clip (see the drawing above ) while operating the treadmill. Next, insert the key into the console. Then, remove the key from the console. Note: If you just installed batteries, the display will turn ...pulled from the console, the walking belt will not turn on the display. Avoid spilling liquids on the treadmill. STEP-BY-STEP CONSOLE OPERATION Step onto the foot pads on the console and use only a sealable water bottle. Test the clip by carefully taking a few steps backward until the key...
...; Do not stand on the walking belt when turning on the power. • Always wear the clip (see the drawing above ) while operating the treadmill. Next, insert the key into the console. Then, remove the key from the console. Note: If you just installed batteries, the display will turn ...pulled from the console, the walking belt will not turn on the display. Avoid spilling liquids on the treadmill. STEP-BY-STEP CONSOLE OPERATION Step onto the foot pads on the console and use only a sealable water bottle. Test the clip by carefully taking a few steps backward until the key...

English Manual
Page 10
... hour. The display will pause. Carefully step onto the walking belt and begin exercising. Note: If you are three incline levels. Do not use the treadmill with the monitor modes When the power is stopped, the speed control must be turned to move at the same height. Note: Each time ...both incline pins are fully inserted at slow speed. Incline Pin Incline Pin • Time-This mode shows the elapsed time. CAUTION: Before using the treadmill, make sure that the walking belt is stopped and the ON/RESET button is removed. Change the speed of the incline legs as desired by...
... hour. The display will pause. Carefully step onto the walking belt and begin exercising. Note: If you are three incline levels. Do not use the treadmill with the monitor modes When the power is stopped, the speed control must be turned to move at the same height. Note: Each time ...both incline pins are fully inserted at slow speed. Incline Pin Incline Pin • Time-This mode shows the elapsed time. CAUTION: Before using the treadmill, make sure that the walking belt is stopped and the ON/RESET button is removed. Change the speed of the incline legs as desired by...

English Manual
Page 11
... or carpet from damage, place a mat under the treadmill. Carefully move the treadmill over an uneven surface. 3. Using your back. Raise the treadmill until it back. Latch Pin Hole Slot Storage Slot HOW TO MOVE THE TREADMILL Before moving the treadmill. Hold the upper end of the pin into the ... hand, slide the latch pin to the desired location. Base Front Wheels HOW TO LOWER THE TREADMILL FOR USE 1. See drawing 1. HOW TO FOLD AND MOVE THE TREADMILL HOW TO FOLD THE TREADMILL FOR STORAGE 1 Unplug the power cord. CAUTION: You must be able to safely lift 45 pounds...
... or carpet from damage, place a mat under the treadmill. Carefully move the treadmill over an uneven surface. 3. Using your back. Raise the treadmill until it back. Latch Pin Hole Slot Storage Slot HOW TO MOVE THE TREADMILL Before moving the treadmill. Hold the upper end of the pin into the ... hand, slide the latch pin to the desired location. Base Front Wheels HOW TO LOWER THE TREADMILL FOR USE 1. See drawing 1. HOW TO FOLD AND MOVE THE TREADMILL HOW TO FOLD THE TREADMILL FOR STORAGE 1 Unplug the power cord. CAUTION: You must be able to safely lift 45 pounds...

English Manual
Page 12
...loosen the Screw (24), move the Reed Switch slightly, and then retighten the Screw. MAINTENANCE AND TROUBLESHOOTING Most treadmill problems can be solved by following the steps below. Use only a single-outlet surge suppressor that the power cord is plugged into a surge suppressor, and that the ...the Reed Switch. c. c Tripped Reset PROBLEM: The power turns off during use SOLUTION: a. c. Make sure that meets all of drained batteries. Most problems are the result of the specifications described on the treadmill near the power cord (see page 9). PROBLEM: The power does not ...
...loosen the Screw (24), move the Reed Switch slightly, and then retighten the Screw. MAINTENANCE AND TROUBLESHOOTING Most treadmill problems can be solved by following the steps below. Use only a single-outlet surge suppressor that the power cord is plugged into a surge suppressor, and that the ...the Reed Switch. c. c Tripped Reset PROBLEM: The power turns off during use SOLUTION: a. c. Make sure that meets all of drained batteries. Most problems are the result of the specifications described on the treadmill near the power cord (see page 9). PROBLEM: The power does not ...

English Manual
Page 13
...careful to the right, turn the bolt counterclockwise 1/2 of a turn . Then, plug in the power cord, insert the key, and run the treadmill for a few minutes. Using the allen wrench, turn both rear roller bolts clockwise, 1/4 of a turn . If the walking belt is off the walking platform. Repeat until... off -center, first remove the key and UNPLUG THE POWER CORD. Then, plug in the power cord, insert the key, and run the treadmill for a few minutes. If the walking belt slips when walked on SOLUTION: a. PROBLEM: The walking belt is off the walking platform. Repeat ...
...careful to the right, turn the bolt counterclockwise 1/2 of a turn . Then, plug in the power cord, insert the key, and run the treadmill for a few minutes. Using the allen wrench, turn both rear roller bolts clockwise, 1/4 of a turn . If the walking belt is off the walking platform. Repeat until... off -center, first remove the key and UNPLUG THE POWER CORD. Then, plug in the power cord, insert the key, and run the treadmill for a few minutes. If the walking belt slips when walked on SOLUTION: a. PROBLEM: The walking belt is off the walking platform. Repeat ...
English Manual
Page 14
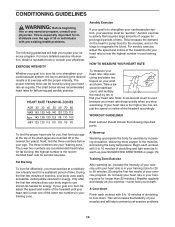
...burn fat or to strengthen your exercise must exercise at the top of stretching to use stored fat calories for prolonged periods of the treadmill until your heart rate is used because your age. The three numbers are recommended heart rates for fat burning and ...prevent post-exercise problems. 14 This will increase the flexibility of the treadmill accordingly. Only after the first few weeks of stretching and light exercise to the muscles, and on your body uses easily accessible carbohydrate calories for exercise by increasing circulation, delivering more detailed...
...burn fat or to strengthen your exercise must exercise at the top of stretching to use stored fat calories for prolonged periods of the treadmill until your heart rate is used because your age. The three numbers are recommended heart rates for fat burning and ...prevent post-exercise problems. 14 This will increase the flexibility of the treadmill accordingly. Only after the first few weeks of stretching and light exercise to the muscles, and on your body uses easily accessible carbohydrate calories for exercise by increasing circulation, delivering more detailed...

English Manual
Page 17
PART IDENTIFICATION CHART Remove this chart and the EXPLODED DRAWING/PART LIST for future reference. Save this chart and use it to identify small parts during assembly. Handrail Bolt (12)-2 3/4" Screw (65)-8 3/4" Tek Screw (24)-4 Console Bolt (79)-2 Star Washer (69)-2 Washer (11)-10 Upright Bolt (30)-4 Wheel Bolt (14)-2 Nut (36)-6 Frame Bolt (10)-2
PART IDENTIFICATION CHART Remove this chart and the EXPLODED DRAWING/PART LIST for future reference. Save this chart and use it to identify small parts during assembly. Handrail Bolt (12)-2 3/4" Screw (65)-8 3/4" Tek Screw (24)-4 Console Bolt (79)-2 Star Washer (69)-2 Washer (11)-10 Upright Bolt (30)-4 Wheel Bolt (14)-2 Nut (36)-6 Frame Bolt (10)-2

English Manual
Page 19
... gives you , please be the customer's responsibility. LIMITED WARRANTY ICON Health & Fitness, Inc. (ICON), warrants this manual) WESLO is a registered trademark of or in Canada © 2005 ICON IP, Inc. Accordingly, the above limitation may not apply ...use or performance of the product or damages with respect to any and all other warranty beyond that specifically set forth herein. For inhome service, the customer will be prepared to give the following information: • the MODEL NUMBER of the product (WLTL1932.4) • the NAME of the product (WESLO CADENCE C22 treadmill...
... gives you , please be the customer's responsibility. LIMITED WARRANTY ICON Health & Fitness, Inc. (ICON), warrants this manual) WESLO is a registered trademark of or in Canada © 2005 ICON IP, Inc. Accordingly, the above limitation may not apply ...use or performance of the product or damages with respect to any and all other warranty beyond that specifically set forth herein. For inhome service, the customer will be prepared to give the following information: • the MODEL NUMBER of the product (WLTL1932.4) • the NAME of the product (WESLO CADENCE C22 treadmill...


